Do you wanna build a snowman…?

IMG_2817

As someone with an almost-four year old niece, it was inevitable that Aunty Claire was going to get the call at some point. I was half-expecting a request for a Princess Elsa dress for her birthday, but it turned out to be a slightly last-minute Anna cloak to wear to a Frozen-themed party. So, I leapt into action, dashed down to the fabric shop, managed to grab the very last of the purple pom-pom trim, and set to work!

IMG_2906

The finished cloak was a bit on the big side, but thankfully very well received, despite not being quite as screen-accurate as I normally like my costumes to be! The silver clasp at the neck worried me a little bit – I was concerned that Milly wouldn’t be able to fasten it easily, or might be hurt if another child pulled on the cloak or stepped on it. So Paul cut off the hook and loop, filed them down smooth, and I sewed on the two pieces as decoration only. The cloak fastens with a piece of velcro, so it will come apart quickly if necessary, and Milly can easily dress herself.

IMG_2117

This one is Milly’s somewhat delayed Christmas Dress. She’d finally grown out of the pattern I’d been using since her first birthday, so this is a new one – Butterick 5876. I have to say that I don’t really recommend the pattern. It does make a lovely dress, but the finishing techniques, for a garment that’s going to be outgrown in a matter of minutes, were frankly bonkers. Lots of mucking about with facings and hand stitching around the arms, that could have been accomplished so much more quickly and easily with a bit of bias binding! Next time…

IMG_2897

The only alteration I made to the pattern on this occasion was to significantly enlarge the pocket. Honestly, what’s the point of a silly little pocket that even a three year old can’t get her hand into? As you can see from this picture, the pocket was full of jelly beans. And Milly had her face painted like a cat, to match the dress – how cute is that?!

IMG_2907

And here is a tiny piece of evidence that my niece is very much a child after my own heart. Fancy dress costume, pretty party dress, giant stompy boots underneath. Excellent!

A quiet month

1970s dress

Oh dear, I do seem to have got out of the habit of blogging again lately. I’ve just been feeling a bit… quiet. Which anybody who knows me will be aware, isn’t very much like me at all. I’m somewhat lacking in creative inspiration, and I’m feeling a bit fed up about it, and not really sure quite what to do with myself.

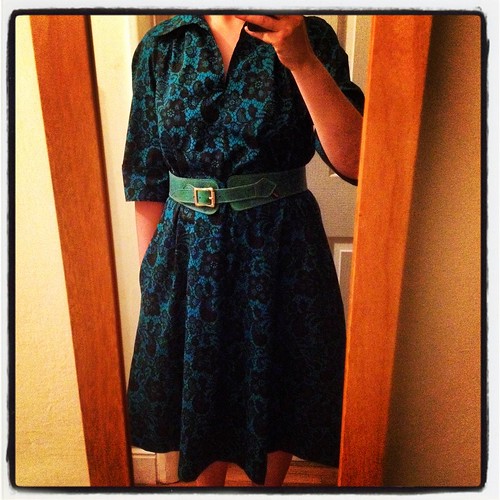
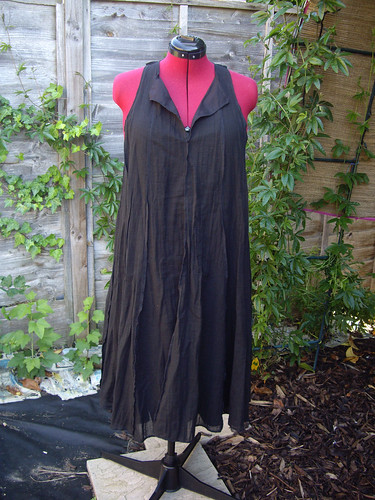
Still, the odd bit of making is happening. This is the result of Butterick 4736, the 1970s dress pattern I mentioned last time. I’ve been wearing it quite a lot, and it’s really comfortable. One person did ask me whether it was vintage or reproduction (both, I guess?), thanks to the enormous collars, but I have to admit I rather like them.

1970s Butterick 4376

I made the shorter length which, being a not-very-tall person, is pretty much spot on. I keep half wondering whether I could cut it off at hip level to make a blouse, but I’m not quite sure that would work. I need to dig out a piece of fabric that’s not quite long enough to make a whole dress, and see how it comes out.

1960s Sew Knit N Stretch 228

I have also made this bra slip, and against all odds it fitted perfectly! Straight out of the packet! While I was rummaging around in the sewing room I found a forgotten bra-making kit, which had just enough fabric and elastic to make the top half. A quick dash to the fabric shop later (the princely sum of £2.14 having exchanged hands) and I had a metre and a half each of polyester habutae and nylon lace to make the bottom half. It’s the perfect length to go underneath the 1970s dress, and now that I’ve established the fit I can make more in some nicer fabrics. I’m thinking stretch silk, and maybe some soft jersey versions to wear as vests.

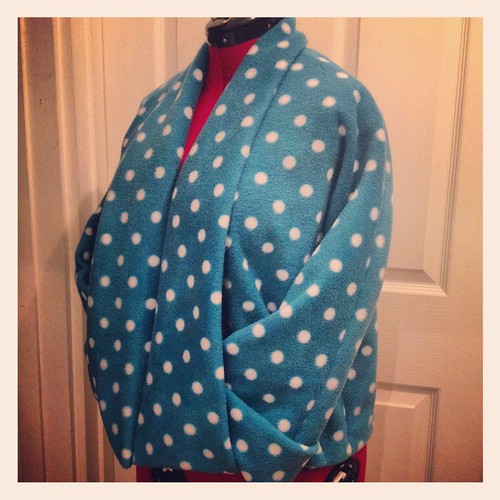
fleece jacket

Oh, and then there’s this. Inspired by a knitting pattern I saw on Etsy, where the collar folds back to make pockets, I put together this fleecy jacket. It looks a bit too much like a dressing gown in this spotty fleece, but once I’ve ironed out some technical hitches (I made a mistake on one of the lining pieces, so it doesn’t fit together quite right) I can feel quite a few versions of this one coming on too. It has wide kimono sleeves, which means that the sleeves of my dresses will actually fit down it – currently a problem, as all of my existing cardigans were bought or made to go over t-shirts!

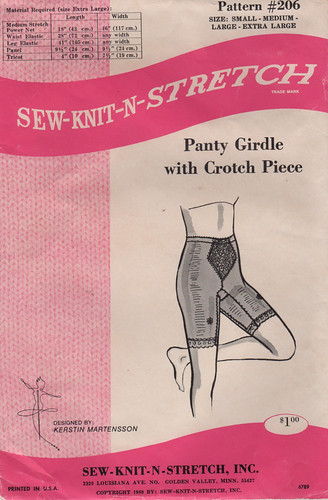
Sew-Knit-N-Stretch 206, 1969

And then, to add to my increasingly glamorous collection of old-fashioned underthings, there’s this. Currently on its way to me from the US, it’s a 1969 pattern for a long-leg panty girdle “with crotch piece”. This is important, as the opposite of “with crotch piece” is not “crotchless”, it is in fact “with a godawful seam in a terrible place”. Which is why I don’t wear ordinary cycling shorts underneath my dresses. So uncomfortable! These shorts can be made from a variety of materials, depending on how restrictive you want them to be. I’m aiming more for comfort than shapewear, so I’m thinking about cotton jersey, and maybe just the faintest whiff of lycra for the front panel. I’m quite interested to see the instructions for these, as the directions for the bra slip were quite minimal. I’m hoping this one’s a bit more thorough.

I think I’m finally starting to get somewhere with my new-old wardrobe though. I’m still very tempted by beautiful 1950s dresses, but it’s looking very much as though the 1970s are actually much more me!

Vintage Pattern Round-Up

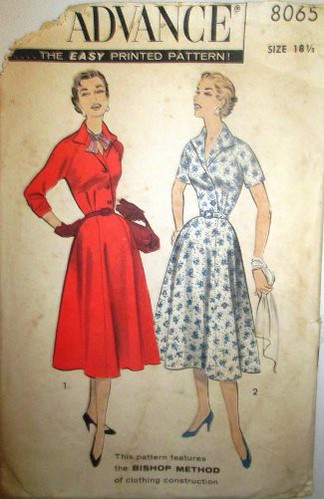
Advance 8065

For a while now I’ve been buying a vintage sewing pattern each month, with a view to expanding my wardrobe into the realms of Things I Actually Want To Wear, rather than Things I Wanted To Sew. Apparently those two things are not the same, and it’s resulted in a very full wardrobe, and Nothing To Wear.

I made one of these to wear to the Vintage Night at work, and I’ve actually worn it rather a lot over the summer. Lightweight, cool, smart for work or all the parties that I never go to – I love this one, and have fabric set aside for another. It simply screams NOVELTY PRINT at me, and I have a huge list of fabrics that I want to buy from eQuilter, once I’ve saved up enough to pay the customs fees. (Bonus: their Lorax prints are all on organic cotton!)
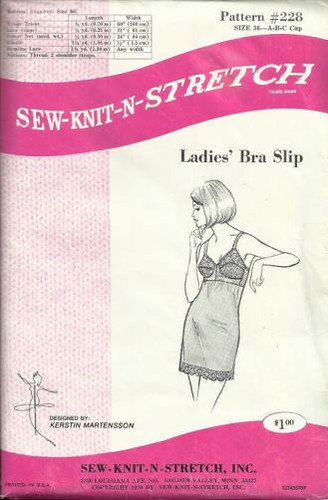
1960s Sew Knit N Stretch 228

During my adventures in Me-Made May, I discovered that the key to making these dresses look properly smart is having the appropriate underwear to go with them. As the fibromyalgia simply won’t allow me to wear 1950s-style girdles on a daily basis (nor will my budget, sadly!), I thought this bra slip would be a good alternative. Fitted at the top, but not too constricting around the waist. Making it myself also means that I can choose fabrics such as cotton or silk, which will be much kinder to my skin than the expected nylon and polyester knits. This one will require a shopping spree to acquire the right fabrics before I can start, although I probably have enough powernet left over from my Structured Lingerie course to make a prototype first.

1960s Simplicity 5890

This lovely pattern, very sadly, didn’t work out. I used the blouse pattern with the last of the My Little Pony fabric, and it just didn’t fit me right, so it’s now sitting in the Etsy shop waiting to find a good home. I did make the dress, in a nice grey suiting, but when I tried it on to check the fit… it was awful. A perfectly nice outfit (I made the gored skirt version), just really not for me. It looked very uniform-ish… which it’s supposed to, I guess. It’s a smart working-woman’s outfit. It’s just that apparently I am not a smart working woman! Thankfully, at the Museum, I don’t have to be. The dress code is “smart-casual”, so there is absolutely no requirement for me to turn up in a blouse and a pinafore dress if I don’t want to. Phew.
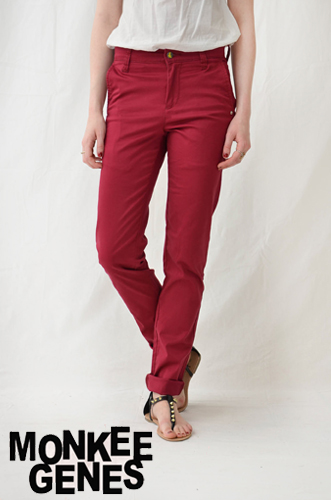
Monkee Genes Slim Fit Chinos

A few months ago I did decide that I should probably head slightly towards the smarter end of the smart-casual spectrum, especially as I’m the first person that most visitors to the Museum see when they come in. To that end, it was time for my too-small and rather frayed old jeans to be retired – which meant new jeans. I could have sewn them myself, but I don’t much like sewing trousers or heavy fabrics, so I decided to go shopping. I’m very determined that everything I buy should (as far as possible) be handmade, organic, or at the very least ethically produced, and with jeans this is easier said than done. Eventually I’d saved up £130 to treat myself to two pairs of Monkee Genes. However, they’re described as “slim fit”, which I’m most definitely not, so I wanted to try them on before I spent my money. I discovered that my local branch of Sports Direct (a shop I’d never normally venture into!) was a stockist, so I wandered in and discovered two things. One: Monkee Genes Slim Fit Chinos were my perfect trousers, and Two: they were in the sale. For £8-£10 per pair. Not £65 each. (In fact, the last few pairs of these chinos are currently on the Sports Direct website for SIX POUNDS A PAIR!!)

So, I did what any sensible person would do – I bought every pair in the shop in my size, then came home and bought every pair on the Sports Direct website, until I found myself with NINE PAIRS of ridiculously-coloured organic cotton chinos, for less than the price of the two pairs of jeans I’d originally intended to buy. I’d say “oops”, but do you know what? I’d budgeted the money for this purpose, I spent less than I’d planned, and given that my last two pairs of jeans saw me through five years of wear, I can’t imagine myself needing to buy trousers again for a very long time! These chinos fit well, they’re very comfortable, they’re organic cotton, and they’re ethically produced. Perfect!
Simplicity 2148

Of course, what I need now, is shirts to go with them. I’d thought that Simplicity 5890 would be the solution, but for work the neckline was too low, and I just didn’t like the fit of the resulting blouse. So, I decided to use the top half of this pattern to make a smart short-sleeved shirt. Unfortunately I had a bit of a maths error, resulting in a blouse that was a bit too tight across the shoulders, and a lot too tight around the hips. Back to the drawing board. (I’ve since added the skirt from Advance 8065, to turn it into a dress. That’s now sitting on my pile of Things Awaiting Buttons.)
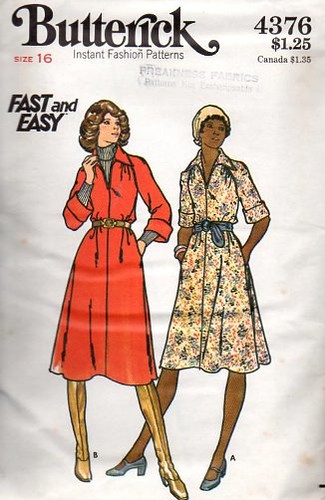
1970s Butterick 4376

I’ve spent a LOT of time on Etsy and Ebay, searching for the perfect 1950s or 1960s raglan-sleeved shirt pattern. The raglan sleeve thing is important, as it not only suits my very rounded shoulders, but also allows a much greater range of movement than a normal set-in sleeve. (This is one reason why I don’t wear my beautiful T.M. Lewin shirts as much as I’d expected – I always feel as though I can’t lift my arms.) I did find some lovely patterns, but never in my size, and after one failed shirt incident I lost my nerve at the thought of trying to draft one from scratch. So, I broadened my search to include 1970s patterns, which is when I spotted this.

Granted, it’s not a button-through shirt, which is what I was originally looking for. But, it has raglan sleeves, it’s styled with layers, which I like, as a dress it has the all-important pockets, and I can just imagine it as either a tunic length worn over the top of all of my ridiculous trousers, or as a blouse length that I can wear tucked in. I have to admit that I was also sucked in by the promise of “Fast and Easy”, but on reading the instructions it turns out that the way to keep this a fast make is by simply not bothering to finish the inside! So perhaps I won’t go for that approach after all. Slow and Easy’s far more my style.

Another piece of Marcy Tilton magic

Vogue 8975

This is some organic cotton jersey, bought from the Organic Textile Company, oooh, ages ago. It was sold as seconds because it had been dried in a malfunctioning drier, and smelled terribly of exhaust fumes. Thankfully a quick trip through my own washer and dryer sorted that out, no problem at all. But it wasn’t until I came to iron the fabric before cutting into it that I spotted this perfect hand print! Fortunately it’s on the inside, but it did make me laugh to see it. Genuine evidence of the handmade nature of the fabric!

Vogue 8975

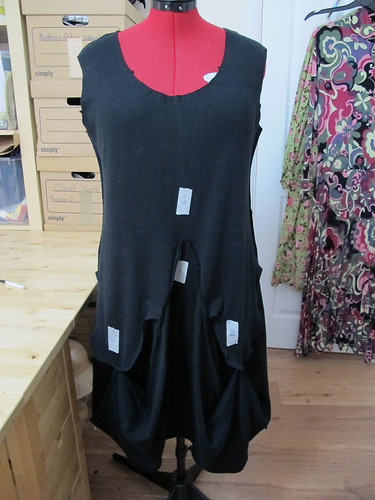
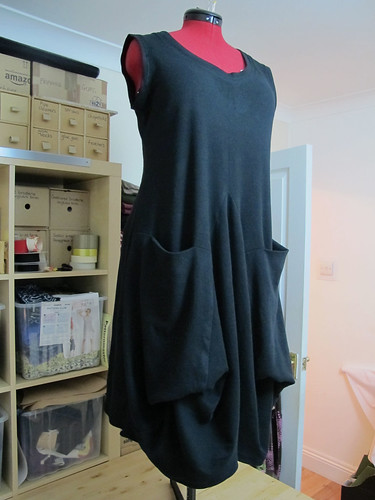
The jersey has now been transformed into Vogue 8975, another Marcy Tilton pattern. That woman must be some kind of pattern drafting genius, because I’ve finished making this dress, and worn it a couple of times, and I still have absolutely no idea how all of the pattern pieces came together to make this shape.

Vogue 8975

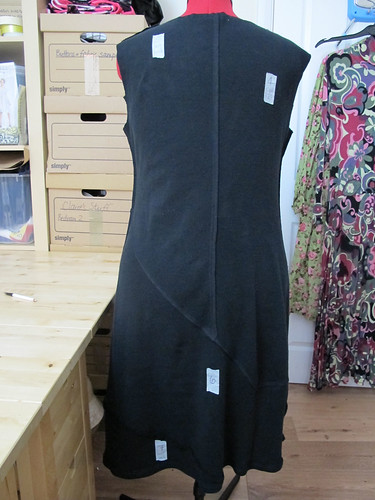
I used masking tape on all of the cut pieces, partly to identify the right and wrong sides of the fabric, and partly to make sure that I was sewing everything together the right way up. My diagonal seam across the back has ended up going in the opposite direction from the illustration on the pattern envelope, but other than that it all seems to have come together rather well!

Vogue 8975

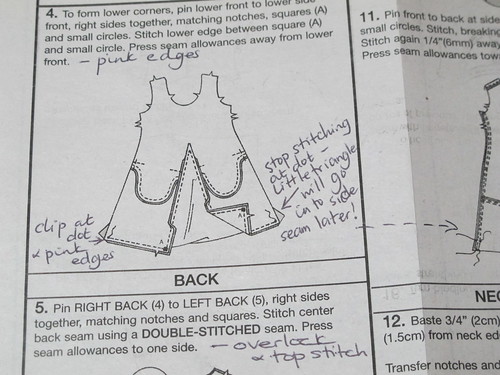
I did annotate the pattern as I was going along. I found it very important to just throw out all of the things I thought I knew about dressmaking, and just follow the instructions. Where it says “stop stitching at small circle”, you stop stitching at the small circle, even if you have a weird triangle-y piece of fabric sticking out in an inexplicable manner, even if you think you know better, or want to try and take a shortcut. Just don’t. Trust the instructions, and it will all come out fine in the end!

Vogue 8975

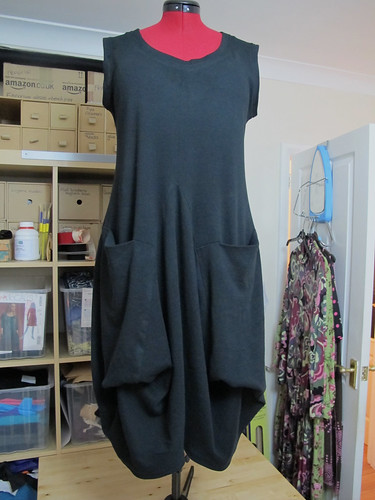
Ta-Daa! My only deviation from the instructions was in the binding of the armhole edges, and I wish I’d just followed the pattern. Instead of a smooth armscye, I now have slightly flanged minuscule cap sleeves, which I didn’t really want. This is what happens when you’re trying to finish sewing a dress at eleven o’clock at night because you really want to wear it to work the next day, and you decide that trimming away the seam allowances and binding them properly will “take too long”. (Note to self: It would have taken exactly the same amount of time, and looked much nicer. Next time: Do It Properly.)

Vogue 8975

As with my previous Marcy Tilton patterns, I went down from my usual Vogue size and cut out a medium. This has given me a perfect fit across the top (where I’m smallest), and the shape of the pattern means that there’s plenty of room at the waist and hips. I think my only disappointment with this design (and it’s ever such a tiny one) is that the pockets aren’t actually as big as all that draping makes them look. They don’t need to be huge, but I think I will alter the pattern slightly to make them just an inch or so longer.

I’ve worn this dress a couple of times now, and I’m extremely tempted to make another identical one. It’s so comfortable to wear, and I’m so pleased with how it looks, I’m definitely going to need more than one of these in my wardrobe!

New Year, New Dress!

Vogue 8813

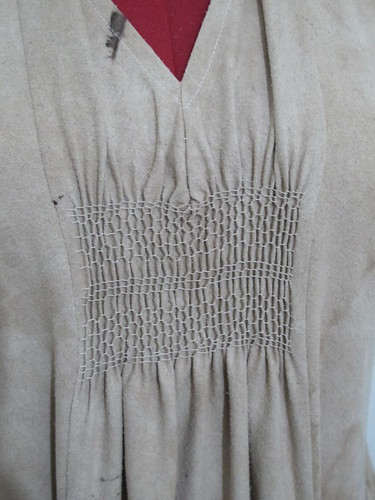
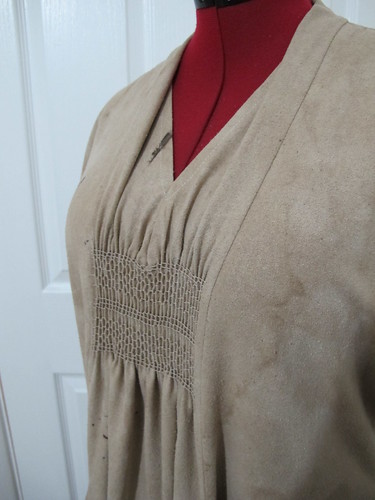
First completed garment of 2014 – this is Marcy Tilton for Vogue, 8813. The fabric is silk noile, dyed in my tea urn with about six months’ worth of saved tea bags. I blogged about my failed attempt at dyeing the fabric and scalding my foot, but apparently I failed to mention the second attempt, which came out looking lovely! Well, I think so, anyway.

Paul doesn’t much like the black marks, which are iron stains from rusty nails. I’m slightly concerned that people will make “hilarious” jokes about tea stains, but I really love this fabric. I plan to over-dye it every six months or so with the tea bags that I’m still saving. I figure that each successive dye bath will add new stains and patches and colours, which will add lots of depth and texture.

Some of you have been following the progress of the smocking over on Facebook… ta-da!

Vogue 8813

I’m slightly peeved about the wonky bit in the centre, caused by a dart that I added after the smocking rather than before. Note to self: read the instructions all the way through, especially if you’re making changes to the pattern.

Often when I’ve finished sewing something I’m so sick of the sight of it that I can’t even think about making another one. I enjoyed working on this dress so much that I’m already thinking about different colour combinations, and wondering how many I can get out of the fabrics I’ve already got in my stash. There’s a version suggested with contrasting colour panels, one with buttons on the enormous pockets… and I want to wear them all!

Vogue 8813

Notes on the pattern: BE CAREFUL. It’s not difficult by any means, but there are a few places where you need to be really accurate otherwise you’ll come unstuck. You also need to read the instructions properly *cough*, as the pocket construction in particular is a bit origami-like. The back, by way of contrast is completely plain and flat.

Fitting-wise, the only measurement you need to worry about is the full bust. If the dress is too tight across the front, it’ll be too tight under the arms and through the cap sleeves. I still went down a size from my usual Vogue Large to a Medium, and there’s plenty of room to breathe.

Vogue 8499

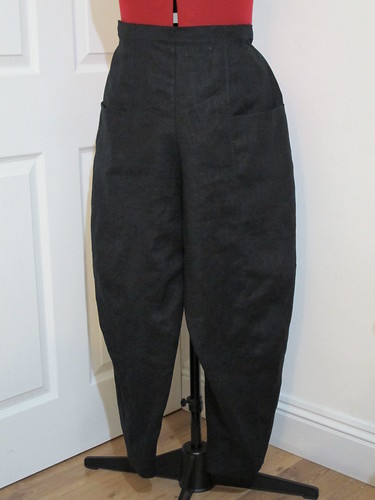
This, as you may be able to tell, is not another dress. It is another Marcy Tilton though, Vogue 8499. These trousers have a flat front and elasticated back, large pockets, and darts at the knees. They’re very wide at the hips, tapered at the ankle, and sit very high at the waist. Perfect!

My only complaint about this pattern is that there are no actual garment measurements given anywhere! If I’d sewn my usual Vogue size 18 or 20, these would have been phenomenally huge, even for a very baggy style like this. After reading a lot of reviews online, I took a gamble and made a size 14. This has turned out spot on, thank goodness. Any smaller and I wouldn’t have been able to pull them over my hips, but thankfully there’s still plenty of ease.

Once again, parts of the pattern require absolute accuracy. I ended up with a tiny hole in the waistband where I sewed past one of the small dots by a couple of stitches, though it was easily fixed.

This picture doesn’t really do them justice, although I think you can get an idea of the shape. I think they’ll also work well in lightweight corduroy, or maybe a nice drapey suit wool. They’re so comfortable that, like the dress, I want to make more already!

Birthday Dress – In Progress

Overdress - in progress

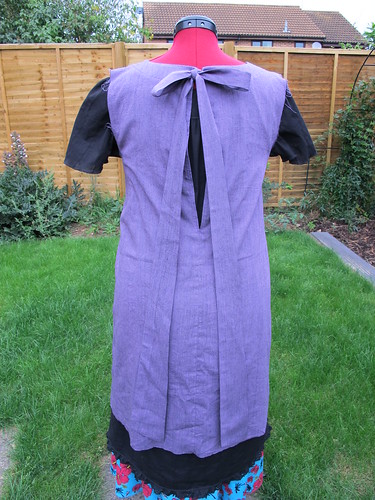
This is the back view of the prototype version of my 40th Birthday Dress. So far, I’m very glad that I made a prototype, and didn’t take the scissors straight to the gorgeous shot silk dupion that I’ve got waiting!

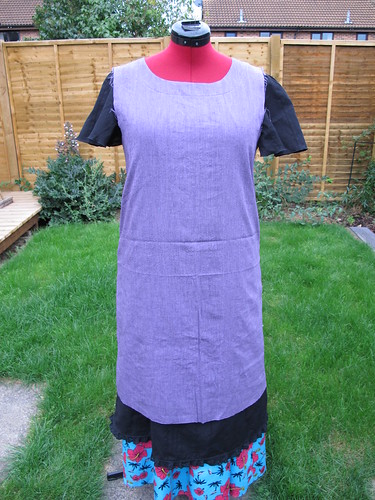
The style of the dress is exactly spot on. The open back designed to give a glimpse of the layer underneath, the ridiculous bow inspired by a 1971 Style pattern (more on this later), and a high round neck at the front, deliberately kept very plain, to show off a big necklace or a pretty scarf.

Overdress - in progress

Unfortunately, I forgot something important. (No, not the ironing. Shush.) You see those drag lines at the sides, underneath the bust? I forgot the all important part where fabric is flat but bodies are curved, and I didn’t leave quite enough breathing room at the top. Fortunately my dress form is somewhat more generously endowed than I am, so the dress does fit. But it is a bit tight, so I’ll need to re-draft the front pattern piece before I make another. (I blame the fact that my pattern drafting books are already packed for the move, so I had to make the pattern up as I went along.)

I’ve been adding a lot of “Lagenlook” inspired outfits to Pinterest lately (you can see the board here), and the point is to wear a lot of loose layers, often with plenty of frills and asymmetry thrown in for good measure. The basic silhouette of a Lagenlook outfit is fundamentally triangular. As I am also fundamentally triangular, this seems like a great look for me!

Overdress - in progress

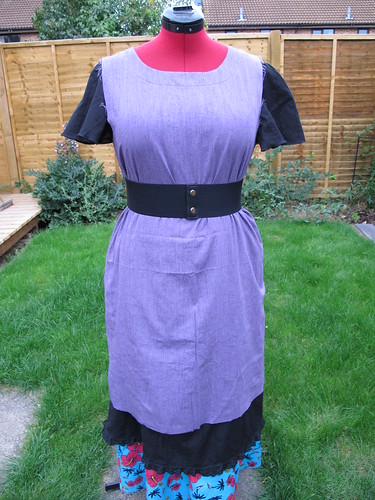
The annoying thing is, I’m so utterly conditioned to the “right” shape for a woman being an hourglass, or at least having some semblance of waist definition, that my immediate thought on adding this belt to the dress form was, “that’s better”.

Except that it’s not better. It’s not better at all. It pretty much guarantees that I’ll have indigestion after an hour, be uncomfortable all day, and generally be distracted by my clothes instead of focussing on whatever it is I’m supposed to be doing. None of which, however you look at it, can possibly be defined as “better”.

I think what I need to do now is take the belt away, make the next version of the dress much more wide and floaty, and try to step away from any and all forms of media that try to tell me that my body shape is fundamentally wrong.

(And work out how best to add the most ENORMOUS pockets to the front of the dress. Obviously.)

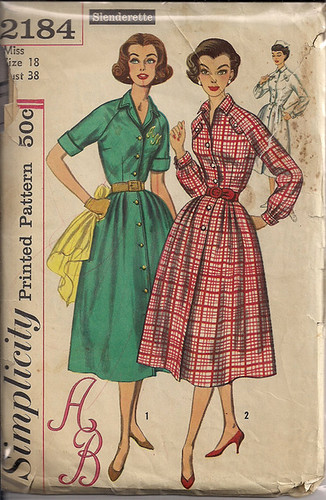
Simplicity 2184: Vintage dress pattern holy grail!

Well, it’s taken me almost five years to find it, but here it is – my vintage dress pattern holy grail, in the form of Simplicity 2184.

Raglan sleeves. Short and long sleeve options. FRENCH CUFFS. Convertible collar. In a size that I don’t have to re-draft too much. HALLELUIA! All I need to do is add pockets in the side seams (and 3″ to the waist) and it will be PERFECT! It even still includes the embroidery transfers for the monogram. *swoons*

It’s probably just as well that I need to wait for it to arrive all the way from Canada (I bought it on Etsy, from HoneymoonBus), hopefully that will ensure that I’ve calmed down a little bit by the time it arrives. I’ve already mentally sewn it in about 153 different fabric combinations, and thrown out every other item of clothing in my wardrobe. I need to slow down.

I posted the link on Facebook, and several people were somewhat boggled by the term “Slenderette”. Thankfully a friend discovered that Gertie (whose blog I am now reading obsessively) had contacted Simplicity to find out what on earth. Apparently the term was used for patterns that were specifically designed to make you look more slender. Not that this is going to work for me, as I’m going to have to let out the waist by at least three inches to make the dress fit – or invest in some fairly serious underwear.

Yes, underwear is still an ongoing issue. This stupid annoying fibromyalgia thing that I’ve got going on means that wearing a bra is absolutely excruciating, so I haven’t done it for the best part of a year. (And the Fashion Police didn’t arrest me or anything! It’s been a revelation!) Those “secret support” vests – sorry – camisoles with a soft bra hidden inside are a bit better, but they still have a constricting band of elastic around the body, so they’re not ideal. I did make a lovely soft teddy from bamboo fabric, but there were some issues with the fit (which is why I haven’t blogged about it yet), and Paul said it looked “like Victorian underwear – in a bad way”. Clearly some improvement needed there!

I keep looking at Kiss Me Deadly, whose vintage-inspired underwear would be perfect underneath this type of dress. But sadly their pretty things are outside the realms of my budget at the moment (anybody want to buy me a Vargas dress? Go on, you know you want to!), and I’m not 100% certain that my body will tolerate being squished by powernet all day.

So perhaps while I’m waiting for this pattern to arrive and fill me with wonder and glee, I should concentrate on doing some experiments with underwear. I’ve only made a couple of bras since I went on LCF’s Structured Lingerie course, and that was two years ago. Now I really want to do their Lingerie Workshop, but again, budget, and the courses take place in the school holidays, which is when I tend to be doing extra hours at work. Hey ho.

In the meantime, I’ve been reading blogs such as Ohhh Lulu, and reading my 1970s and 1980s lingerie-sewing books, in the hope that these might encourage me to get over my terrible fear of wasting fabric, and actually cut something out. I think now’s the time!

Rolled hem foot

IMG_0095

I love my Pfaff rolled hem foot very much.

Without it I couldn’t have hemmed Karen’s wedding dress without having some kind of a nervous breakdown.

Thanks are also due also to Gabrielle, whose rolled hem foot tutorial helped me to figure out the tricky business of getting the hem started.

The inside layers of the dress were done on the overlocker, as I didn’t fancy trying to do two more rolled hems on very fine jersey. I thought that might be pushing my luck a little bit.

But the dress is finished, I’m never hemming chiffon again (how many times have I said that now?), and I’ve got a week and a half to finish my own dress to wear to the wedding.  That just needs buttons… oh yes, and the hem.

Vogue 1301

Vogue 1301

This is Vogue 1301, a Koos van den Akker design. I’ve been stalking this pattern online for ages, so as soon as it appeared in the UK I snapped it up. The recommended fabrics are chiffon, georgette and gauze, all of which I hate sewing with a fiery passion, so I decided to go for a fine cotton voile instead. I also decided to go for plain black, figuring that would have an easier place in my wardrobe than the four contrasting prints pictured on the envelope! It also meant that I needed much less fabric – only three metres in total.

Despite being marked as “advanced”, the pattern came together really easily. All the seams are sewn on the outside, and then finished with the overlocker. The dress has a simple three-piece lining, so you don’t have to make the entire thing twice. I used cotton lawn for the lining, which was probably a mistake as the two layers tend to stick together. (And it shrank A LOT when I pre-washed it.) Next time I’ll use bamboo, which is much more slippery.

Vogue 1301

The finished dress is actually extremely full, although it doesn’t look it because the fabric’s so thin. It’s pretty shapeless, so I added a large belt. I think the only thing I’d change about this pattern is the shape of the armholes. They’re enormous! It does say “cut away” on the envelope, but they come down almost to my waist! So this dress can really only be worn with a vest or a t-shirt underneath, unless you don’t mind showing your bra to all and sundry.

The belt I made up as I was going along. The wide part is from Butterick 5371, and the ties are my usual 2″ fabric sash belt. The ties are offset (at the top on one side and the bottom on the other) so that they don’t get all tangled up as they cross over in the middle of the belt. They simply tie in a bow at the back. I lined the belt with velvet, the idea being to stop it from sliding around over the top of the dress.

I think I need a plainer belt for every day wear, but I’m really pleased with this dress. Although I made it for the summer, with a contrasting t-shirt and socks underneath, I think it’ll actually get a lot of wear all year round.

First Birthday Dress

First Birthday Dress

It was my niece’s first birthday last week, so of course I wanted to make her a little party dress! I was very tempted to make something very floofy and over the top, but given that her primary means of locomotion is crawling at high speed, I decided it made more sense to sew something that she could move about in.

This is Butterick 3772, in the smallest size. The fabric is half a metre of Alexander Henry, which I bought because I fell in love with it a couple of years ago. I’m glad it’s finally made its way out of the stash and been put to a good use.

Milly's First Birthday Party

As you can see, the dress saw a lot of action at the party!

I have lots of little pieces of interesting and unusual fabric in the stash, so I can feel a few more of these simple little dresses coming on. I’ll wait until she’s a bit bigger before I go for the full-on floofy party dresses, I think.