Sew, Knit N Stretch

1960s Sew Knit N Stretch 228

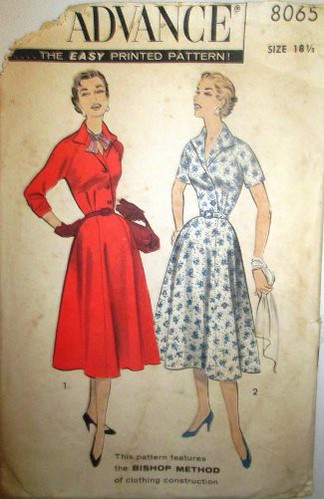
I’ve been collecting these Sew-Knit-N-Stretch (the precursor to Kwik Sew) patterns for about a year. These particular designs date from 1969 and 1970, so I can’t really think of them as being “vintage” just yet. Okay, yes, they’re from before I was born, but only by three or four years. And that’s NOT OLD. Definitely not.

The peculiar thing about these patterns is that they come without any kind of size reference whatsoever. Yes, they say “S-M-L-XL’ on the front, but there is absolutely no indication, anywhere, as to what those sizes might mean. Not on the envelope, not in the instructions, not on the pattern pieces. Not anywhere.

Sew-Knit-N-Stretch

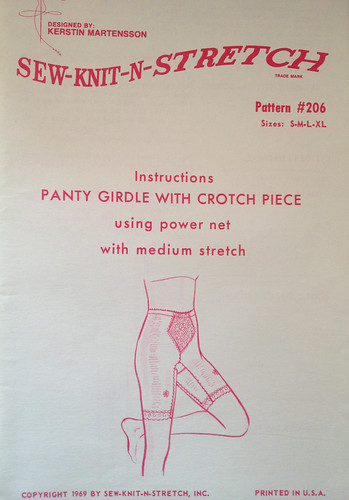
I made an XL in this one, a complete guess, and thankfully it turned out quite well. Okay, they have been relegated to pyjamas, but I need to do a bit of fabric thinking before I make another pair. The pattern calls for power net (as they’re supposed to be a “control” garment), I went for cotton jersey… but I think perhaps some kind of sportswear fabric might turn out to be a good in-between answer.

Sew-Knit-N-Stretch

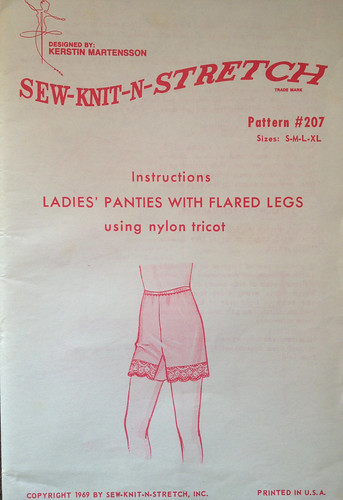
You saw these as part of Me-Made May – and yes, they’re now pyjamas too. I made a size XL, thinking they’d be nice and comfy, and I think they will be in a woven fabric. In a knit though, I can definitely go down to a size L without any trouble at all.

Sew-Knit-N-Stretch

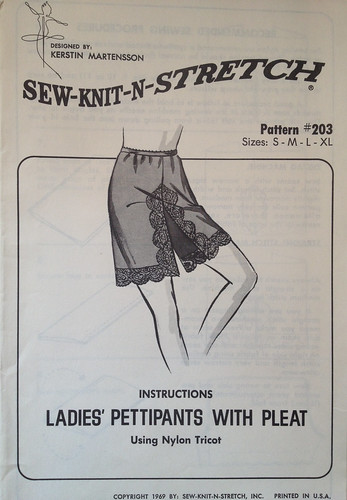
This pair I haven’t made yet, but I think I’m going to start by tracing off the size L this time, and hoping that the sizing is the same as for the other patterns!

These, and the ones above, are designed for nylon tricot. Personally I’m not a huge fan of nylon – it creates static electricity, it clings to your legs, and it’s hot and sticky in the summer. Hot and sticky is precisely what I’m trying to avoid by making this type of underwear, so I think a different fabric choice is going to be required. It needs to be something slippery, so that cotton dresses move nicely over the top, but not something that’s going to be hot or static or climb up your legs in an annoying way.

I think I need to stalk Scruffy Badger’s blog – she makes some lovely running shorts in sportswear and performance fabrics, so I think there might be inspiration to be had over there!

Sew-Knit-N-Stretch

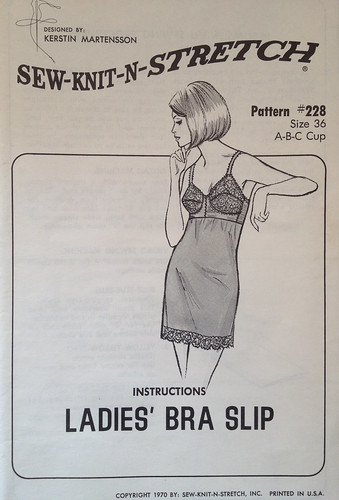
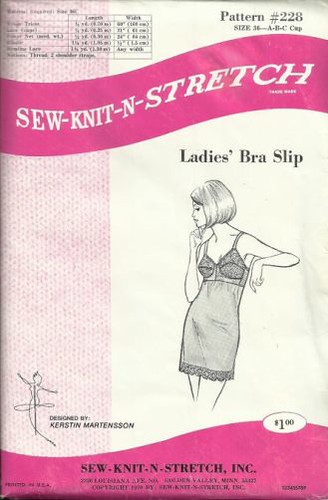
This one is the weirdest of all, in that it turned out to (mostly) fit first time! I made a 36C, assuming it would be too big, and I could then alter it down to fit. In an off-the-shelf bra I wear a 36A, or a 34B, or a 32D, depending on what mood the manufacturer was in on the day they decided to pluck the imaginary sizes out of thin air. Surprisingly the 36C turned out to be almost spot on… although the more I wear the slip, the more I wonder whether I should try and find a copy in a 38 to see whether that would fit even better.

Most UK bras are sized using the frankly bizarre “+4” system – you measure around your ribcage to find your underbust measurement, you add four inches to this measurement for no readily apparent reason (three inches if it’s an odd number, obviously), and that’s your bra size. You then measure around the fullest part of your bust, and work out the difference between the under bust and over bust measurements to determine which cup size you need. Then you go to a shop, take every bra in that size into a changing room, and weep gently as not a single one of them turns out to fit you, and they’re all wrong in a different way. Or is that just me?

Anyway, I wonder whether, being a dressmaking pattern, this bra slip is actually given as a dress size, rather than a bra size. Dress patterns are sized according to your over bust measurement, and most of the vintage patterns I buy are a size 38 or 39″ bust. (This could be anything from a size 14 to a size 20½, depending on which decade the pattern is from.)

Actually, a quick search has turned out to reveal that the bra slip is only available up to a size 36, but what looks like the identical bra pattern without the slip part is available in a 38. Perhaps I can cobble the two together and see what happens.

Vintage Pattern Round-Up

Advance 8065

For a while now I’ve been buying a vintage sewing pattern each month, with a view to expanding my wardrobe into the realms of Things I Actually Want To Wear, rather than Things I Wanted To Sew. Apparently those two things are not the same, and it’s resulted in a very full wardrobe, and Nothing To Wear.

I made one of these to wear to the Vintage Night at work, and I’ve actually worn it rather a lot over the summer. Lightweight, cool, smart for work or all the parties that I never go to – I love this one, and have fabric set aside for another. It simply screams NOVELTY PRINT at me, and I have a huge list of fabrics that I want to buy from eQuilter, once I’ve saved up enough to pay the customs fees. (Bonus: their Lorax prints are all on organic cotton!)

1960s Sew Knit N Stretch 228

During my adventures in Me-Made May, I discovered that the key to making these dresses look properly smart is having the appropriate underwear to go with them. As the fibromyalgia simply won’t allow me to wear 1950s-style girdles on a daily basis (nor will my budget, sadly!), I thought this bra slip would be a good alternative. Fitted at the top, but not too constricting around the waist. Making it myself also means that I can choose fabrics such as cotton or silk, which will be much kinder to my skin than the expected nylon and polyester knits. This one will require a shopping spree to acquire the right fabrics before I can start, although I probably have enough powernet left over from my Structured Lingerie course to make a prototype first.

1960s Simplicity 5890

This lovely pattern, very sadly, didn’t work out. I used the blouse pattern with the last of the My Little Pony fabric, and it just didn’t fit me right, so it’s now sitting in the Etsy shop waiting to find a good home. I did make the dress, in a nice grey suiting, but when I tried it on to check the fit… it was awful. A perfectly nice outfit (I made the gored skirt version), just really not for me. It looked very uniform-ish… which it’s supposed to, I guess. It’s a smart working-woman’s outfit. It’s just that apparently I am not a smart working woman! Thankfully, at the Museum, I don’t have to be. The dress code is “smart-casual”, so there is absolutely no requirement for me to turn up in a blouse and a pinafore dress if I don’t want to. Phew.

Monkee Genes Slim Fit Chinos

A few months ago I did decide that I should probably head slightly towards the smarter end of the smart-casual spectrum, especially as I’m the first person that most visitors to the Museum see when they come in. To that end, it was time for my too-small and rather frayed old jeans to be retired – which meant new jeans. I could have sewn them myself, but I don’t much like sewing trousers or heavy fabrics, so I decided to go shopping. I’m very determined that everything I buy should (as far as possible) be handmade, organic, or at the very least ethically produced, and with jeans this is easier said than done. Eventually I’d saved up £130 to treat myself to two pairs of Monkee Genes. However, they’re described as “slim fit”, which I’m most definitely not, so I wanted to try them on before I spent my money. I discovered that my local branch of Sports Direct (a shop I’d never normally venture into!) was a stockist, so I wandered in and discovered two things. One: Monkee Genes Slim Fit Chinos were my perfect trousers, and Two: they were in the sale. For £8-£10 per pair. Not £65 each. (In fact, the last few pairs of these chinos are currently on the Sports Direct website for SIX POUNDS A PAIR!!)

So, I did what any sensible person would do – I bought every pair in the shop in my size, then came home and bought every pair on the Sports Direct website, until I found myself with NINE PAIRS of ridiculously-coloured organic cotton chinos, for less than the price of the two pairs of jeans I’d originally intended to buy. I’d say “oops”, but do you know what? I’d budgeted the money for this purpose, I spent less than I’d planned, and given that my last two pairs of jeans saw me through five years of wear, I can’t imagine myself needing to buy trousers again for a very long time! These chinos fit well, they’re very comfortable, they’re organic cotton, and they’re ethically produced. Perfect!

Simplicity 2148

Of course, what I need now, is shirts to go with them. I’d thought that Simplicity 5890 would be the solution, but for work the neckline was too low, and I just didn’t like the fit of the resulting blouse. So, I decided to use the top half of this pattern to make a smart short-sleeved shirt. Unfortunately I had a bit of a maths error, resulting in a blouse that was a bit too tight across the shoulders, and a lot too tight around the hips. Back to the drawing board. (I’ve since added the skirt from Advance 8065, to turn it into a dress. That’s now sitting on my pile of Things Awaiting Buttons.)

1970s Butterick 4376

I’ve spent a LOT of time on Etsy and Ebay, searching for the perfect 1950s or 1960s raglan-sleeved shirt pattern. The raglan sleeve thing is important, as it not only suits my very rounded shoulders, but also allows a much greater range of movement than a normal set-in sleeve. (This is one reason why I don’t wear my beautiful T.M. Lewin shirts as much as I’d expected – I always feel as though I can’t lift my arms.) I did find some lovely patterns, but never in my size, and after one failed shirt incident I lost my nerve at the thought of trying to draft one from scratch. So, I broadened my search to include 1970s patterns, which is when I spotted this.

Granted, it’s not a button-through shirt, which is what I was originally looking for. But, it has raglan sleeves, it’s styled with layers, which I like, as a dress it has the all-important pockets, and I can just imagine it as either a tunic length worn over the top of all of my ridiculous trousers, or as a blouse length that I can wear tucked in. I have to admit that I was also sucked in by the promise of “Fast and Easy”, but on reading the instructions it turns out that the way to keep this a fast make is by simply not bothering to finish the inside! So perhaps I won’t go for that approach after all. Slow and Easy’s far more my style.

Back again.


Hello! I seem to be getting into a very lazy habit of only updating the blog about once a fortnight. My excuses are that it’s too frustrating trying to post using the iPad, and it’s so much easier to update Instagram and Facebook. Probably best to follow me there, if you feel like keeping up with me on a more regular basis.

Here you can see me in a fantastically stereotypical Instagram shot – staring whimsically into space as I contemplate how I’m going to get out of this dress when I haven’t added the front placket yet.

I was originally going to make a dress, then I changed my mind and decided to make a shirt. Thanks to a slight maths error (okay, the fact that I didn’t measure my hips properly) the shirt didn’t fit, so I decided to chop off the bottom eight inches and make it into a dress after all. But because I was cobbling together two patterns, I hadn’t quite worked out how I was going to get in and out of the thing. My task for today is to cut into the skirt and add a placket, so I’ve got room for buttons below the waist.

I have quite a few buttonholes in my future – this petticoat needs eight of them. (I just need to find eight matching lingerie buttons from my stash.) The pattern is Butterick 3263, and I made the slip to test the fit of the bodice before I embark on the combinations. Just as well I did, as the petticoat didn’t fit me at all! I took in two inches at the centre back bodice, half an inch at each side, an inch out of each shoulder, and added a dart at the centre back skirt to accommodate my sway back. I’m now slightly paranoid that I’ve made it too tight, but I won’t find out until the buttons are in place. (Cue the traditional cursing of my sewing machine that refuses to make buttonholes unless I’m standing in the sewing machine shop complaining to Sue about it – when of course it makes them perfectly. Git.)

In an attempt to be more organised, and to try and keep both my pattern and fabric stashes under control, I’ve started work on a new system. I’ve printed out a little picture and the fabric details for each of the patterns I sew most often, and glued them down to the pages in a small Filofax that was sitting empty in a drawer. I plan to add swatches for each garment as I make them, so that I can see what I’ve got already and where any gaps might be. The second section will be swatches cut from my fabric stash, so that when I go fabric shopping I can see what I’ve got at home, and make sure I’m not duplicating things. This will also allow me to match up the patterns with the swatches, and hopefully shrink the stash a little bit by actually sewing something from it!

Section three, which you can see poking out on the right, is swatches from clothes that are already in my wardrobe. (These were cut from inexplicable horizontal loops on the back of my jeans.) Having these with me will mean that I can buy fabric (or wool) to match clothes that I have already, thereby creating Actual Outfits rather than a wardrobe full of lovely clothes that bear no relation to one another. (Currently I have nine pairs of smart trousers, and no tops at all to go with them. I’m very bored with black t-shirts already.) I’m also contemplating knitting tiny swatches to match my cardigans, though I think that might be a step too far into madness. Perhaps just sticking in a few strands of yarn would do just as well.

Speaking of madness… the other day I made this little doll face. I found her a bit fiddly (hence the slightly squiffy eyes!), so I enlarged the pattern, thinking I’d try making a doll on a slightly larger scale. Except that when I really looked at the photocopied pieces, I realised that “slightly larger” is actually going to turn out about three feet tall! Do I really want to make a doll at that kind of size? Well, I’ve got a big enough piece of felt, so why not?! We’ll see how long it takes for me to get bored of stuffing all the pieces. (I predict: Not Very.)

In Other News… 

I’ve been clearing out my pattern stash into the Etsy shop.
There are a few vintage patterns that turned out not to fit me, a few that I bought and then changed my mind about, and a few that are cut out to sizes that I now can’t fit into. More to come over the next week or so.

My zipped pouches were reviewed over at Blonde Ambition.
Thank you Katie, for the lovely review!

The Vintage Haberdashery Mystery Boxes have disappeared from Etsy
…but I do still have one left. Let me know if you’d like it, and I can pop the listing back up just for you. Otherwise it’ll sit on my shelf feeling lonely, until I can find a good home for it.

And now? Buttonholes. Lots of buttonholes.

(And hoping that it doesn’t rain on the four loads of washing currently drying in the garden, because I’ve got no room for all that laundry in the house if the weather decides to chuck it down!)