McCalls 5924

McCalls 5924

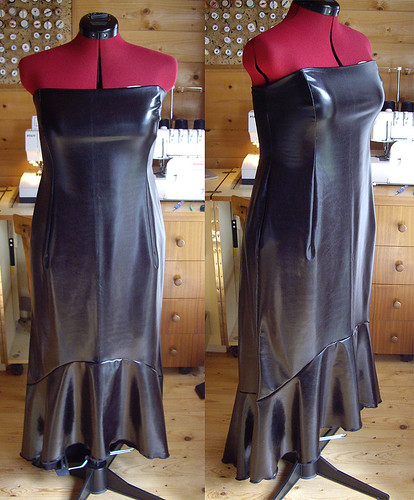
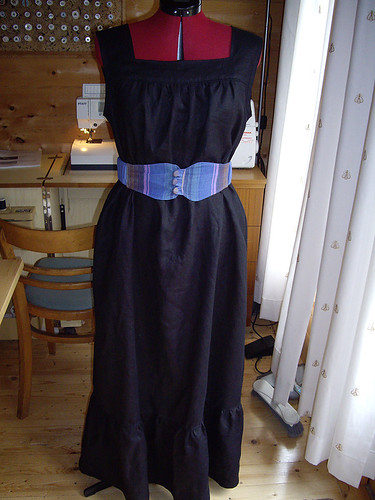
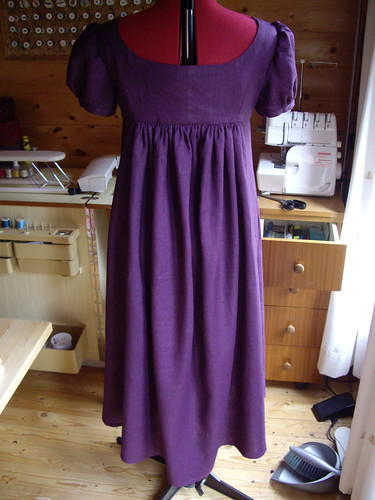
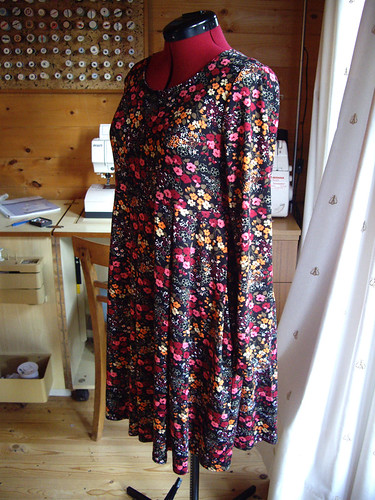
I haven’t been able to settle to anything for the past couple of days (I’ve been unwell again) so I made a very simple little dress. It’s McCalls 5924, which I’ve made before.

The first incarnation came out a little on the generous side, so this time I trimmed the pattern down a size. This jersey’s also much more light and drapey than the cotton lycra I used the first time, and I think it suits this style better. I am a bit worried that it might stretch out of shape though, as the skirt’s pretty heavy to hang from such a little bodice. There is an option to add elastic at the waist, but the casing adds a lot of bulk and I didn’t want it to be tight.

It’s more flattering on than it looks on the dressform, and the most important thing for me is that it’s really comfortable. Not tight at the waist, nice soft fabric, and it has pockets. Perfect.

(Also, the pink flowers match my Fairysteps handbag.)

Now I just need to find some orange woolly tights to wear with it, and I’ve reached the height of mad-art-teacher chic. Excellent!

Butterick 4731

Butterick 4731

Yes, this is exactly what it looks like. An evening dress, in wet-look lycra.

Another one for the “it seemed like a good idea at the time” pile, I suspect!

This is Butterick 4731. It looks a bit odd (relatively speaking) on my dress form because I’m in between sizes. The bust on my larger dress form doesn’t go small enough, and the waist and hips on the smaller one don’t go big enough. Typical. So there will be slightly more curvaceousness (is that a word?) going on in Real Life, but it won’t be quite skintight except at the bust, which obviously is holding up the dress.

The dress went together remarkably smoothly, considering I made such a radical departure from the suggested fabrics. The only change I made to the pattern was to leave out the centre back zip. The fabric is so stretchy that it doesn’t need any fastenings, and I didn’t fancy trying to top-stitch on this fabric. Having said that, it didn’t stick to the machine anywhere near as badly as I’d expected.

I do still need to add a lining or facing to finish it off though – the top edge is just folded over at the moment. The pattern is constructed with a boned foundation made from interfaced lining, but there’s not much point in trying to bone a stretchy dress, and the edges of the bones will show through the outer fabric anyway. Instead I think I’m going to make an internal girdle, of sorts, using powermesh. I’m not sure exactly how I’m going to achieve that yet, but I’m sure I’ll figure something out!

Black Linen Dress

Black linen dress

Okay, so I didn’t dive straight into the organic cottons, but I needed a new black summer dress and I had a piece of linen tucked away in the Shed. It was originally earmarked to become another Regency-ish dress, but I decided to try out a long version of the blue organic tunic instead.

The ruffle’s twice as deep, and I think I might go back and chop a couple of inches off it, because the dress touches the floor. I wanted it to be long, but that’s a bit too long even for me! I haven’t made a matching belt for this one yet – in fact I’ve been wearing it without – but I think it looks quite smart with the blue one.

Having worn it, I also want to go back and add pockets. It’s too late now to put pockets in the side seams (well, I could, but I don’t fancy unpicking overlocked linen!), so it’s going to be big patch pockets on the front. I just need to decide whether to make them in matching black, or whether to have the pockets and belt in a contrasting colour. Maybe I should keep the pockets plain, then I can choose whatever colour belt I’d like.

Blue Organic Cotton Dress

Blue organic cotton dress

This is a little tunic dress, from one of my own patterns. The main body of the dress is blue organic cotton from Bishopston Trading. The yoke and assorted other parts are also organic cotton, from Kaffe Fassett’s collection for Rowan a few years ago.

The pockets are set into the side seams, because it seemed like a good way of creating a nice sturdy finish. As the tunic is so full, next time I think I’ll make patch pockets and place them a little further towards the centre.

I’ve worn this with and without the belt, and I think it looks great either way. The belt is made from 5cm elastic, simply covered with matching fabric which gathers as the elastic contracts. The ends are fastened with loops and matching fabric-covered buttons. Next time I’ll add a slightly thicker interfacing, or perhaps a scrap of corset coutil, to make the front panels a little less likely to fold over on themselves. I also need to make another one about two inches longer, as this one’s a bit too tight for my liking!

I’ve been thinking for a long time about what to make with my organic cottons, and I’m really pleased with this tunic and belt. This is going to be the start of some thinking out loud in fabric, as I try to work out which styles might be available for sale.

Purple linen Regency-ish dress

Simplicity 4055

This is Simplicity 4055 again, this time in a lovely deep purple linen. I did make a couple of amendments to the pattern, mostly to the fit of the bodice. I widened the sleeves by an inch, to allow room for my biceps and to make it easier to lift my arms. I also made a full bust adjustment (a novelty for me!) to allow me to wear a modern bra rather than Regency stays. Next time I need to bring the gathering a little more towards the middle, but the fit is still very much improved.

Simplicity 4055

I also altered the back of the bodice, to eliminate the buttons. Not having a maid to dress me, I couldn’t fasten the buttons between my shoulder-blades without some serious yoga practice, so I decided to get rid of them. Instead I added a rather anachronistic zip into the side seam, which was much easier to manage. I really like the back of the bodice without the buttons, it looks much neater.

I did have a brief look around the internet and in some of my costume books, to see whether there were any examples of Regency dresses that didn’t fasten at the back, and was very interested in this tutorial for making a bib-front style. The wraparound section at the front would eliminate the need for separate stays, and you could make lots of different detachable bibs with embroidery and smocking and all sorts of details. That idea is now looking very tempting for my next big dress project!

Regency-ish Dress and Bloomers

Regency-ish dress & bloomers

(Sorry about the terrible picture, trying to take photos of black lace is a nightmare.)

Today I have finally finished all the hand-sewing on this Regency-ish dress based on Simplicity 4055. Some of it was of my own making – I had to bind the edges of the armholes to stop the seams of the net sleeves from being scratchy. Originally I’d put poppers at the back, but it turned out to be a bit tight and every time I moved they’d pop open. Not good for dancing. So I unpicked the poppers, put in eyelets, and now it laces up. Not very Regency. Ah well. The length’s hardly period – and it’s even shorter than I’d intended, hence the definitely not-Regency bloomers to go underneath.

The bloomers started life as Simplicity 2777, view E. I left off the waist casing, and finished the top edge with picot edged lingerie elastic. I also left off the leg bands and ruffles, because I found a piece of very extravagant garter elastic in my stash. It was much too stretchy to use as an actual garter, but absolutely perfect for trimming these little shorts.

I’m still trying to get used to the shape of the dress. It’s pretty and I know it’s basically the same shape as me, but I’m so conditioned to believe that every woman should have a neat little waist that I feel as though it looks a bit frumpy. Hopefully that’ll wear off when I put it on and discover that it’s actually comfortable rather than digging into the waist that I haven’t got, which is what happens with most of my other dresses. Which is why I never wear them.

I’m wearing the outfit on Friday evening, so hopefully I’ll be able to ask someone to take a better photo for me!

The Moon and the Hare

The Moon and the Hare

If you’ve been reading this blog for a very long time, you might recognise The Moon and the Hare. One of the first posts I wrote was about a t-shirt alteration featuring this print. I actually bought the t-shirt back in 2000 or 2001, the first time my paths crossed with the clog dancers. They were having an all-day event, and I had a stall selling velvet waistcoats and silver jewellery. I think I bought more than I sold that day, including this t-shirt.

I bought it from Hedingham Fair, rather optimistically in a children’s size, and when I eventually outgrew it I was rather upset. So I was really pleased to run across their stall at Chippenham, and find a t-shirt with the same print! This time I bought it in a men’s XXL, and spent a rainy Bank Holiday transforming it into a little tunic dress.

I started by removing the neckband and sleeves, and separating the shoulder seams. I then used an existing t-shirt to trace a new shape for the shoulders, armholes and neck. I used the old baggy sleeves to make new fitted ones, but thanks to a slight lapse in concentration I managed to sew the first one into place inside out. Using the overlocker. Oops. If I’d unpicked it the edges would have been a mess, and if I’d cut it out the sleeve would have been too small to go back in again… so I made an executive decision to go without sleeves. I copied another t-shirt and finished off the armhole and neck edges by simply turning the edges to the outside, stitching them in place, and letting them curl. I liked this effect, so I chopped off the original hem of the t-shirt and stretched it out until that curled too.

So there you have it – a new t-shirt becomes a new dress. Simple!

A step ahead

I walked past my local branch of Hobbs yesterday, and spotted this lovely pink dress in the window.

Then I came home and looked in my wardrobe at my pink party dress, which has a very similar keyhole-and-knot detail on the back. Now I don’t need to covet the Hobbs dress, and have thereby saved myself £169. Bargain!

Pink Party Dress

Vogue 1161

This is Vogue 1161, a Rachel Comey designer pattern.

I think this ranks as the most technically complicated thing I’ve ever made (look at those right-angled seams on the front!), and I have to say that I’m rather proud of it.

Yes, there are things I’d change (mostly in the fit of the bodice), and things I’m not too pleased with (the hem facing and the not-very-invisible zip), but overall I’m very pleased with how this came out. Plus it does actually fit, which is always a bonus when you’ve spent two days making a dress!

Vogue 1161

My favourite part of this dress is the back. The knot makes the construction rather complicated, as it affects the order in which you have to assemble all the parts. But it looks so pretty! The keyhole back is just high enough that you can wear an ordinary bra underneath. This is always good, because any dress that requires specialist underwear almost invariably never gets worn. I also love the little flare at the back of the skirt. So pretty and so flattering, although a bit of a tricky one to hem.

The centre back seam isn’t as wonky as it looks, honest. I had to take a couple of inches out of the back of the bodice. This made a curved seam which fits me really well, but my dress form less so. I’m also fairly happy with the zip. It’s not as invisible as I’d have liked, but this was the first time I’d used an invisible zip (in 14 years of sewing!), so I think allowances can be made. I was very glad that I managed to line up the seams at the waist so neatly though.

I wore this out to a friend’s birthday party the day I finished it, and it coped well with the rigours of dancing and eating cake. It’s a little shorter than I’d normally wear, but this one will definitely be coming out of the wardrobe on special occasions!

A dress to match the ties.

Simplicity 2307

Okay, so I did have an ulterior motive for making those last two ties. This is the dress version of Simplicity 2307, the same as the fish blouse I made a little while ago. Once I’d cut out the hem band, sleeve bands and neck facing I had plenty of fabric left over, so a couple of ties seemed like the way to go.

This dress isn’t supposed to fasten at the neck, but I find it a little low cut for my liking. I plan to add a hook and eye, or a little button and a thread loop, and I thought that a matching tie would be the perfect finishing touch.

Hopefully it will also help to disguise the fact that I just can’t seem to get the neck facing to sit nice and flat. I had the same problem on the fish blouse, but thought that it was to do with having too many layers of interfacing. I didn’t interface the neck facing this time, and the back piece just doesn’t want to stay put. I need to double check the pattern piece, because it seems as though there’s just too much fabric there.

I’m also a little bit uncertain about the proportions of this pattern. With the hem band it comes down to my knees, which is fine, but there’s something about the length of the dress or the depth of the band that just isn’t quite right. Maybe the band needs to be a little less deep. Maybe the dress needs to be a couple of inches shorter. Maybe the band stands out too much because of the contrasting fabric. I’m not sure.

I think I need to wear this one a couple of times, before I decide what alterations I need to make to the next version.