Rolled hem foot

IMG_0095

I love my Pfaff rolled hem foot very much.

Without it I couldn’t have hemmed Karen’s wedding dress without having some kind of a nervous breakdown.

Thanks are also due also to Gabrielle, whose rolled hem foot tutorial helped me to figure out the tricky business of getting the hem started.

The inside layers of the dress were done on the overlocker, as I didn’t fancy trying to do two more rolled hems on very fine jersey. I thought that might be pushing my luck a little bit.

But the dress is finished, I’m never hemming chiffon again (how many times have I said that now?), and I’ve got a week and a half to finish my own dress to wear to the wedding.  That just needs buttons… oh yes, and the hem.

The right tools for the job.

Upholstery & Lampshade Needles

No, I haven’t been sewing upholstery or lampshades. But I did find myself in need of a curved sewing needle today, and I knew I had a packet somewhere. I hadn’t realised that they’d be older than I am! They’re in perfect condition, and they were just what I needed to sew through multiple layers of fabric that couldn’t be done by machine.

Pleats & Pins

I’m in the process of making a costume, which is going to be an extremely sumptuous ball gown. The starting point was my (first) wedding dress, which has been sitting in my loft for almost fifteen years. Thanks to an extremely generous seam allowance, I was able to let it out enough to make it fit again! I’m replacing the ivory skirt with a matching burgundy one, but  rather than dismantling the original dress I’m simply adding an extra layer of fabric. So this is five metres of satin, draped and pleated into place.

Clearly there was no way I could have even considered doing this kind of alteration using the sewing machine, but working by hand directly on the dressform (to maintain the shape of the draping as I worked) was rather awkward. Thankfully the curved needles were strong enough to push through all those layers as I sewed down the pleats, and the perfect tool for this kind of fiddly work.

Time permitting, I’m intending to make a matching hat. I have a feeling that these curved needles are going to come in handy again!

New curtains

New Curtains

I can’t claim that I made these, but they’re a good example of a simple modification. The only curtains we could find in the right colour for the kitchen had tab tops, and it wasn’t possible to get the curtain pole off the wall (without making a great deal of mess!) in order to slot the curtains into place.

All I needed to do was buy enough curtain tape (at a grand total of 26p a metre!) to go across the width of each curtain, snip off the tabs, and sew the tape into place. They’re now hanging from the existing rings and letting a lovely turquoise light into my kitchen.

Alterations

Alice's tunic top

I don’t usually take on alterations – one of the reasons I started offering sewing lessons was so that I could teach other people to make their own. But these small changes rescued two lovely garments from being abandoned, so I couldn’t resist helping out a friend.

The tunic above had a ridiculously wide neck that A. could actually have climbed out of, which wasn’t exactly ideal. We decided it would be better as an off-the-shoulder top with some nice wide straps, so all I had to do was make the straps and sew them on. 45 minutes later, a brand new summer top. Marvellous.

Anna Scholz silk robe

This is a gorgeous Anna Scholz silk robe. It fastened with two ties at the front edge, but that meant it didn’t cross over at all, making it more than a little revealing! I shortened the ties, unpicked the stitching and used the fabric to cover four buttons. (Two on the outside, two on the inside.) The remaining ends of the ties were turned into loops.

Ta-da! Two quick and easy alterations that have made two unwearable garments wearable again.

The Moon and the Hare

The Moon and the Hare

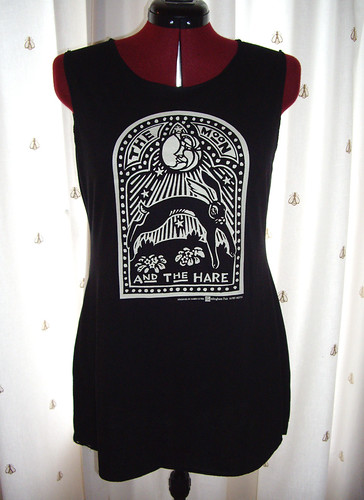
If you’ve been reading this blog for a very long time, you might recognise The Moon and the Hare. One of the first posts I wrote was about a t-shirt alteration featuring this print. I actually bought the t-shirt back in 2000 or 2001, the first time my paths crossed with the clog dancers. They were having an all-day event, and I had a stall selling velvet waistcoats and silver jewellery. I think I bought more than I sold that day, including this t-shirt.

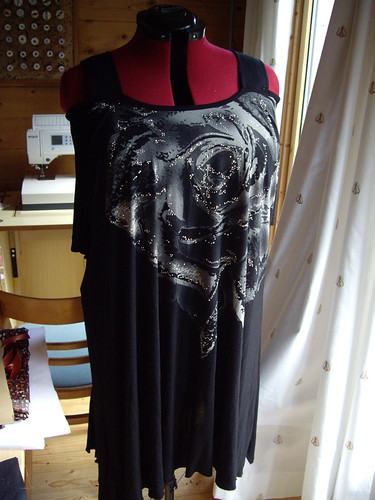
I bought it from Hedingham Fair, rather optimistically in a children’s size, and when I eventually outgrew it I was rather upset. So I was really pleased to run across their stall at Chippenham, and find a t-shirt with the same print! This time I bought it in a men’s XXL, and spent a rainy Bank Holiday transforming it into a little tunic dress.

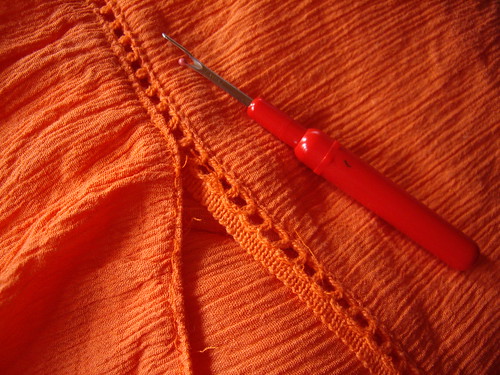
I started by removing the neckband and sleeves, and separating the shoulder seams. I then used an existing t-shirt to trace a new shape for the shoulders, armholes and neck. I used the old baggy sleeves to make new fitted ones, but thanks to a slight lapse in concentration I managed to sew the first one into place inside out. Using the overlocker. Oops. If I’d unpicked it the edges would have been a mess, and if I’d cut it out the sleeve would have been too small to go back in again… so I made an executive decision to go without sleeves. I copied another t-shirt and finished off the armhole and neck edges by simply turning the edges to the outside, stitching them in place, and letting them curl. I liked this effect, so I chopped off the original hem of the t-shirt and stretched it out until that curled too.

So there you have it – a new t-shirt becomes a new dress. Simple!

Twenty-eight buttons

Military jacket

This is a lovely jacket that belongs to a friend of mine. It came with black buttons, and we’d been chatting about how nice they were, and how difficult it would be to find a replacement if one was lost. A couple of hours later… you’ve guessed it! One missing button.

There were no spare buttons with the jacket, so the only option was to replace the whole lot. All twenty-eight of them. (There are two more on the sleeves that you can’t see in the picture.)  They’re ever so slightly larger than the original buttons, but thankfully they still fit through the buttonholes.

I bought practically every button in this style, and I’ve tucked a couple of spares into one of the pockets. That way, if another button goes missing, I don’t have to replace them all again. My fingers are really sore, from sewing them all on in one evening!

Altering some new trousers

H! by Henry Holland

I like Henry Holland, and he had some trousers in Debenhams, and they were pink tartan, so obviously it was compulsory for me to buy them.

(Yes, I know they look ridiculous. I have every intention of wearing them anyway.)

But!
Because these are tapered trousers, the legs were much too tight in my usual size. So I tried the next size up, which were much more roomy in the legs but ridiculously enormous around the waist.

So I looked at the trousers and came up with a solution.

H! by Henry Holland
First I carefully removed the fake pocket welts from the back.

H! by Henry Holland
Then I wrapped the resulting strip of fabric around a length of elastic, and sewed them together many times.

H! by Henry Holland
I tucked the elasticated strip underneath the belt loops, and sewed it into place. Now the trousers can’t do that annoying gappy business at the back!

I also slipstitched down the inside pleats on the front, so that it didn’t look as though I was carrying inexplicable balloons in my pockets.

Ta-daa!

New trousers.

Summer brights

Karen's orange dress

A seam ripper is one of the most useful tools you can have as a dressmaker. Not just for those inevitable wobbles and wonky bits, but for tasks like this one.

My very petite friend had bought a dress that was too long for her, and she asked whether I could remove the ruffle from the hem. I don’t usually do alterations, but this was a nice simple one, so I brought my seam ripper to the rescue.

Rather than attack the dress with scissors, I used the seam ripper to nip out the stitching that was holding the ruffle in place. This allowed me to get a lovely neat edge, and expose the lace trim that was holding the two sections together.

It’s so tidy that I don’t even need to hem the new bottom of the dress. Marvellous!