It’s not until next April, but I’m really looking forward to it, as it brings a number of my interests together into one place.
The conference is the occasion for the launch of their next book, The Typical Tudor, which examines not the court dress of previous books, but the clothes of the ordinary Tudor person. It also contains knitting patterns, which I’m very excited to see!
The focus of the conference is on the hunt for evidence, which is much more difficult when you’re talking about clothes that weren’t preserved for posterity in the way that court dress often was. The search for reliable sources around intangible history is really interesting to me, as it’s a difficulty that I’m facing in my research into early modern medicine. The Herbals exist, and we can trace who owned and used them… but what about the people who didn’t have access to the books? Those who couldn’t afford or couldn’t read them? I’m hoping that the conference will introduce me to different ways of looking for evidence, and how to distinguish what is most likely to be both reliable and broadly representative.
And of course, on a purely practical level, I can’t wait to get the book and start sewing! Despite having owned The Tudor Tailor for many years, I’ve never actually constructed a Tudor outfit. Everyday clothing is far more my style than court dress, so I’m really interested to see the patterns and decide what I’m going to make.
I’ve had an idea in the back of my mind for a couple of years to put together a period-correct outfit suitable for swordfighting in. We primarily study Manciolino and Marozzo, who both published treatises during the 1530s, so these patterns will be spot on.
Obviously I won’t be allowed to fight in Tudor clothing – not unless I build it in such a way that I can safely incorporate my modern protective sports kit. But I would definitely like to go through some of the exercises and flow drills, just to make the point that it would have been absolutely possible for a Tudor woman to be a fencer – if she’d had the opportunity.
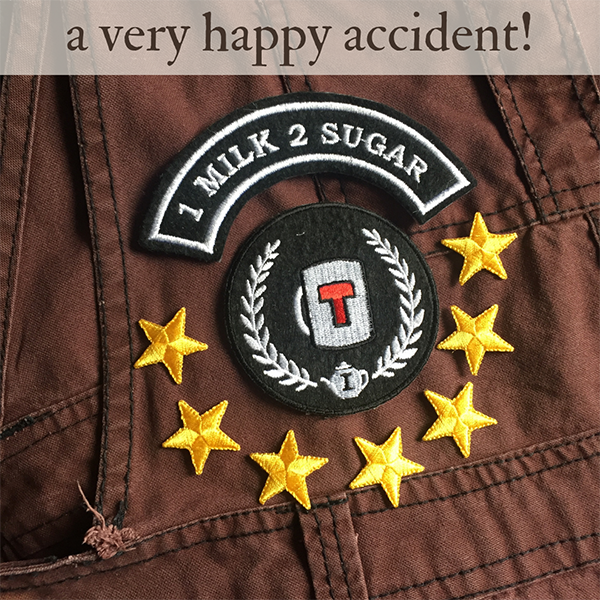
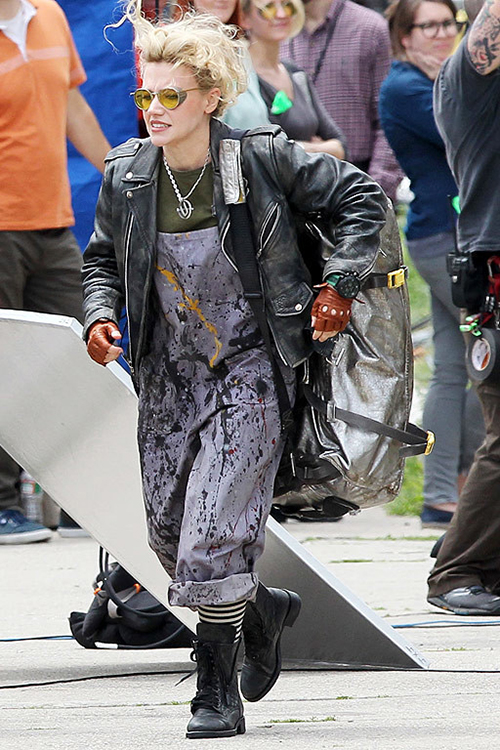
After my lengthy waffle about making myself a new steampunk costume, I decided to bite the bullet and just dye my existing dungarees. They were black, and I ran them through a 95º wash (I hope they haven’t shrunk!) with a box of Dylon pre-dye. I had been intending to dye them Espresso Brown, but I’m glad now that I didn’t buy the dye in advance, as it turns out I didn’t need it! They came out this lovely rich brown colour all on their own.
The patches, quite coincidentally, popped through the letterbox just as I was getting ready to take this photo, which couldn’t have been better timing. They were a gift from Lisa at Off With her Head Millinery, and they’re by Doctor Geoff. While I was browsing his patches, I spotted this enamel badge for the RSPCAM – the Royal Society for Prevention of Cruelty to Abominable Monsters. If my character’s going to be an in-the-field catcher of magical and/or mythical beasts, I’m definitely going to need one of those!
My first order of business is going to be mending and reinforcing that tear at the edge of the bib (you can see it in the bottom left of the photo) which I hadn’t noticed was there. Then I can start covering the dungarees with patches and enamel pins, before I start thinking about my accessories.
Sometimes I worry about myself. For lots of different reasons, it has to be said, but most often for the fact that my brain absolutely cannot and will not stick to the most basic version of any given idea. It always wants to escalate things until a project is impossibly ambitious.
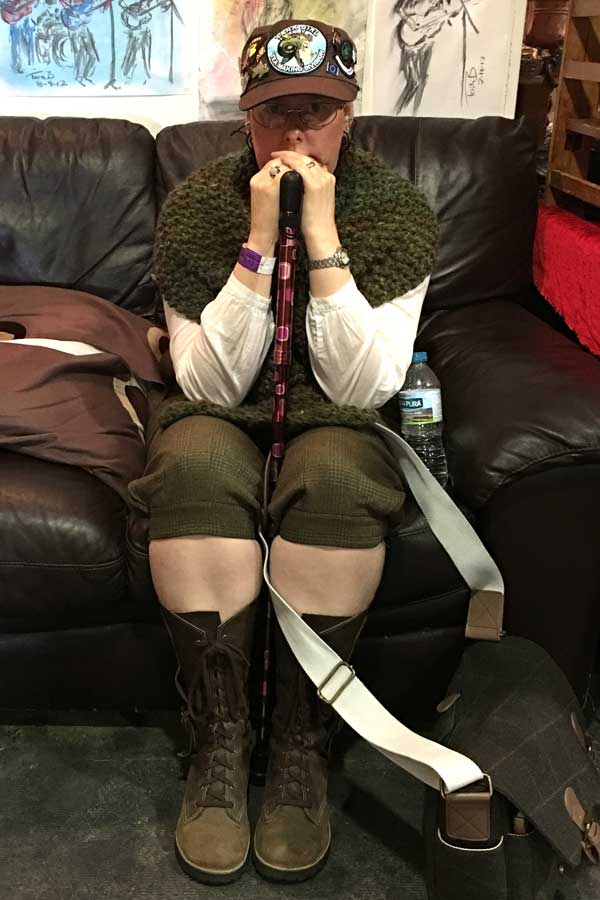
My current steampunk-ish outfit
This is a frankly terrible picture of what passes for my current steampunk-ish outfit. Knee length tweed breeches (held up by braces which are hidden by my scarf), tall leather Faerysteps boots, a collarless pintucked shirt, and a cap that’s covered with badges. This outfit came about for two reasons. One, I need to be comfortable. (See: comfy sofa, warm scarf, earplugs, walking stick, tired face. The concrete floor in that otherwise excellent venue did not go down well with the fibromyalgia. Not at all.) Two, it’s common for a lot of steampunk imagery to be very upper-class-colonial-Victorian-explorer. That makes me feel a bit uncomfortable, and when a friend pointed out that you never see a lower-class “steampunk urchin” costume, I knew what I had to do.
My intended costume (I was going to say “planned”, but that’s a bit of a strong word at this stage) is going to be for a character who’s an in-the-field catcher of magical and/or mythical beasts. Think of a kind of a steampunk / Hellboy / Harry Potter / Fantastic Beasts / Ghostbusters crossover.
Nerf Zombie Strike Doublestrike
The first order of business was to buy a second-hand Nerf pistol from a friend. Nerf guns of all kinds are a common steampunk accessory, and I wanted a small one that Paul could transform for me into something that looks like a tranquilliser dart gun.
I have a pair of oversized black dungarees that I usually wear to do the gardening. So far, so good. I was going to bleach them and dye them brown to match my cap. I figure that it doesn’t matter if they come out a bit patchy, as they’re supposed to be working overalls. But then I thought that perhaps I should wear something that gave a bit more of a nod to a recognisable movie costume.
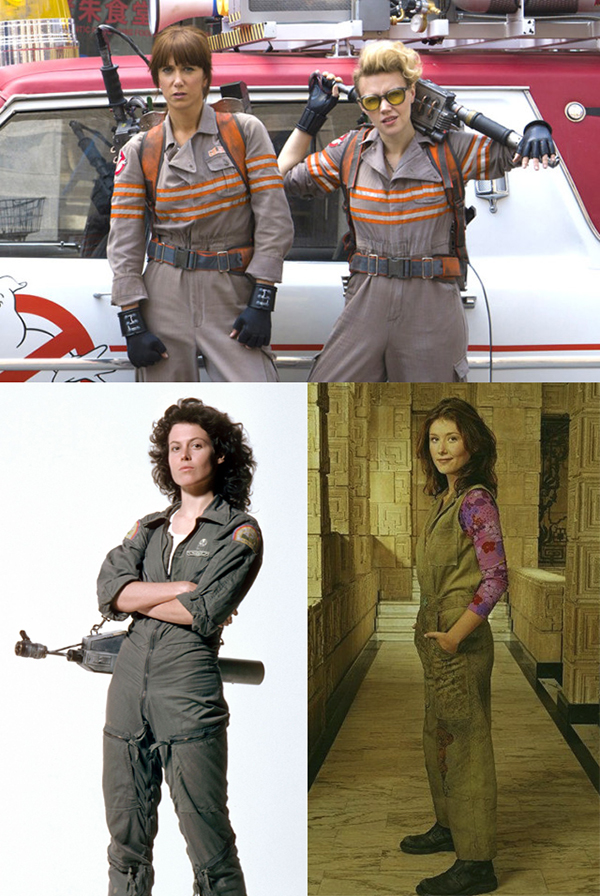
Top: Kristen Wiig and Kate McKinnon in Ghostbusters Left: Sigourney Weaver in Alien Right: Jewel Staite in Firefly
A brief online search later, and that turns out to mean boiler suits or flight suits rather than dungarees.
Kate McKinnon in Ghostbusters
(Although, to be honest, this photo of Kate McKinnon in Ghostbusters isn’t so much a costume as a bunch of stuff that I could pull out of my wardrobe right now. I love it when that happens.)
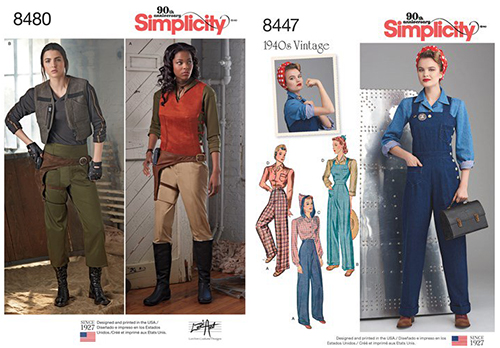
Simplicity patterns for a Firefly / Serenity / Rogue One costume, and reproduction 1940s dungarees & hooded blouse
It turns out that boiler suits are EXPENSIVE. (Health & Safety, and all that.) So I thought that I should maybe just have a little look at some jumpsuit sewing patterns. I knew that Simplicity had a Firefly/Serenity pattern (now being sold as Rogue One), and some 1940s reproduction dungarees with a hooded blouse that I definitely don’t need but am simultaneously looking for an excuse to make.
I haven’t yet made any form of final decision, except for thinking that paying around £12 to chuck some Dylon pre-dye and Espresso Brown at my existing dungarees is going to be a lot cheaper, quicker and easier than buying a sewing pattern and fabric and starting from scratch. And it’s definitely cheaper than any genuinely utilitarian, as opposed to fashionable and therefore largely pocketless, jumpsuit that I can currently find online.
And then, of course, there’s the issue of accessories and props. What does an in-the-field catcher of magical and/or mythical beasts need to carry with them? I’ll have the Nerf gun, I already have a sonic screwdriver (obviously), and I’ve seen a miniature fire extinguisher (water pistol) that I’m definitely going to have to hang from a belt loop. (Mythical creatures might breathe flames at you, so a miniature fire extinguisher seems like a sensible thing to have.) I’ve been looking at small vintage suitcases, thinking I could maybe put together something Newt Scamander would be proud of… but I suspect a backpack of some sort would be a bit more practical. And of course it will need to double as an actual handbag, given the ridiculous amount of Stuff that I carry around with me at all times.
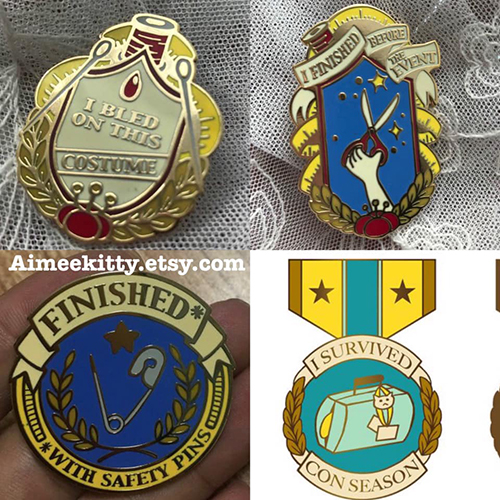
While I was wittering on about all of this over on Facebook, a friend spotted these enamel pin badges which are frankly PERFECT. They’re by aimeekitty on Etsy, and although I’ve never (yet) had to resort to “finished with hot glue”, I have definitely made costumes that have required blood sacrifice – or that I’ve been sewing right up until the moment we got into the car to travel to the event! I don’t currently have a particular event in mind for this costume, but I’m pretty sure that one or two of these pins are going to apply.
More teeny-tiny photos again, this time from 2005, when I was apparently making extravagant dresses! (I know I have larger versions of these photos, I really must try to find them.)
This one was made from my favourite ever fabric – a black stretch velvet with glittery silver stars printed all over it. Well, I say favourite… I hate working with velvet, it makes such a mess! Add glitter to that, and I think I was covered with sparkly fluff for weeks. But I certainly loved the way it looked, even though it was so long that people were constantly stepping on the hem whenever I wore it!
blast from the past – satin hearts ball gown
Now this one is bothering me a little, because I must have made a dress this extravagant for a specific event, and yet I have absolutely no recollection of ever wearing it!
It’s based on my absolutely favourite style of dress in the whole world, which is a 1990s ball gown with a sweetheart neckline, ridiculously puffy sleeves, and a very full skirt gathered into a pointed bodice.
ball gown pattern and star print satin
I’m actually going to be making myself another ball dress very soon, for an event that I’m going to just after Hallowe’en. This is the fabric… and there are no prizes for guessing which pattern I’m going to be using!
Sometimes I miss making big, extravagant dresses. But then I remember how stressful it was to work in the bridal industry, and (usually) I change my mind. I think that any big, extravagant dresses that I make in the future are going to be strictly for myself.
I’ve been wearing my ancient cheesecloth blouse since the heatwave started. As I pulled it from the washing line yesterday I realised that it’s made entirely from rectangles, which means that no fabric waste was left over from its production. This has been bothering me lately. I’ve been making lavender bags and summer hats from my fabric scraps, and I donated a bag of bits to a friend who’s organising a charity quilt project, but I still have more leftovers than I’d like. So… why not try and design the leftovers out?
This rang a bell with a cutting diagram that I’d seen in one of my textile history books… and here it is! How to cut a top or dress, using the maximum width of the fabric, without wasting a single piece.
nineteenth century smock
The garment in question is one of these – a nineteenth century smock – but the construction is identical to the summer blouse I’m wearing today.
The first volunteering I did for the Museum of English Rural Life, about nine years ago, was documenting their collection of smocks, so I’ve been lucky enough to get my hands on about sixty examples of the real thing. Another volunteer and I took detailed measurements, studied whether they’d been stitched by hand or machine, and described the patterns of smocking and embroidery stitches on each garment. One particularly interesting thing we noticed was that the vast majority of the adult smocks were made from the same width of fabric, regardless of the size of the wearer. The side seams were almost always made from the selvedges, so we could see straight away that the entire width of fabric had been used.
I’m starting to feel an experiment coming on… not to replicate a 19th century smock, because I know how much time that would take! And probably not a 1970s or 80s smock like the ones in my pattern books. But maybe a pintucked blouse or a coat dress, made entirely from rectangles, with no scraps left over. I like that idea very much.
smocked aesthetic dress
Mind you, there is one thing I’d like to replicate at some point… and that’s a smocked aesthetic dress. Obviously this one has a much more complex construction, including a very heavily structured inner layer. Not quite the no-waste experiment I’m looking at right now, but isn’t it gorgeous?
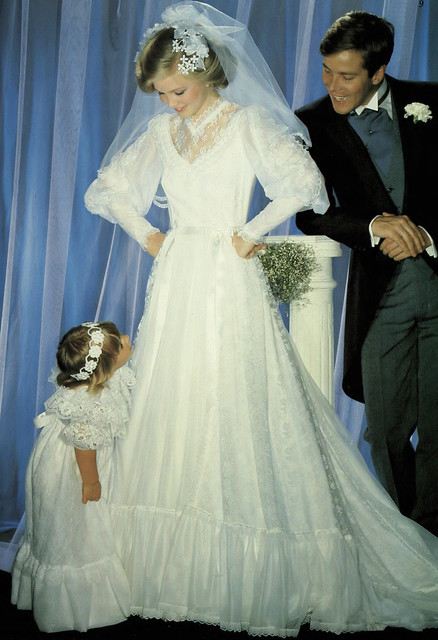
Say hello to “Lucinda”, one of Pronuptia‘s finest wedding dresses of 1983.
I’d been looking on Ebay for a while for a stereotypically 1980s wedding dress, the bigger and the pouffier the better, but somehow I always seemed to end up being outbid by 15p at the very last minute. I had a look in charity shops, but everything they had was too nice, or too far out of my very limited budget.
So, I asked around on Facebook, and a photographer friend said he thought he might have something appropriate lurking around in the garage, from a project that had never come to fruition. He sent it over to me, and it turned out to be perfect!
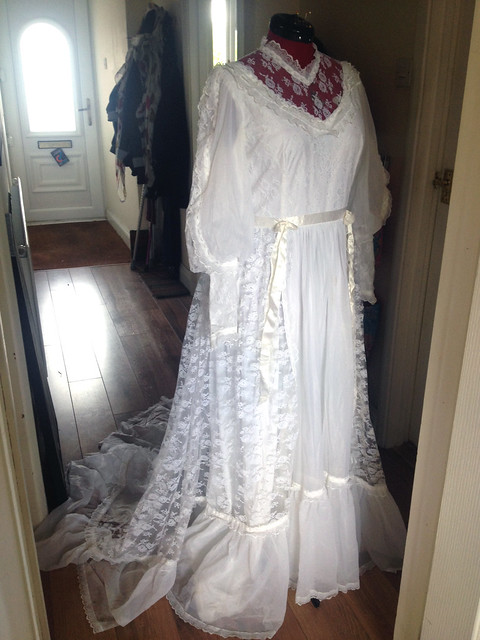
It’s a perfect example of 1980s-does-Edwardian, and being a Pronuptia gown it’s really well made. Okay, yes, it’s really well made from 100% nylon (lovely!), but that means it’s survived a trip through the washing machine, and has come out looking great. And best of all, as you can see by the mannequin, the dress is an absolutely perfect fit. I couldn’t have asked for anything better!
There’s a little bit of damage to the bottom ruffle – a hole at the back, and a couple of places where the lace is coming away. There’s also some staining on the lining of the train, where the dress has obviously been wet at some stage… and there’s a mark on the front of the skirt, that might be wine, or might be gravy!
Clearly this dress has had one very good day in its life, but considering the dated style and the damage, I can’t say I feel too bad about making some slight alterations. Details will follow later, but what I will say is that this is for a photo project of my own, mainly involving messing about in the woods in a big white dress. After I’ve taken the scissors to it, that is.
As someone with an almost-four year old niece, it was inevitable that Aunty Claire was going to get the call at some point. I was half-expecting a request for a Princess Elsa dress for her birthday, but it turned out to be a slightly last-minute Anna cloak to wear to a Frozen-themed party. So, I leapt into action, dashed down to the fabric shop, managed to grab the very last of the purple pom-pom trim, and set to work!
The finished cloak was a bit on the big side, but thankfully very well received, despite not being quite as screen-accurate as I normally like my costumes to be! The silver clasp at the neck worried me a little bit – I was concerned that Milly wouldn’t be able to fasten it easily, or might be hurt if another child pulled on the cloak or stepped on it. So Paul cut off the hook and loop, filed them down smooth, and I sewed on the two pieces as decoration only. The cloak fastens with a piece of velcro, so it will come apart quickly if necessary, and Milly can easily dress herself.
This one is Milly’s somewhat delayed Christmas Dress. She’d finally grown out of the pattern I’d been using since her first birthday, so this is a new one – Butterick 5876. I have to say that I don’t really recommend the pattern. It does make a lovely dress, but the finishing techniques, for a garment that’s going to be outgrown in a matter of minutes, were frankly bonkers. Lots of mucking about with facings and hand stitching around the arms, that could have been accomplished so much more quickly and easily with a bit of bias binding! Next time…
The only alteration I made to the pattern on this occasion was to significantly enlarge the pocket. Honestly, what’s the point of a silly little pocket that even a three year old can’t get her hand into? As you can see from this picture, the pocket was full of jelly beans. And Milly had her face painted like a cat, to match the dress – how cute is that?!
And here is a tiny piece of evidence that my niece is very much a child after my own heart. Fancy dress costume, pretty party dress, giant stompy boots underneath. Excellent!
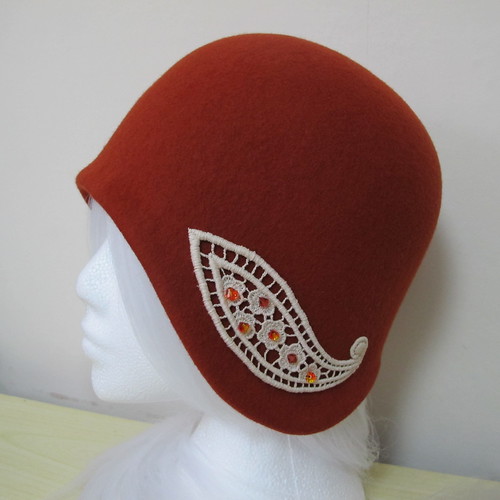
I was doing well for a while, keeping up with the blog, and then I was ill, and then busy catching up with work, and here I am behind again. This is one of the things I’ve been up to – a new hat! It’s my favourite asymmetric cloche shape, with an organic cotton lace motif and Swarovski crystal trim. Available now in the Etsy shop, or made to order in a colour of your choice!
I’ve popped a few other hats in the Etsy shop too, so that I can make them to order. This is one of the first hats I made, and I’m still completely in love with the giant felt flower. You can now order one of your own, though it doesn’t have to be bright orange of course!
I never did get around to making fascinators with the other felted flowers that I made, and they haven’t sold at all well on hair combs, so I think they’ll be coming soon to a hat near you.
This is one of the simpler styles of hat, a plain round cloche trimmed with guipure lace. I think it’s the one I’ve made the most of (three pink and one grey, at the last count), and now you can order one for yourself. The hat can be made in any of 25 different colours, but the lace is only available in black or ivory.
The next step on the hat journey is going to be pillboxes! I’m just waiting for a clever widget to arrive from Guy Morse-Brown, which will allow me to use my existing blocks to make little felt pillbox shapes. I’m not sure yet how I’m going to trim those, I need to see how they sit on the head before I decide. At the moment I’m thinking big felt bows, or maybe lots of little flowers. We’ll see.
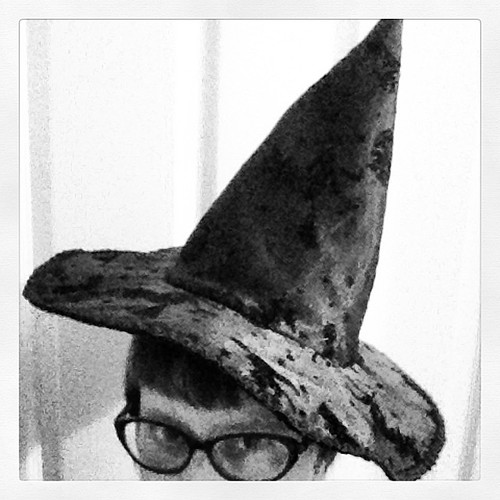
And just by way of a complete contrast, I spent the weekend making this! The reason it looks a little bit too small for me is that it’s intended for my three year old niece. Although I have to confess I’m pretty tempted to make another one that I can keep! This one has a secret pocket inside the brim (where else does a witch keep her important things?), complete with a little packet of “Magic Dust” for casting spells with. I really hope she likes it!
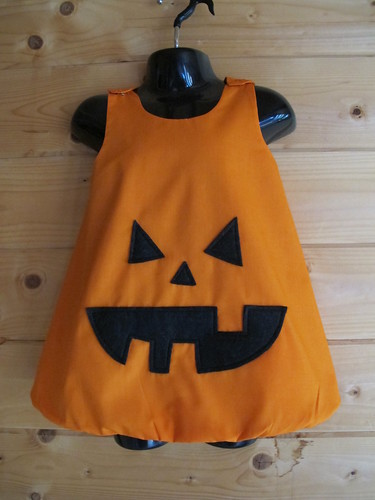
I was going to whinge on about how poorly I’m feeling (working day seven of nine today, half term holidays, should have taken the opportunity not to work the weekend when my boss offered it to me but I’m a sucker for agreeing to stuff), how frustrating the house move continues to be (blocked drains, compost heap full of dog waste, where have the removal men hidden my laundry?!), or how I haven’t knitted anything or checked my email for nearly two weeks (argh!!), but instead I thought I’d show you this lovely picture of my little niece being a scary pumpkin.
As mentioned when I made it, this is Butterick 3772, and I have to say it’s been a brilliantly versatile little pattern!
I made one for her first birthday, which she wore as a dress, and then as a top, until the armholes got too tight.
I made another one for her second birthday, this time with an enormous pocket on the front.
The pattern has loads of cute variations, although I’ve only ever made the simplest version, with a bit of lace or an improvised pocket. (Or a puffball hem and a pumpkin face. As you do.) Up to age 3 you only need a metre of 44″ wide fabric which, given the size of my stash, is pretty easy to come by. You can squeeze the smallest size out of half a metre, if you use a different fabric for the facings. In fact, I only used a metre for the pumpkin version, which is fully lined.
To be honest, it’s such an easy dress to make that I feel like a very bad aunty for not making more! Maybe once I’ve unearthed my sewing machine, I can have a rummage through the fabric mountain and make a few more.
It’s two years since I last made a hallowe’en costume for Milly, so I thought I’d better fulfil my role of Aunty Who Sews, and make another one!
My Mum spotted a knitted pumpkin hat in a magazine, which is what gave me the idea to make a matching pumpkin dress.
This is Butterick 3772, in orange polycotton, with black felt for the face. I think it’s the third one of these that I’ve made now. This one’s fully lined, partly because the fabric’s quite thin, and partly because I wanted to bag out the hem to create a puffball effect. The lining was cut about an inch shorter at the hem, and about an inch narrower on each side. The top layer was then gathered to match, and the difference in length between the inside and the outside pulls the seam underneath. It’s not quite as puffy as I’d have liked, but I think it will look very cute!
And now, at long last, we have a moving date! After months of waiting, we’re making the move next Friday! Eek! So, this is the last thing I’ll sew (by machine, at any rate) before we move. My task for this afternoon is to pack up the machines, and start shoving the rest of the contents of the Shed into boxes. Wish me luck!