William Morris Envy

clothes in William Morris fabrics

I’ve seen quite a few adverts around the place for the new H&M William Morris collection, and I have to admit that I was extremely tempted. I mean, who doesn’t love a fancy blouse with a William Morris print? 

I had a little look online and picked out a couple of cotton tops that I thought would look good with jeans, and that I’d wear a lot. Then I tried to buy them and discovered that all of the larger sizes were already sold out, which was very disappointing. 

At the weekend I was actually in H&M for the first time in about a year (buying a pair of sparkly tights because, with the best will in the world, I can’t make those!) and I completely forgot to even look at the William Morris range while I was in there. Oops.

When I realised, I thought “I don’t need H&M! I can buy some Willam Morris fabric and make my own!”, so off I went to Ebay to have a look for some curtains or duvet covers or anything that I could turn into a dress or a top. Because it’s so popular it turns out that, even second hand, William Morris products are rather pricey. I ended up being outbid on a pair of torn and mildewed curtains (the only thing I could afford!) by 50p, which was anoying, but just as well because… 

…when I looked in my wardrobe I realised that I HAVE A WILLIAM MORRIS TOP ALREADY! 

There it is, on the right. A beautiful Strawberry Thief print, on Liberty tana lawn, in a gorgeous purple and mustard colourway. 

In all my excitement of “I MUST HAVE A WILLIAM MORRIS BLOUSE”, I’d completely forgotten that I already have one. And it’t not even something that’s been hidden away in the back of my wardrobe for ages – I wear it all the time! 

Oops. 

I was going to set up a search on Ebay so that if they do turn up second-hand in a few months, I’d be ready and waiting.

And then I thought, you know what? How many William Morris tops does one woman need? Is it more than one? For me, right now, perhaps it’s not. 

(I still want one though. Because apparently I am definitely not immune to marketing, no matter how hard I try!)

Something a little bit different

eternal magpie vintage style boucle jacket

Remember the cardigan I made recently, from Simplicity 1319

And you know that moment when your husband asks whether you can make a birthday gift, needed in just a few days? (No? Just me?)

Well… here’s another one! A jacket version this time.

My husband chose this fabric and, for the record, I would like to state that I am never letting him choose anything ever again. Or at least, if he chooses a heavy stretch polyester bouclé, I’m going to tell him exactly what he can do with it. 

eternal magpie vintage style boucle jacket

I’ll confess that I allowed him to get away with his choice because I knew I had these buttons lurking in the stash. They’re iridescent glass, and they pick up the traces of pinky-lilac hiding in the fabric absolutely perfectly! 

Despite being a bit grumbly about the thickness and the bumpiness of the fabric, and the general unwillingness of my scissors and my sewing machine to deal with it gracefully, I’m very relieved to say that it pressed well, and it’s turned into a really nice – and definitely striking – jacket.

Working with such thick cloth has made me want to try out a winter version for myself, maybe in a nice rich tweed. Perhaps not in August though… 

Some you win, some you lose…

eternal magpie tie front organic cotton cardigan

I had a very small piece of the spotty/stripy organic cotton jersey left over, so rather than re-burying it in the depths of the stash never to be seen again, I thought I’d use it up straight away. 

This top is loosely based on Burda pattern 7107, which appears to be out of print. I say “loosely based” partly because I didn’t have quite enough fabric to make the tie as long as the pattern required, and partly because I read the instructions and then completely ignored them. 

eternal magpie tie front organic cotton cardigan

I wanted to make a little summer wrap top that would tie under the bust, to add a bit of shaping to the dresses for those of us that suit a higher empire waistline. So far, so good! It does that beautifully, I think. 

Unfortunately, despite checking the measurements three times, and cutting out the biggest size on the pattern… it’s too small for me. The two sides of the front don’t meet, let alone wrap, which is really disappointing as it’s otherwise absolutely perfect!  

eternal magpie tie front organic cotton cardigan

It’s pictured here on my lovely mannequin who is wearing a size 8-10 dress, and measures 88cm (34¾”) around the fullest part of the bust. As you can see, the fronts now wrap over by a couple of inches, and the ties are just long enough to knot at the back if you don’t want them hanging down at the front.

eternal magpie tie front organic cotton cardigan

I’ve popped this one into the sample sale, so that someone smaller than me can pick up a bargain! 

What do you think though? As tops go… is this the sort of thing that you’d like to wear over one of your summer dresses? 

I’m definitely going to have to draw up a new pattern for something in this style – not least because I want to make one which actually fits me! 

Sewing for Myself: Organic cotton 1950s-style cardigan

eternal magpie organic cotton vintage style cardigan

So many people sent messages when I entitled a blog post “selfish sewing”, protesting that sewing for myself rather than for stock wasn’t selfish in the slightest… so I’m going to call this one “self-care sewing”. 

I’m going to a local business seminar, and I’ve been stressing out about it. (Nothing to do with the seminar itself, everything to do with having been ill for a few days on top of my usual fibromyalgia/endometriosis/colitis combination.) I knew that if I spent today worrying about it I’d end up making myself too ill to go, so I needed a project completely unrelated to work, to take my mind off it. 

Enter this cardigan which, contrary to appearances, is actually a 1950s jacket! 

Simplicity 1913 reproduction vintage pattern

The pattern is Simplicity 1319, a re-issue of an original 1950s design. This is actually the long version, view A, although it only sits an inch or two below my waist. I wilfully ignored all of the recommended fabrics and pulled out this organic cotton jersey from my stash. It’s two layers knitted together – the little white spots are a single stitch pulled through from the striped layer. Because I knew that the facings would show, I decided to reverse the fabric to make the most of the two different sides. 

I decided to fix the folded-back front facings in place with two vintage buttons, also from the mountainous stash. The photo is actually a bit misleading – the hem of the facings doesn’t bag like that when there’s actually a person inside the cardigan! If I’d followed the instructions and lined the jacket, the facings would have formed a sort of a pocket – not secure enough to put things in, but a place to rest my hands. I may yet go back and cheat that with a bit of topstitching… I’ll see how it goes.

I think this cardigan will be perfect to wear in this sort of peculiar in-between weather, where it isn’t warm enough for a jacket, but it might turn out to be a bit breezy in the shade. It also feels a bit smarter than some of my knitted cardigans, making it an excellent piece of “smart-casual” wear. I’m going to wear it to the seminar… hopefully I’ll learn something useful while I’m there! 

Outfit post: smock tops

cat print handmade smock top

These two smock tops fall firmly into the category of “things I wasn’t quite sure about to begin with, but it turns out I wear them all the time”. 

I bought the one above in March, from a local charity shop. I saw the fabric, which is gorgeous little cats in orange and khaki green, saw that it was my size, paid the £2 (TWO POUNDS!) and grabbed it. I could see that it was hand made, but it wasn’t until I got it home that I realised it was also faded, stained, and mended. Honestly though? It’s so lovely, and so comfortable, that none of those things really matter too much. You can’t see the details on this fuzzy phone selfie, but at some point I’ll show you the damage, and what the original owner and I have done to repair it. (There’s a patch over a hole right on the front near one of the pockets, but it’s so beautifully done that I have to look twice to find it every time.) 

organic cotton and bamboo striped smock top

This one I made, a few years ago. The fabric is a gorgeously soft bamboo and organic cotton blend. I tracked down the pattern on Etsy, having seen a picture of it on a “WORST SEWING PATTERNS EVER” board on Pinterest… so that should tell you something about my fashion sense! 

I have to confess that I’m awkwardly holding the flowers because, thanks to an appalling oversight (also known as running out of fabric), this one doesn’t have pockets, so I needed something to do with my hands. 

What I particularly like about these tops is that they’re really versatile. As you can see, in the first photo I’m wearing the smock top over jeans (Monkee Genes Emily style) and a long sleeve t-shirt (Gossypium). In the second photo I’m wearing a pair of navy shorts that used to be my work uniform, but have turned into really useful summer wear since I left that job! I’ve also worn the stripy one over long dresses, and I can see it being really handy for the beach, so they’re really useful all year round.

Selfish Sewing: summer blouse

eternal magpie white summer blouse

I decided to take advantage of a day to myself over the Bank Holiday to indulge in a bit of Selfish Sewing – in this case a lightweight summer blouse. I get sunburnt very easily (many years of medications have left my skin photosensitive, plus I’m allergic to every type of sunscreen that I’ve ever tried), so I need something with long sleeves that I can pop on when the sun comes out which isn’t going to leave me boiling hot! 

eternal magpie white summer blouse

Enter this blouse, which I have to say is made from the most frustrating fabric that I’ve worked with in a very long time! It’s been lurking in the stash since before I made the decision to use only organic and recycled fabrics. It’s a white spotted cotton lawn, with a cream floral print over the top. What I didn’t realise when I bought it was that the floral print is actually some kind of plastic. So the cotton lawn needs a fine needle and a nice hot iron… but the plasticky print needs a heavier needle and a cool iron. Nightmare. Usually I’m an advocate of ironing your clothes to keep them looking lovely. Sadly I’m just going to have to wear this one crinkly, because even inside out and with a pressing cloth, the fabric has left gunk all over my iron. Grrrr. 

eternal magpie white summer blouse

Anyway! On a cheerier note, I’ve been wearing it for a few hours now, and it’s really soft and comfortable. I particularly like the details – the back fastens with an elastic loop and a vintage flower button, and the sleeves are trimmed with vintage Austrian lace. 

Speaking of the sleeves… I can see some of you cringing at them from here, but I have to confess that I absolutely love a massive puffy sleeve. The pattern for the top is New Look 6471, view D, with the front lengthened to match the back. The sleeves I copied from Simplicity 5645, a pattern from 1982, as I didn’t think the original ones were enormous enough! The lace trim and the elastic cuffs were made up as I went along. The elastic is designed to be loose at the wrists, but just tight enough to stay put when the sleeves are pushed up to the elbows. 

Apparently the weather’s going to stay warm and sunny for the next few days, so I should have plenty of opportunity to give this top a good wear and see whether it does its job!

“Fun-time Ensemble” part one…

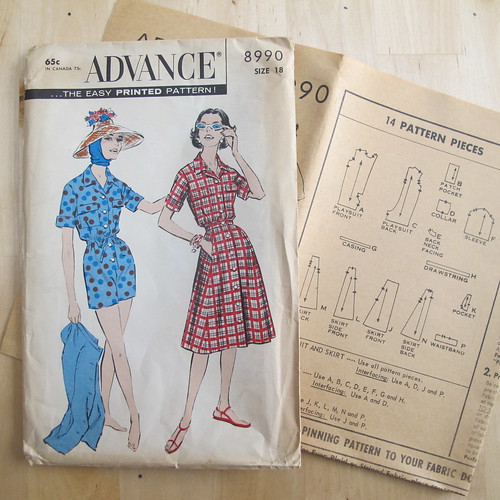
Advance 8990

Say hello to the lovely ladies of Advance 8990 – a 1959 pattern for a playsuit and skirt. I did have a momentary pause about making what is, after all, a glorified onesie, but it looked like a useful garment for wearing in the heat. I like that it’s quite a formal-looking romper, what with the collar and turned-back sleeves, but I particularly like the idea of popping a matching skirt over the top so that you’ve instantly got a nice smart dress!
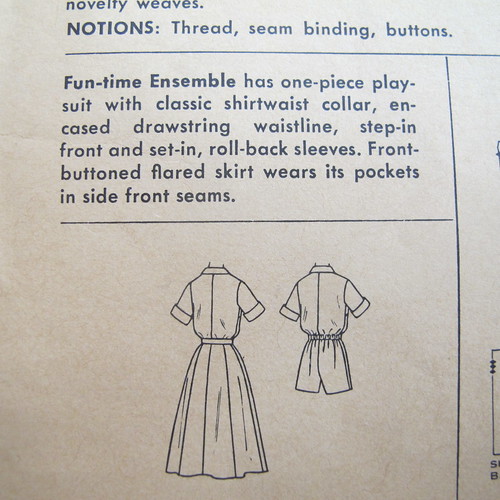
Advance 8990

I asked for Paul’s opinion (as I usually do) before I bought the pattern, and was met with an emphatic shaking of the head. Oh dear. To be honest, I think he was put off by the rather alarming hat-and-balaclava combination, which I definitely won’t be attempting to carry off! But honestly. How could I possibly resist a pattern that describes itself as a “Fun-time Ensemble”? I’m only disappointed that it doesn’t list “novelty prints” amongst the suitable fabrics. (Rest assured though – a novelty print version will be forthcoming at some stage.) It could only be better if it had a raglan sleeve.
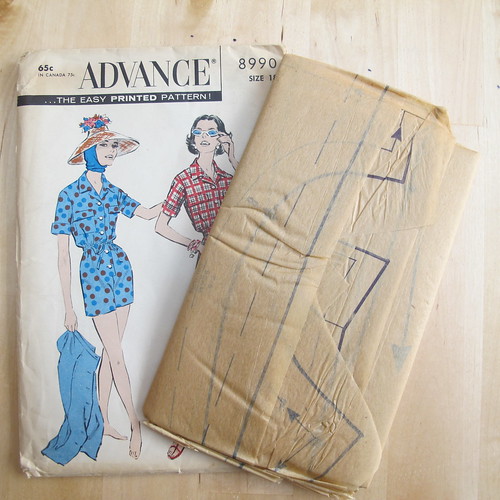
Advance 8990

I was quite excited to discover that the pattern, despite being 56 years old, was actually brand new and still in its factory folds! Unfortunately, it looks as though it perhaps hasn’t been stored in the best conditions, because the paper was incredibly fragile – more so than any other vintage pattern I’ve come across so far. I managed to tear the pieces several times as I was unfolding them and cutting them out, so I think drastic measures are going to be called for. I expect to be using this pattern more than once, so I think I’m going to iron the pieces onto some lightweight interfacing to stabilise them. I know this will effectively destroy the original pattern, but it’s in such poor condition that it’s pretty much ruined anyway. Normally I’d trace the pieces onto stronger paper, but the originals are just going to fall apart in the envelope, so I might as well make sure that I can use them for the purpose for which they were intended.

(The museum/conservation person in me is writhing in horror at the prospect of ironing these pattern pieces onto adhesive interfacing. But I do believe that these things are made to be used, and this particular example is no longer of a quality worth trying to preserve in its original state. So, I’m doing it anyway.)
Advance 8990

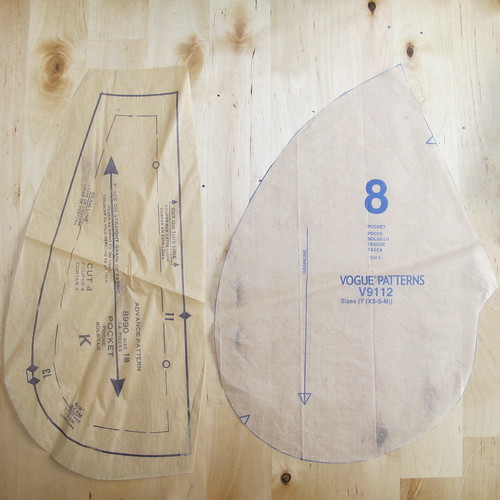
According to the envelope, the “Front-buttoned flared skirt wears its pockets in side front seams.” I spent ages looking for the pocket pattern, thinking that the piece on the left was some kind of cuff or trim. Nope – it’s the pocket. But it’s tiny! The innermost dashed line marks the seam allowance, which will be the finished size of the pocket – and I can’t even get my hand inside it! What were the designers thinking?! I don’t know what the lady of 1959 was expecting to be able to keep in there, but it must have been very small.

When I make the skirt, I’m going to substitute the pockets from my new Marcy Tilton pattern, Vogue 9112. You know, ones I can actually fit my hands into. I’ll probably add slightly smaller pockets to the playsuit as well, just because. You can never have too many pockets.
Advance 8990

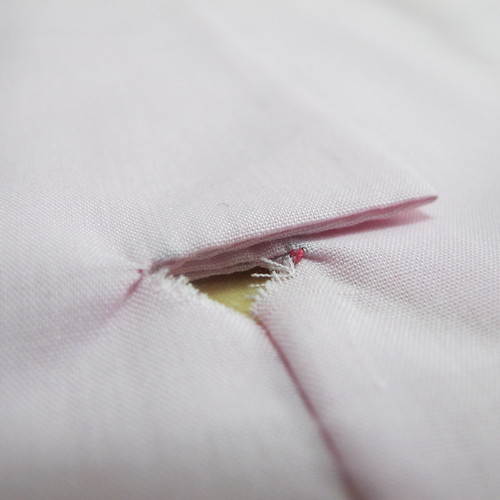
I have to say that the instructions for this pattern are pretty sparse. They basically say “cut out pieces; make playsuit”. So when I followed an instruction that said “clip to small dots”, I did so… but apparently in the wrong direction. This extremely neat little triangular hole is at the bottom of the front placket. I can patch it so that it looks deliberate, but it’s not the best place for a hole in a pair of shorts, really! I will now be annotating the instructions on a separate piece of paper, as I go along.
Advance 8990

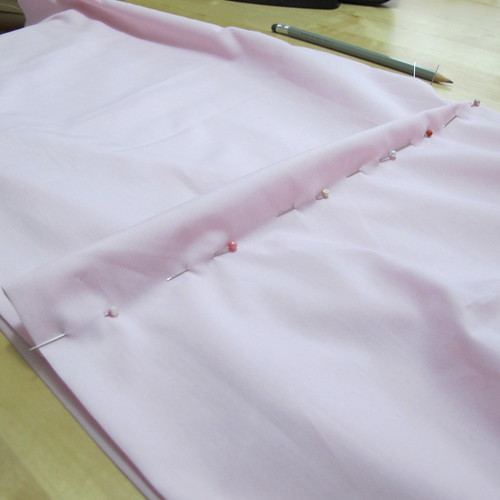
This attractive pale pink poly-cotton was just a piece of left-over fabric sitting in the stash, and I’m very glad that I decided to use it to try out the pattern before cutting it out in decent fabric! These pins represent a slightly unusual alteration, in that I’m taking 6cm out of the length at the too-long centre front, and then tapering it out to nothing at the side seams because the back is the perfect length.

I was a bit confused about this at first – how could the back length be fine, but the front be far too long? However, I think what I’m actually doing here is making a sway back/big bum alteration in reverse. Normally I’d expect to lengthen the centre back to create extra room, but I’d also expected the playsuit to be too long overall, because I’m very short in the body. As a result, the back is fine as it is, which makes the front too long by comparison. It’s all very complicated!

The only other alteration I’m going to need to make is to add a couple of inches of width at the hips. The shorts fit, but they’re quite snug, and it looks a bit out of balance with the rest of the garment being so loose. Adding a little bit of extra ease will give me the space to include the pockets, too.

I have to admit that the temptation to run down to the local fabric shop and snap up five metres of lots of different cheap novelty-print cottons is very high. But I do have some fabric in the stash that I can use up first, and I’m still trying as hard as I can not to buy non-organic cottons. We’ll see how long my resolve lasts.

Making Do and Mending

IMG_3999

Well, isn’t this irritating? One freshly-dyed white t-shirt (Dylon Rosewood Red, not as lurid as it appears in these photos!) complete with stain that, annoyingly, wasn’t visible when the t-shirt was white. Now that the t-shirt’s dyed I can’t use a stain-removal product or scrub at the fabric, as that will most likely take off the dye as well as the stain. My only option now is to cover it up with something.

IMG_4002

That’s better! A bit out of focus, but these are floral motifs carefully snipped from a small piece of Lancaster & Cornish organic cotton lace. I’m hoping there might be just enough loose dye still in the fabric that a little bit of it leaches out into the lace the next time it’s washed, just to soften the cream colour a little bit. But if that doesn’t happen, no worries, because the cream lace makes the white stitching on the t-shirt look as bit more as though it’s supposed to be white on purpose.

Knowing that the stitching wouldn’t take the dye was the main reason I chose the colours I did for dyeing my trousers – beige to dark brown, and pale blue to dark grey. With the contrast stitching they just look like smart, lightweight jeans. I also have plans for mending all of my funny-coloured trousers in the future. I’m on the look-out for small pieces of Liberty print fabrics that I can use for patching, and maybe for adding a hint-of-a-print on the turn-ups. Hopefully that will be a long way off yet though!

IMG_4004-1

While I was mending things, I made the decision to take two of my most beloved t-shirts out of my wardrobe. This Suzanne Vega t-shirt is from the very first gig I ever went to – at the Wulfrun Civic Hall in Wolverhampton, on April 8th 1993. (We were sitting three rows from the back, and Suzanne Vega had a cough.) Having been worn pretty often over the past 22 years, although recently relegated to hospital wear or pyjamas only, it’s safe to say that this t-shirt is very much past its best! But there was no way on earth I was going to throw it out, and it’s really not fit to give to a charity shop, so it was the work of about five minutes to turn it into a cushion. The tour dates are on the back.

IMG_4005-1

The same fate befell my other favourite t-shirt, also purchased in 1993, this time from Forbidden Plant in Hanley. I didn’t own any other green clothes, and it was far too big for me (being a men’s size XL), but I just had to have it. It saw me through art college and University, but again, it’s not even really fit to wear as pyjamas any more. But, because it was still in my wardrobe, it kept mysteriously finding its way out and onto my body. Drastic measures clearly had to be taken. So, cushion it is.

(No, I don’t iron my bedding. Sorry, Mum!)

Making these two cushions from my favourite t-shirts has made me wonder though – are there any items in my current wardrobe that I can imagine myself still wanting to keep in 22 years’ time?!

Not quite a pillowcase top

3567474842_c24e9f131d_z

Still feeling inspired by the Great British Sewing Bee, this time the alteration challenge to create something from a pair of curtains. I’ve done a fair amount of fabric recycling in the past, from curtains, duvet covers, and end-of-roll fabrics. The tunic dress above was made from a gorgeous brand new vintage bed sheet, and I was able to use the border print along the hem.

IMG_4929

I was suddenly inspired to make a little cropped layering top, that I could fit onto just a pillowcase-sized piece of fabric, so I opened up my pattern drafting software and came up with this. Sadly it doesn’t fit onto a pillowcase, because I hadn’t taken into account the actual size of a pillowcase when I was working on the design. Oops. It does however fit onto a single metre of fabric, so it’s a very economical little top.

This prototype version is cut on the bias and has a seam down the centre front and back. The only reason for that is because the pieces were cut from the skirt of a dress that I made years ago, and never wore, so it’s still fabric recycling in that sense. It would definitely look better without the seam, and in this type of fabric I don’t think having it on the bias really makes all that much difference.

IMG_4931I’d originally envisaged wearing this with trousers and a long-sleeved t-shirt, or maybe over a camisole top in the summer. When I had a rummage in my wardrobe though, I spotted this empire-line dress and thought they’d go really well together!

The top is designed to be reversible, with the v-neck at the front if you have a pretty necklace to show off, or at the back if you have, say, a lovely tattoo, or perhaps you just prefer the higher neckline. This one is finished with some vintage nylon lingerie trim, but I can also imagine it with very fine organic cotton lace. In fact it would look lovely with some deeper lace around the hem as well.

10406953_10152469716633829_8661130960669008137_nIn fact, way back in May, I bought a little pile of organic cotton fabrics, most of which are about a metre in size. The bicycle print and the matching spots have been turned into a tunic for a friend, but all the others are still sitting in my stash. I think I might have just discovered what to do with them!


A quiet month

1970s dress

Oh dear, I do seem to have got out of the habit of blogging again lately. I’ve just been feeling a bit… quiet. Which anybody who knows me will be aware, isn’t very much like me at all. I’m somewhat lacking in creative inspiration, and I’m feeling a bit fed up about it, and not really sure quite what to do with myself.

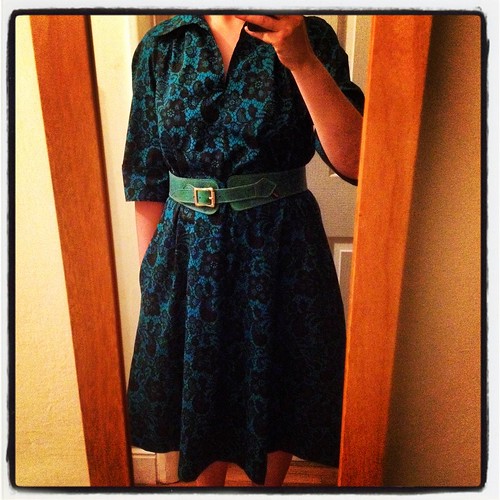
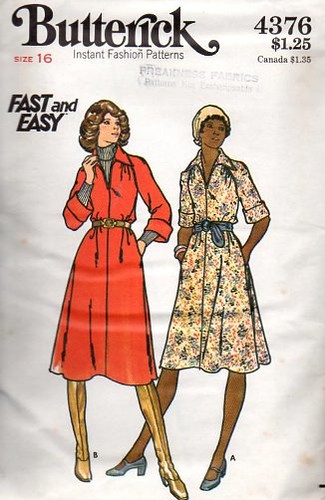
Still, the odd bit of making is happening. This is the result of Butterick 4736, the 1970s dress pattern I mentioned last time. I’ve been wearing it quite a lot, and it’s really comfortable. One person did ask me whether it was vintage or reproduction (both, I guess?), thanks to the enormous collars, but I have to admit I rather like them.

1970s Butterick 4376

I made the shorter length which, being a not-very-tall person, is pretty much spot on. I keep half wondering whether I could cut it off at hip level to make a blouse, but I’m not quite sure that would work. I need to dig out a piece of fabric that’s not quite long enough to make a whole dress, and see how it comes out.

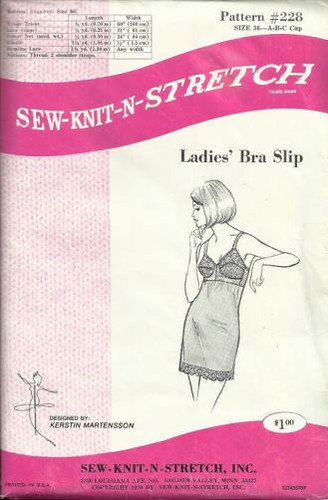
1960s Sew Knit N Stretch 228

I have also made this bra slip, and against all odds it fitted perfectly! Straight out of the packet! While I was rummaging around in the sewing room I found a forgotten bra-making kit, which had just enough fabric and elastic to make the top half. A quick dash to the fabric shop later (the princely sum of £2.14 having exchanged hands) and I had a metre and a half each of polyester habutae and nylon lace to make the bottom half. It’s the perfect length to go underneath the 1970s dress, and now that I’ve established the fit I can make more in some nicer fabrics. I’m thinking stretch silk, and maybe some soft jersey versions to wear as vests.

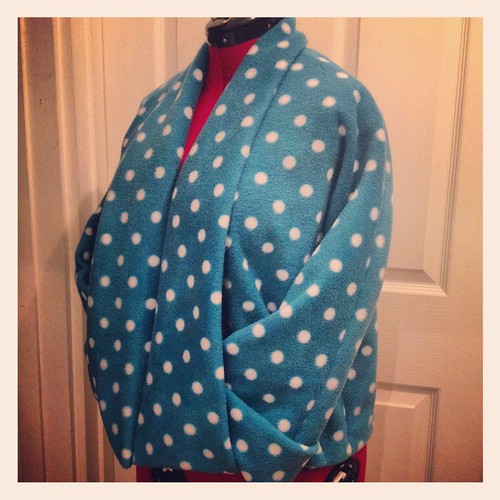
fleece jacket

Oh, and then there’s this. Inspired by a knitting pattern I saw on Etsy, where the collar folds back to make pockets, I put together this fleecy jacket. It looks a bit too much like a dressing gown in this spotty fleece, but once I’ve ironed out some technical hitches (I made a mistake on one of the lining pieces, so it doesn’t fit together quite right) I can feel quite a few versions of this one coming on too. It has wide kimono sleeves, which means that the sleeves of my dresses will actually fit down it – currently a problem, as all of my existing cardigans were bought or made to go over t-shirts!

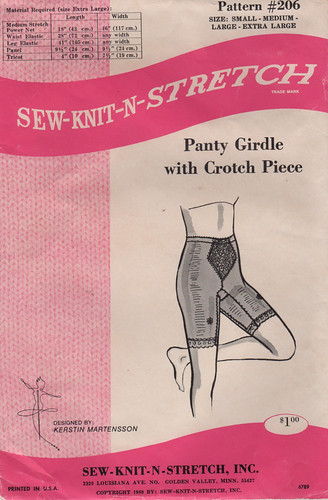
Sew-Knit-N-Stretch 206, 1969

And then, to add to my increasingly glamorous collection of old-fashioned underthings, there’s this. Currently on its way to me from the US, it’s a 1969 pattern for a long-leg panty girdle “with crotch piece”. This is important, as the opposite of “with crotch piece” is not “crotchless”, it is in fact “with a godawful seam in a terrible place”. Which is why I don’t wear ordinary cycling shorts underneath my dresses. So uncomfortable! These shorts can be made from a variety of materials, depending on how restrictive you want them to be. I’m aiming more for comfort than shapewear, so I’m thinking about cotton jersey, and maybe just the faintest whiff of lycra for the front panel. I’m quite interested to see the instructions for these, as the directions for the bra slip were quite minimal. I’m hoping this one’s a bit more thorough.

I think I’m finally starting to get somewhere with my new-old wardrobe though. I’m still very tempted by beautiful 1950s dresses, but it’s looking very much as though the 1970s are actually much more me!