Meet Lucinda

Pronuptia Lucinda, 1983

Say hello to “Lucinda”, one of Pronuptia‘s finest wedding dresses of 1983.

I’d been looking on Ebay for a while for a stereotypically 1980s wedding dress, the bigger and the pouffier the better, but somehow I always seemed to end up being outbid by 15p at the very last minute. I had a look in charity shops, but everything they had was too nice, or too far out of my very limited budget.

So, I asked around on Facebook, and a photographer friend said he thought he might have something appropriate lurking around in the garage, from a project that had never come to fruition. He sent it over to me, and it turned out to be perfect!

Pronuptia Lucinda, 1983

It’s a perfect example of 1980s-does-Edwardian, and being a Pronuptia gown it’s really well made. Okay, yes, it’s really well made from 100% nylon (lovely!), but that means it’s survived a trip through the washing machine, and has come out looking great. And best of all, as you can see by the mannequin, the dress is an absolutely perfect fit. I couldn’t have asked for anything better!

There’s a little bit of damage to the bottom ruffle – a hole at the back, and a couple of places where the lace is coming away. There’s also some staining on the lining of the train, where the dress has obviously been wet at some stage… and there’s a mark on the front of the skirt, that might be wine, or might be gravy!

Clearly this dress has had one very good day in its life, but considering the dated style and the damage, I can’t say I feel too bad about making some slight alterations. Details will follow later, but what I will say is that this is for a photo project of my own, mainly involving messing about in the woods in a big white dress. After I’ve taken the scissors to it, that is.

(Oh, and if you fancy a bit of a giggle, Pronuptia have digitised 60 years’ worth of their catalogues, and made them available online!)

Do you wanna build a snowman…?

IMG_2817

As someone with an almost-four year old niece, it was inevitable that Aunty Claire was going to get the call at some point. I was half-expecting a request for a Princess Elsa dress for her birthday, but it turned out to be a slightly last-minute Anna cloak to wear to a Frozen-themed party. So, I leapt into action, dashed down to the fabric shop, managed to grab the very last of the purple pom-pom trim, and set to work!

IMG_2906

The finished cloak was a bit on the big side, but thankfully very well received, despite not being quite as screen-accurate as I normally like my costumes to be! The silver clasp at the neck worried me a little bit – I was concerned that Milly wouldn’t be able to fasten it easily, or might be hurt if another child pulled on the cloak or stepped on it. So Paul cut off the hook and loop, filed them down smooth, and I sewed on the two pieces as decoration only. The cloak fastens with a piece of velcro, so it will come apart quickly if necessary, and Milly can easily dress herself.

IMG_2117

This one is Milly’s somewhat delayed Christmas Dress. She’d finally grown out of the pattern I’d been using since her first birthday, so this is a new one – Butterick 5876. I have to say that I don’t really recommend the pattern. It does make a lovely dress, but the finishing techniques, for a garment that’s going to be outgrown in a matter of minutes, were frankly bonkers. Lots of mucking about with facings and hand stitching around the arms, that could have been accomplished so much more quickly and easily with a bit of bias binding! Next time…

IMG_2897

The only alteration I made to the pattern on this occasion was to significantly enlarge the pocket. Honestly, what’s the point of a silly little pocket that even a three year old can’t get her hand into? As you can see from this picture, the pocket was full of jelly beans. And Milly had her face painted like a cat, to match the dress – how cute is that?!

IMG_2907

And here is a tiny piece of evidence that my niece is very much a child after my own heart. Fancy dress costume, pretty party dress, giant stompy boots underneath. Excellent!

Me-Made May 2014

1956 Shirtwaist

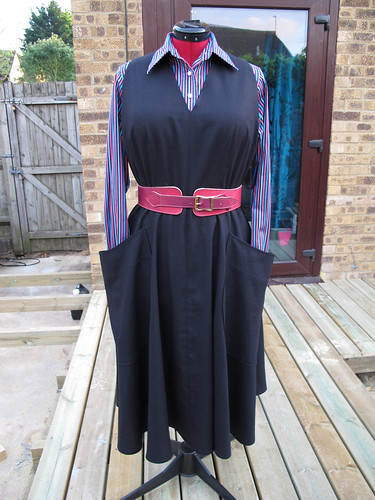
This dress (a 1956 Advance pattern) is almost complete, it just needs buttons and buttonholes. (And a placket and a couple of snap fasteners.) I’m making it for a purpose – there’s a 1950s night coming up at work, and I wanted to be properly attired. It’s got me thinking though (always dangerous) – once it’s been out to the Vintage Night, will I actually wear this dress again? Of course I want to say yes. I love the fabric, I love the style, it fits me very well… but my dressmaking history reveals that there’s a strong chance of it just living in the wardrobe and only coming out for Dressing Up Occasions.

October 2012

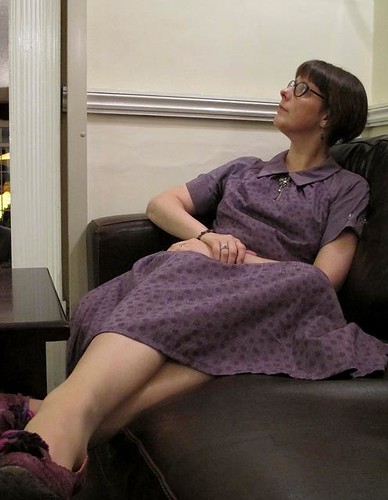
This one (Simplicity 1755) was made in October 2012, for a friend’s wedding. It’s been worn precisely once since then, to a smart-ish occasion at work. It’s comfortable, it’s soft (I saved up for ages to buy the bamboo and cotton blend fabric), it has my favourite raglan sleeves, it even has pockets. It would take me precisely two minutes to replace the annoying hook and eye at the front collar with a few stitches that would prevent it from popping open all the time. And yet it sits in the wardrobe, unloved.

March 2013

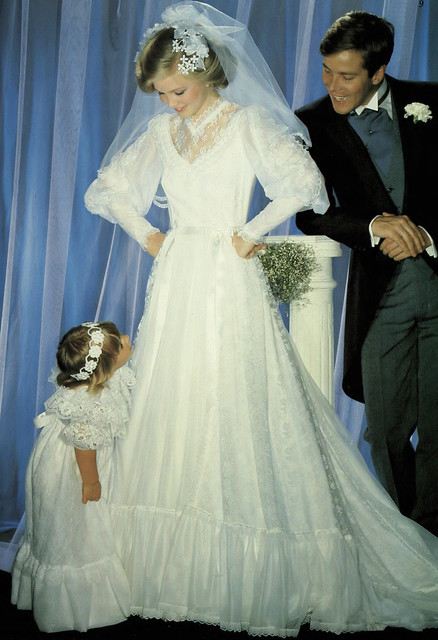
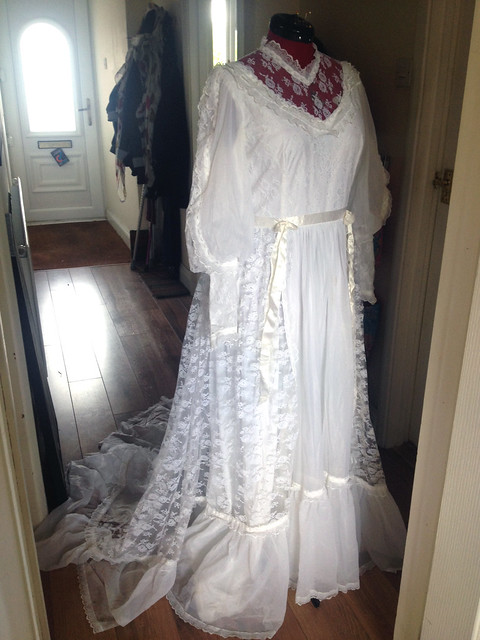
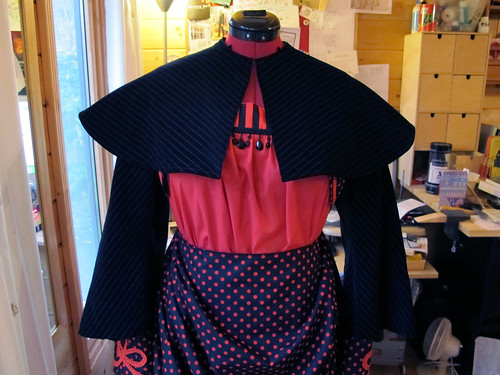
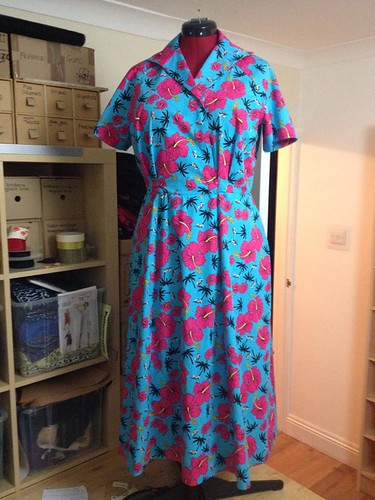
I made this dress specifically to wear to a 1940s event (although it’s from a 1950s pattern), but the combination of the fabric being a bit too stiff and Paul telling me that the print looks like curtains has put me off it entirely. I don’t think this one’s ever been out of the wardrobe except for this single occasion, and it’s currently hanging on the back of the sewing room door waiting to be chopped up and turned into zipped pouches and headscarves. Particularly frustrating, as I went out of my way to find a vintage pattern in my size (1950s 18½, as it turns out), and I put a lot of effort into the hand-stitched buttonholes, covered buttons, and french cuffs. The knitted turban though, which I was still sewing together minutes before we left the house for the day, has actually been worn a lot.

Simplicity 3968 (1952)

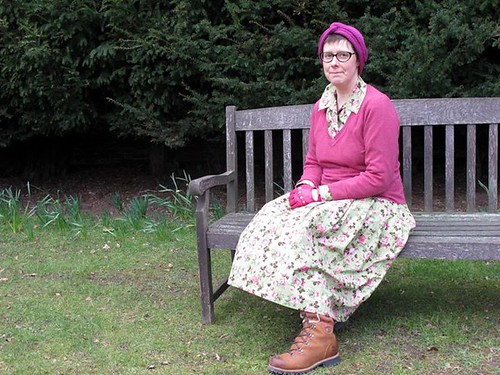
Even this 1952 pinafore, which I absolutely LOVE for its frankly ridiculous pockets, has only been out of the wardrobe a couple of times. In this instance it’s because the fabric is a linen blend, and there’s miles and miles of skirt to iron before it looks smart enough for work. (And then I sit on the bus for half an hour to get there, and immediately scrunch it up again!)

So what do I actually wear, if I’m not wearing these? Well, mostly I go to work wearing a pair of cord trousers, a jumper and a big scarf. Maybe leggings and a jersey dress. (And a big scarf.) At home I usually pootle about in the World’s Oldest Jeans, and one of the very long jumpers that my Mum knitted for me about twenty years ago.

February 2011

Otherwise, I wear this. Admittedly I’m not usually festooned with small parrots, but I made this coat in the summer of 2009, and it’s been worn endlessly since then. The silk yarn for the hat was a wedding gift, and the resulting Wurm (Silk Wurm, get it? *groan*) has barely left my head. Also featured: the ubiquitous hoody, and of course a scarf. Every now and then I think I should make myself a new coat, but the thought of not having this one is somehow a bit too much. I think I’m going to have to look out for some more pink spotty needlecord, so that I can replicate it when it finally does wear out.

So, back to ME MADE MAY, which was allegedly the point of this post!

I do actually wear at least one item of clothing that I’ve made myself (even if it’s only a knitted hat) almost every day, so that in itself won’t be the challenge for me. What I want to do is pay more attention to the handmade items that I do and don’t wear, and to try and understand why.

Is it too uncomfortable? Did I make it for an occasion that simply doesn’t come around very often? It is too cold to wear for work, too restrictive to wear for a long time, does it make me feel as though I’ve accidentally left the house in fancy dress? Did I make it for myself, or for the Imaginary Claire in my head who’s twenty years younger, two stone lighter, and at least four inches taller than me? Did I actually want to wear this garment, or did I see the construction process as an interesting challenge?

Hopefully by the end of May I’ll have a clearer idea of the things I do and don’t wear, and the reasons why. Perhaps it’ll give me a good reason to get rid of some of the least likely to be sewn patterns from my stash… although it seems more likely that I’ll be inspired to buy some new ones!

Scary Little Pumpkin

Scary Pumpkin!

I was going to whinge on about how poorly I’m feeling (working day seven of nine today, half term holidays, should have taken the opportunity not to work the weekend when my boss offered it to me but I’m a sucker for agreeing to stuff), how frustrating the house move continues to be (blocked drains, compost heap full of dog waste, where have the removal men hidden my laundry?!), or how I haven’t knitted anything or checked my email for nearly two weeks (argh!!), but instead I thought I’d show you this lovely picture of my little niece being a scary pumpkin.

As mentioned when I made it, this is Butterick 3772, and I have to say it’s been a brilliantly versatile little pattern!

Milly's First Birthday Party

I made one for her first birthday, which she wore as a dress, and then as a top, until the armholes got too tight.

Milly & Me

I made another one for her second birthday, this time with an enormous pocket on the front.

The pattern has loads of cute variations, although I’ve only ever made the simplest version, with a bit of lace or an improvised pocket. (Or a puffball hem and a pumpkin face. As you do.) Up to age 3 you only need a metre of 44″ wide fabric which, given the size of my stash, is pretty easy to come by. You can squeeze the smallest size out of half a metre, if you use a different fabric for the facings. In fact, I only used a metre for the pumpkin version, which is fully lined.

To be honest, it’s such an easy dress to make that I feel like a very bad aunty for not making more! Maybe once I’ve unearthed my sewing machine, I can have a rummage through the fabric mountain and make a few more.

Milly’s Pumpkin Dress

Milly's Pumpkin Dress

It’s two years since I last made a hallowe’en costume for Milly, so I thought I’d better fulfil my role of Aunty Who Sews, and make another one!

My Mum spotted a knitted pumpkin hat in a magazine, which is what gave me the idea to make a matching pumpkin dress.

This is Butterick 3772, in orange polycotton, with black felt for the face. I think it’s the third one of these that I’ve made now. This one’s fully lined, partly because the fabric’s quite thin, and partly because I wanted to bag out the hem to create a puffball effect. The lining was cut about an inch shorter at the hem, and about an inch narrower on each side. The top layer was then gathered to match, and the difference in length between the inside and the outside pulls the seam underneath. It’s not quite as puffy as I’d have liked, but I think it will look very cute!

And now, at long last, we have a moving date! After months of waiting, we’re making the move next Friday! Eek! So, this is the last thing I’ll sew (by machine, at any rate) before we move. My task for this afternoon is to pack up the machines, and start shoving the rest of the contents of the Shed into boxes. Wish me luck!

The History of Underclothes

This is my new favourite book. Originally published in 1951 (the Dover edition above is from 1992), it’s a detailed history of underclothes (the clue is in the title!) from the medieval period to the 1930s. The information is collected from magazines and catalogues, as well as museums and the study of extant garments.

The tone of the writing, as you might expect, is rather dated, and reveals perhaps more than the authors intended about 1950s attitude towards underwear! But the descriptions are invaluable, and extremely detailed.

I only wish that the book had continued to write about one more decade. At the moment I’m interested to learn about underwear of the 1940s – specifically the Utility Clothing Scheme. There’s quite a bit of information out there about CC41 clothing, but I haven’t turned up much about the underwear. Was it included in the brand? Were people expected to just keep wearing the same old worn-out underpants? Did many people make their own? I’m still at the “googling vaguely” stage of research at the moment, so if anybody has any links that might be useful, please feel free to share!

Velvet coat – almost finished…

Butterick 5266

Not the greatest photo ever – the combination of black velvet and a dark Shed is not the best – but I think you can see the progress on this coat! It has a body now, which is a big improvement on last week’s cape and sleeves. It’s still not quite finished – the hem needs, well, hemming, and it needs front fastenings of some kind. It also needs overlocking around the sleeves, and a jolly good pressing around the collar.

(Before anybody says anything, yes, I know the purple lining doesn’t go with the red outfit underneath. I wasn’t about to go out and buy another five metres of lining when I already had this purple in the stash.)

The saving grace of this project has been its simplicity. If it had been more complicated, there would probably be a lot more swear words in this post. As it is, I simply left out most of the tricky parts to make my life easier. The sleeves will be overlocked to the body instead of slip stitched. The fronts and neck and sleeve hems are topstitched rather than understitched. Where the lining came out a quarter of an inch bigger than the coat (at the sleeve heads and the hem, don’t ask me why!), I simply chopped off the difference and stopped worrying about it. I haven’t bothered with the fourteen metres of braided trim, or the openings in the front panels. Oh, and I left out the side seam vents too. Simple!

Having moaned on about the frustrating parts, I will concede that the sleeve heads eased into place beautifully, as did the collar. I’m now deciding how I want the front to fasten, and whether I’m going to add any kind of trimmings at all. I think I might need at least a little bit of detail on the ends of the collar, to make them stand out against the front a bit more. Paul’s suggested black frog fasteners and sequin trims, and I think he might be right.

Oh, and the poster in the frame, behind the dressform? That’s a little idea we had, that we’re hoping to turn into a reality!

Pinstriped velvet coat and cape

The tidy side

Remember when I bought this fantastic Ikea unit for the Shed, and tidied everything into neat little cubby holes?

Today I had every intention of making a hat. I had everything I needed laid out on the sewing table. Instructions, fabric, buckram, wire, lining, curved sewing needles… but no pattern. I knew it was in the Shed somewhere – most likely in the ever increasing pile of stuff I haven’t put away yet.

THE PILE

This is my (technically Paul’s) big comfy chair – where I can sit to do hand sewing. Except I can’t, because on the chair lives THE PILE. Anything that doesn’t have a tidy home yet, or anything that I’m going to “put away in a minute” tends to be dumped in the pile. I knew the hat pattern was in there somewhere, and I found it almost at the bottom – alongside the missing pattern for my niece’s dress. The last time I’d looked at either of those patterns was May. Eight months ago. Oops.

What you can also see overflowing from THE PILE is a mountain of pinstriped fabric. That’s about ten metres of cotton velvet, which I bought way back in the mists of time when I worked in a fabric shop. Scrunched up underneath it was the pattern for Butterick 5266, a pattern for a Victorian-ish coat with a cape. (Now out of print.) In my infinite wisdom, I decided that the best way to tidy this fabric and get it out of the Shed was to finally sew the dratted coat.

Cape and sleeves

So, I now have the cape part, and a pair of sleeves. Unfortunately I have also remembered how much I absolutely loathe sewing with cotton velvet. And the pinstripes aren’t helping either. They look great, but they’re printed onto the fabric rather than woven in, and they’re not printed on the straight grain. Which means that I have to choose either to follow the pinstripes or follow the grain. Not an ideal situation, particularly with velvet.

Pinstriped velvet

Isn’t this lovely though? That glorious moment when the pinstripes actually match at the seams as though I meant it, makes up for a lot. Unfortunately, it doesn’t make up for the frustrating way that velvet moves around when you sew it, even with the usually fantastic differential feed on my machine. So the pinstripes only match beautifully on one of the sleeves, and of course that’s the one where the fabric kept slipping as I was sewing in the lining, because the velvet was off the grain. And the sleeve that isn’t puckered around the cuff? The pinstripes don’t match up at all. Of course.

And that’s the easy bit.

The front and back panels are so big that they each have to be cut twice from a single layer of fabric. And then lined. I think from now on I’m going to ignore the instructions, and just leave out all the fiddly bits that could go wrong. No braid trimming, no side vents, no slits to put your hands through (what are they for anyway? the thing has sleeves!), no loops for the buttons – nothing. I’ll bag out the lining so it can’t slip around, and I’ll sew on enormous poppers with buttons over the top. Or buy frog fasteners.

It’ll be a few days before I can get back in the Shed to finish this off (my Real Job calls), but hopefully I can get this finished very soon. Then I can gleefully THROW AWAY* whatever’s left of the velvet, and rejoice in my decision to NEVER SEW WITH IT AGAIN.


*No, of course I won’t actually throw it away. I’ll give it to a charity shop, or donate it to anyone daft enough to take it off my hands after they’ve read this.

[edit] Well, Lisa of Off With Her Head has admitted to being daft enough – so when I’ve finished the cape, I’ll be sending her a big parcel. Look out for pinstriped velvet millinery, coming soon!

The right tools for the job.

Upholstery & Lampshade Needles

No, I haven’t been sewing upholstery or lampshades. But I did find myself in need of a curved sewing needle today, and I knew I had a packet somewhere. I hadn’t realised that they’d be older than I am! They’re in perfect condition, and they were just what I needed to sew through multiple layers of fabric that couldn’t be done by machine.

Pleats & Pins

I’m in the process of making a costume, which is going to be an extremely sumptuous ball gown. The starting point was my (first) wedding dress, which has been sitting in my loft for almost fifteen years. Thanks to an extremely generous seam allowance, I was able to let it out enough to make it fit again! I’m replacing the ivory skirt with a matching burgundy one, but  rather than dismantling the original dress I’m simply adding an extra layer of fabric. So this is five metres of satin, draped and pleated into place.

Clearly there was no way I could have even considered doing this kind of alteration using the sewing machine, but working by hand directly on the dressform (to maintain the shape of the draping as I worked) was rather awkward. Thankfully the curved needles were strong enough to push through all those layers as I sewed down the pleats, and the perfect tool for this kind of fiddly work.

Time permitting, I’m intending to make a matching hat. I have a feeling that these curved needles are going to come in handy again!

Vaguely Victorian: Part Two

Victorian-ish outfit

Here you go – for those who were wondering, this is what the vaguely Victorian outfit looked like at the end of a long day, in a lovely Victorian staircase hall.

Contrary to a few people’s concerns, I did not boil to death with so many layers of clothes on. The skirt was quite heavy, but the bustle was so comfortable I kept forgetting I was wearing it and trying to squeeze through spaces that were impossible to negotiate with such an enormous bottom!

At the end of the day I also learned that it is possible to run for the bus in a corset and bustle – although I wouldn’t recommend it! In fact it’s not the ideal outfit for bus travel generally. You can’t get upstairs, for a start, and I was a bit worried that the driver would ask me to buy two tickets for taking up so much room!

I must admit that, without the complicated underpinnings, I’d actually quite happily wear this outfit (or something very similar) to work on any old not-particularly-Victorian day.