All hats, all the time…

Felt cloche hat

Okay, that’s not strictly true, and I don’t even really know what I’ve been doing with myself over the last fortnight apart from working a lot and feeling a bit ill, but I have just finished a little flurry of hats, so here they are.

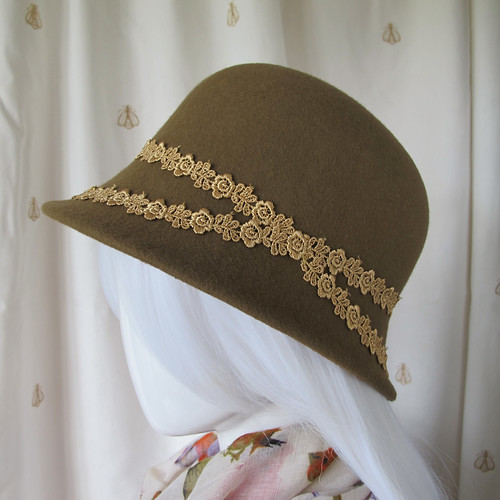
The one above is the colour of a perfect cup of builder’s tea, trimmed with gold lace that took weeks and weeks to arrive from China. I won’t be ordering that lace again, but I’m making good use of it while I’ve got it. This one in particular is very pretty, and I have enough left over for at least one more hat.

Felt cloche hat

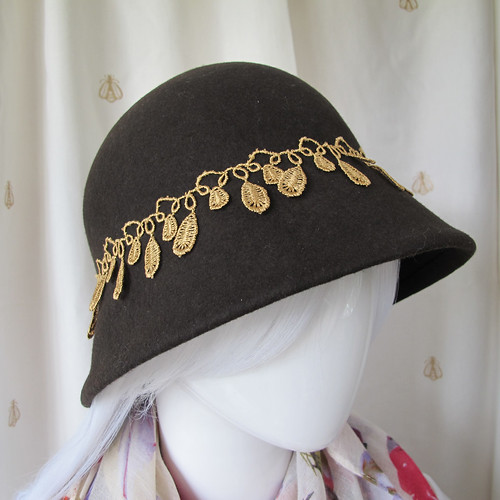
This one’s more the colour of coffee, or really good dark chocolate. This is also lace-from-China, which I’ve altered slightly from its original form. It had a segmented piece at the top which is designed to have ribbon woven through it, but in this case I preferred it without. The loopy bits are all couched down securely to the crown of the hat, but the teardrop shapes are left loose to allow a bit of movement.

I’m hesitant to describe these two hats as “Steampunk” just because they happen to be brown and gold, but perhaps they’ll be the perfect addition to somebody’s outfit.

Felt cloche hat

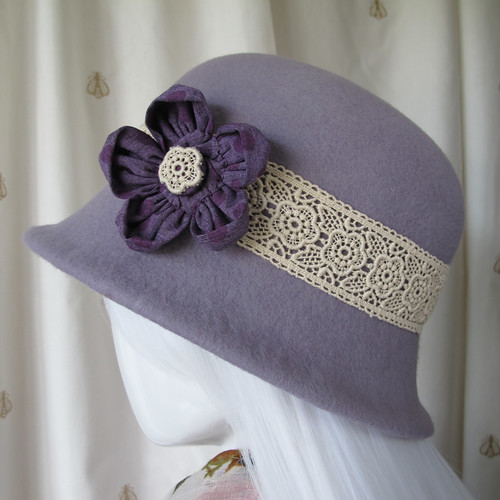
I wasn’t at all sure what I was going to do with this lavender coloured felt, and then I spotted this gorgeous organic cotton lace from Lancaster & Cornish. Okay, so it’s a lot more expensive than the Chinese lace (in this particular instance, fifteen times more expensive!!), but now I’ve worked with it I’m in no doubt that it’s absolutely worth it. The quality is amazing, it’s organically produced, and to be honest it’s just plain gorgeous.

The flower embellishment is also organic – a cotton and bamboo blend from the Organic Textile Company. I have quite a lot of little scraps of this fabric left over from a dress, so I can feel a few more of these flowers coming on – perhaps as brooches.

Felt cloche hat

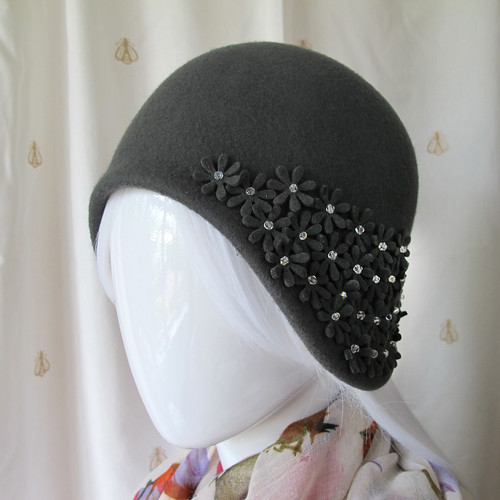
And this… this is what came off my new cloche block from Guy Morse-Brown. Isn’t it just gorgeous? I realise I seem to be singing my own praises here, but really it’s the hat block that does all the hard work, and Owen Morse-Brown (who makes the wooden blocks) has carved an absolute work of art. I’m in love with the asymmetrical shape, the way the crown hugs the head, and the cutaway at the back of the neck which makes it incredibly easy to wear. I’m keeping this one, and I’ll definitely be making more!

Felt cloche hat

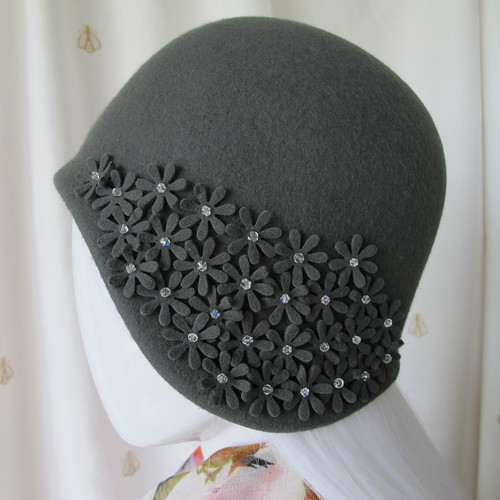
The flowers are made from the offcuts of felt that I trimmed away from the brim, and they’re cut out with Sizzix paper punches. It’s quite hard work to hammer the punches through the thick felt – they’re not really designed for that kind of punishment – but the flowers have come out with nice clean edges. The centres are Swarovski crystals. (I’m trying not to think about how much it looks like one of those flowery swimming caps.)

The hats are all on Etsy, should you fancy a closer look.

I’m now at that awkward stage once again where I need somebody to buy a hat (or a bunch of smaller stuff from the Emporium) before I can afford to buy any more felt hoods to make new hats with. It seems unlikely that wool felt hats are going to fly off the shelves in the middle of summer, but at least it’s not as though I have a shortage of other materials to make things from in the meantime. I have some carded wool batts on order to make some felt which will hopefully be heavy-duty enough for slippers or hats, I have lots of organic cotton to turn into tunic tops, and I have plans to make a few things for myself. Summer dresses, perhaps. I certainly won’t be short of things to do!

Another fuchsia pink hat!

Helen's Custom Cloche

This is the latest hat (almost) off the blocks – another fuchsia pink cloche with black guipure lace trim. I was asked to amend the shape of the back, so that it wouldn’t catch on the back of Helen’s coat collar.

Helen's Custom Cloche

As you can see, the cutaway flattened out a little bit once I’d added the brim wire, but I think it’s still a nice shape. Hopefully it will be shaped enough to accommodate Helen’s coat!

Helen's Custom Cloche

All I need now is a really nice button to finish it off, and to cover the join in the lace. (Where the pins are, although I was careful to make the join as discreet as possible.)

I’m looking forward to having a little more time on my hands when next month comes around, all this hand sewing is very slow. I lost the best part of a week to being ill, and I’m on a course with work this week, which is more sewing time gone, and I’ve got a backlog of hats waiting to be trimmed!

Don’t forget that all of the felt hats in the Etsy store will be going up in price at the end of the month, when the introductory offer comes to an end! I’ll try and get a few more finished before the deadline, so you’ve got plenty to choose from.

Louisa Harding Ginerva

Louisa Harding Ginerva

Issue 34 of The Knitter dropped though my letterbox a couple of days ago, and I was immediately smitten by this lacy dress pattern. It’s Ginerva by Louise Harding, and it’s so new that there are currently only 2 projects for it on Ravelry. (One of them’s mine!)

I decided straight away that I didn’t want to make a dress version, but a shorter jumper would be perfect. A few sums and a day later, I found myself in John Lewis buying two balls of Kidsilk Haze Stripe. This is the Forest colourway.

I’ve started with the sleeves. That way I can see how much yarn they take up, and then hopefully figure out how long I can make the body afterwards. I tried to pick two balls of yarn that looked as though they’d been wound the same way, in the hope that the stripes won’t be too all over the place on the finished jumper.

So far I’ve managed the set-up rows and one repeat of the edging. The pattern says to repeat the twelve row lace pattern until the work measures a certain length (depending on your size), and then you get into the tricky business of trying to work shaping at the same time as keeping track of which pattern row you’re on. I know from experience that I’m very bad at following more than one set of instructions at once, so it seemed like a good idea to make myself a chart. That way I can simply tick off each row as I work it, without having to scribble incomprehensibly all over the magazine.

I thought it would be nice to share it, so you can have it as an Excel file, or a PDF.

Please note that this is NOT THE ENTIRE PATTERN. That’s obviously copyrighted to Louisa Harding and The Knitter. This is just a way of keeping track of the lace motif and the shaping, for both the body and the sleeves. You’ll need a proper copy of the pattern for the rest.

Also, these are only the instructions for a size 14. If you need a different size, I recommend downloading the Excel file and using the original pattern to update the stitch counts for each row. (The central lace motif stays the same for each size.) If you’re already making a size 14, you can just download the PDF.

I’m rapidly discovering that this is the most complicated thing I’ve ever knitted, mostly because the lace motif is worked from both sides. This is definitely going to be slow going because of all the counting and tracking required. Not one to sit and knit in front of the telly, or to take out and about with me. Thankfully I’ve cast on another sock for that!

Peachy Shawls

Tulips Shawlette

Now that these shawls are finally finished and have reached their recipients, I can safely show them to you all!

The Tulips Shawlette, above, is by Anniken Allis, and the pattern’s in Issue 36 of The Knitter. The moment I saw it, I reached for the first 4-ply yarn I could find in my stash, and started knitting. It was quite a while before I realised that I had no earthly use for a peach lace shawl, but I was enjoying knitting it so much that I didn’t really care. Eventually it occurred to me that it would look lovely on Paul’s grandmother, and it became her Christmas gift.

The yarn is Rowan Cashcotton 4-ply, now discontinued. I usually prefer not to work with cotton because it hurts my hands, but this is soft and lovely. Unfortunately the angora does shed – working with this on my lap made me wonder whether Bond villains need shares in lint rollers, to get rid of all the fluffy white hairs.

Tulips Shawlette

I hadn’t knitted any lace quite as complicated as this before, feather & fan being about my limit. But the two designs fitted together really well (being an 8-row and a 16-row repeat) and the pattern was written out as well as charted. I followed the written instructions for the most part, because I find a row of text easier to keep in my head than a row of symbols. I used a lot of sticky notes to mark my place, and it took me a long time to really understand how the pattern worked.

Tulips Shawlette

I did use the charts for the edging pattern, mostly because I couldn’t seem to get the written instructions to repeat properly. I’m not terribly keen on the edging, it doesn’t seem very definite, somehow. But I do like the shawl as a whole, and I feel a bit braver about working from charts now.

Peach Wall of Shawl

Because the Tulips pattern required a lot of concentration, I wanted another project to work on that was much simpler. I also wanted something that could also work as a lap blanket. This one is Wall of Shawl, by Martina Patricia Munroe. I think this design looks much more interesting in a handspun or multi-coloured yarn, but I thought it would be nice to make a “matching” gift for each of Paul’s grandmothers, and I was really enjoying working with the Cashcotton.

In fact, I was enjoying it right up until I came to knit the edging. That yo row (the decorative holes near the bottom) doubles the stitch count, at which point I thought my head might explode with boredom. I didn’t count the stitches on the final row, because I didn’t want to know!

The only thing I don’t like about this shawl is the way that the edge curls up. It’s a natural feature of stocking stitch, so there’s not much I could have done to prevent it. The pattern suggests knitting the ruffle about 3” long, which probably helps, but I was running out of time and patience. I could also have cast off on the wrong side, which would have turned the edging inwards, rather than out. But the shawl itself is a lovely size, and the fabric drapes beautifully.

I still don’t have any real need for a peach lace shawl, but I have quite a lot of this yarn left, and The Knitter seems to be going through a phase of showing me lots of lovely patterns that I really must knit as soon as I possibly can! I’m resisting the urge at the moment though, while I knit my fifth Clapotis – a nice simple one in Rowan Silky Tweed. After that, perhaps I’ll cast on for something a little bit more complicated.

Spotted Lace Shoes

Spotted lace shoes

I realise that you can’t see the spotted lace in this picture – you’ll just have to trust me that it’s there! (It’s the same as the lace on the Regency-ish dress.)

This is my very first pair of completely handmade shoes that are suitable for wearing outside. They have 4mm thick ridged rubber soles, held on with the most revoltingly stinky glue I’ve ever used. And that’s saying something, having used Cow Gum for years when I was a design student.

I’ve been slowly cutting out lots and lots of layers to make the prototype shoes for my patient testers, but I wasn’t entirely happy with the pair I made back in April. It turned out to be really difficult to trim off the welt without leaving an untidy mess, showing all the construction layers. I wanted to make a test pair with the welts turned inwards, to satisfy myself that it could be done neatly enough, and that the shoes would still be strong enough around the edges.

I’ll be wearing this pair to go dancing in this evening, so I’ll be able to report back very soon on how well they hold up!

When I agreed to make eleven pairs of prototype shoes I hadn’t really thought through how long it would take to cut out all the bits. Each shoe has four layers for the upper, three layers for the midsole, and then the outer sole. That’s eight pieces per shoe, sixteen per pair, which means I need to cut out A HUNDRED AND SEVENTY-SIX pieces of fabric, cork and rubber.

I’ve made a start, but I have a feeling that this may take some time…

Regency-ish Dress and Bloomers

Regency-ish dress & bloomers

(Sorry about the terrible picture, trying to take photos of black lace is a nightmare.)

Today I have finally finished all the hand-sewing on this Regency-ish dress based on Simplicity 4055. Some of it was of my own making – I had to bind the edges of the armholes to stop the seams of the net sleeves from being scratchy. Originally I’d put poppers at the back, but it turned out to be a bit tight and every time I moved they’d pop open. Not good for dancing. So I unpicked the poppers, put in eyelets, and now it laces up. Not very Regency. Ah well. The length’s hardly period – and it’s even shorter than I’d intended, hence the definitely not-Regency bloomers to go underneath.

The bloomers started life as Simplicity 2777, view E. I left off the waist casing, and finished the top edge with picot edged lingerie elastic. I also left off the leg bands and ruffles, because I found a piece of very extravagant garter elastic in my stash. It was much too stretchy to use as an actual garter, but absolutely perfect for trimming these little shorts.

I’m still trying to get used to the shape of the dress. It’s pretty and I know it’s basically the same shape as me, but I’m so conditioned to believe that every woman should have a neat little waist that I feel as though it looks a bit frumpy. Hopefully that’ll wear off when I put it on and discover that it’s actually comfortable rather than digging into the waist that I haven’t got, which is what happens with most of my other dresses. Which is why I never wear them.

I’m wearing the outfit on Friday evening, so hopefully I’ll be able to ask someone to take a better photo for me!

Skull & Rose Print Knickers

Red and black skull print knickers

This is pair of knickers number five. This time I started with Kwik Sew 2100, the most striking aspect of which was the ridiculous width of the gusset, especially as the sizes increase. I modified that part of the pattern to make more anatomical sense, and I was impressed by the instructions for putting together the lined gusset. It’s a bit fiddly but you end up with no raw edges on the inside, which makes these knickers very comfortable to wear.

I didn’t like the way that the original knickers were so puffy, so I decided to combine a stretch and a woven fabric to try and make them a bit flatter. They are more streamlined than they look in the picture (the mannequin’s so small I can’t stretch them right out), but they’re still not how I want them. I really need to buy a lingerie-drafting book, so I can work out how to do this properly.

I’m trying really hard to avoid using entirely stretch fabrics because there’s so much more interesting variety in wovens, but I’ll have to get the pattern absolutely right if this is going to work. These need the print panels to be smaller and the jersey panels to be bigger, to allow more stretch around the legs.

I also tried two different ways of applying the elastic – the waist has the elastic turned to the inside, and around the legs it’s on the outside. Each method is a two-step process, so there’s no time-saving in doing it one way over the other, but I think aesthetically I prefer the elastic on the outside, which I didn’t expect. Maybe because it looks more like something you’d buy from a shop, which is what I usually try to avoid.

[Later…]
In fact, I liked the elastic on the outside so much that I trimmed off the waist elastic and sewed it again to match the legs. Much better.

Lace & Ribbon Choker

Lace & ribbon choker

I was going to write a tutorial for this, but I honestly can’t imagine how anybody could need one.

  1. Take a piece of lace that fits around your neck.
  2. Take a piece of ribbon three times as long as the lace, and narrow enough to fit through the holes.
  3. Thread ribbon through holes in lace.
  4. Add a pendant if you happen to have one lying around.
  5. Tie it around your neck.

Ta-daa!