Sea Glass & Silver

Sea Glass & Silver

Whenever I can, I like to go on courses to learn something new. I’m very lucky that my local high school has a Community Arts programme, which runs evening and weekend classes and a Summer School. For several years I wasn’t able to attend the Summer School (the summer holidays being one of my busiest times at work), but this year I was really pleased to be able to go back. I’ve learnt lots of different things there, from ceramics to watercolours, but the thing I’ve enjoyed doing most is making silver jewellery. This year’s Sea Glass & Silver course with Cathy Newell Price offered a range of techniques that I was really interested in learning.

Sea Glass & Silver

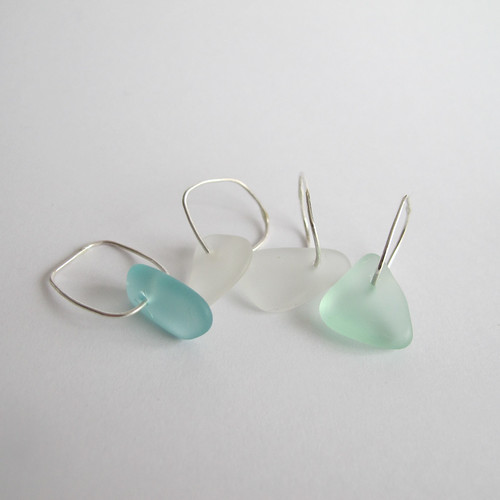
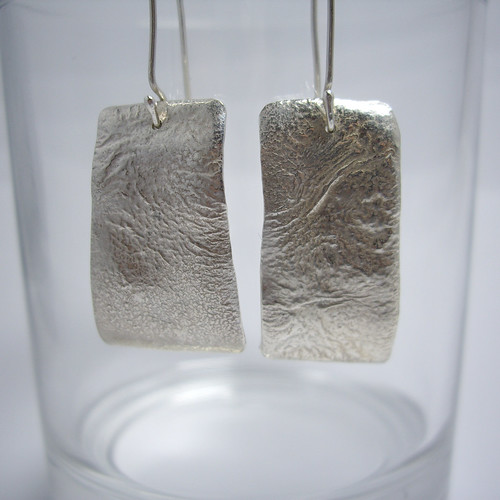
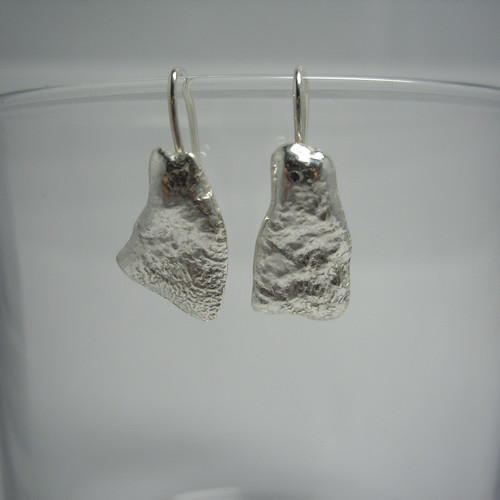
First up – drilling holes in sea glass, using that exciting combination of electricity and water! I managed to drill through four pieces, with only one (on the left) cracking slightly where I hadn’t lined up the hole very well. We also learnt how to solder the silver rings in place, whilst being very careful not to shatter the glass. I’ve never been particularly good at soldering, but working on something this fiddly definitely forced me to improve!

Sea Glass & Silver

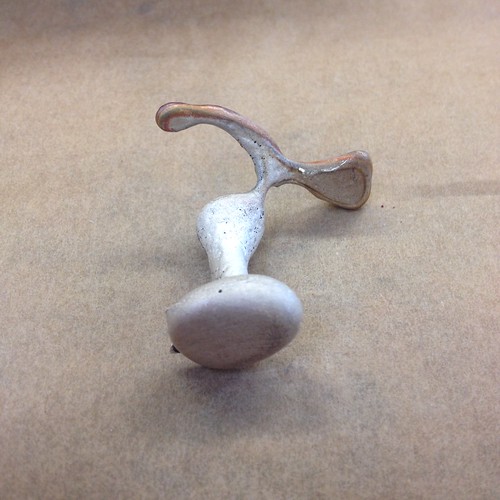
One technique that I was particularly excited about was learning to cast objects using a special type of sand called delft clay. I brought in a nice smooth pebble to cast, which in retrospect was a bit boring. I was very impressed by the person who decided to cast an almond, which came out wonderfully! In case you’re wondering, the pebble part is at the bottom – the sticky-out bits are the sprue (where the molten silver pours into the cast), and a splashy dribbly bit where I was a bit wobbly with the pouring.

Sea Glass & Silver

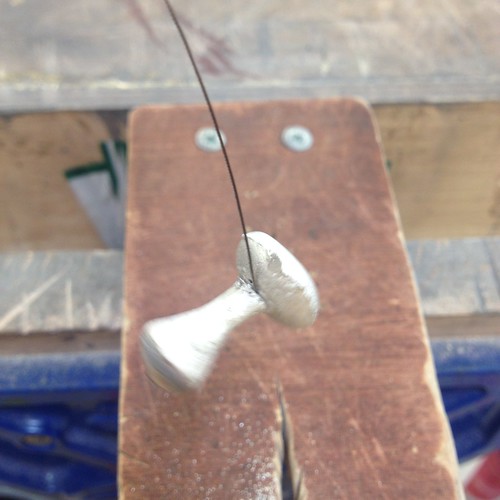
Once the cast is done, then comes the hard part – sawing off the sprue and filing off all the wonky bits where you didn’t quite line up the two halves of the mould correctly. (There’s less of that as you get better at the technique, obviously.) I have to say that I wouldn’t recommend snapping a piercing saw blade half way through your sprue – it’s really difficult to get out again. Oops.

Sea Glass & Silver

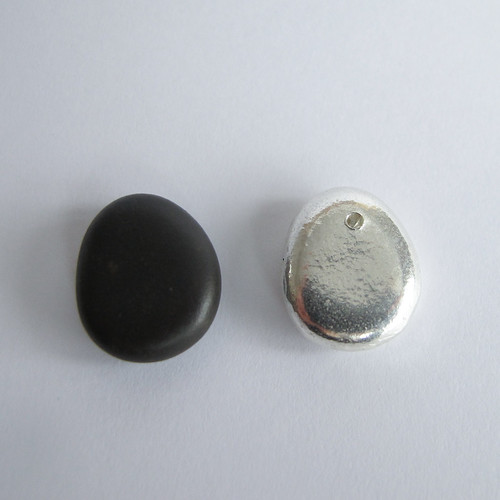
But here it is, all polished and lovely, alongside the original pebble used to make the mould. I like that you can see the very fine texture on the silver pebble, that’s barely visible on the original one. The little crater at the top is where I was trying to drill it through so that I could hang it as a pendant. Sadly, by the end of the course we’d collectively worn out all of the drill bits, so I had to give up! I’ve got a piece of silver wire set aside though, and I’ll use that to cover up the hole and make a bail to hang it from instead.

Sea Glass & Silver

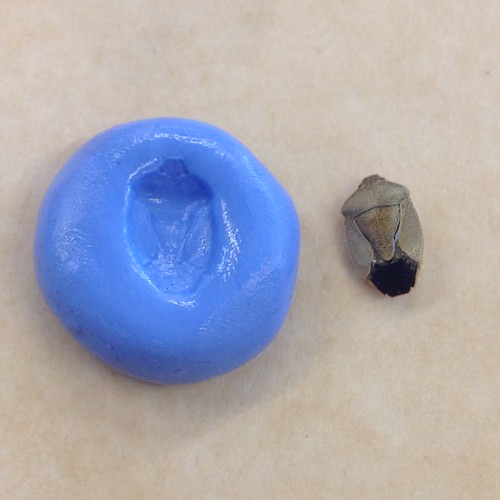
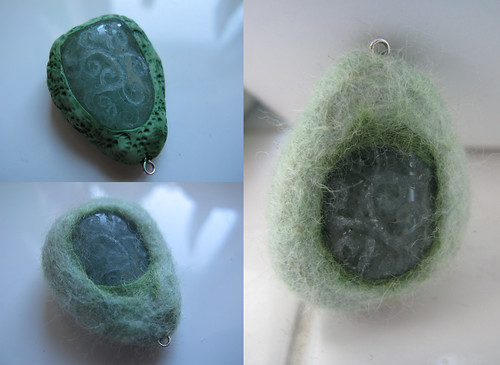
Next up – precious metal clay! I’ve used PMC before, by rolling out flat pieces and stamping them with an impression. I’d never used a mould to make a piece though, so that was fun to try. I brought in a shield bug that I’d found sadly expired in the greenhouse, but again, it perhaps wasn’t the best choice for this technique. Looking at everybody else’s shells, buttons and seed heads, I should have gone for something with more depth and texture for a better result. I also found the clay itself quite difficult to work with – it dried out very quickly, and started to crack.

Sea Glass & Silver

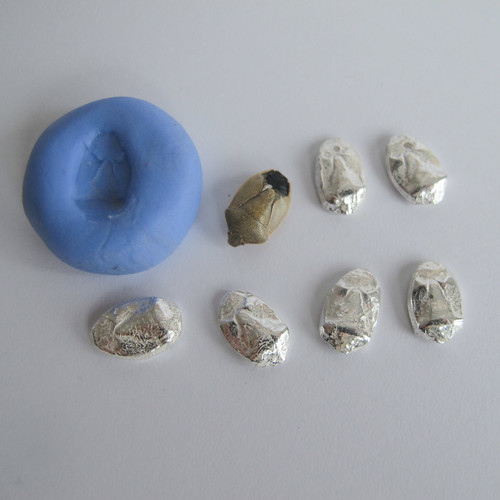
I must confess I was disappointed with my silver clay shield bugs right up until the moment they came out of the tumbler at the end of the day. As soon as they were polished up you could see the details more clearly – although some of the texture is from the drying clay, not from the original beetle. The top two have been drilled, and I’ll add ear wires to those at some point. I’m not sure yet what I’ll do with the other four – suggestions are very welcome!

Sea Glass & Silver

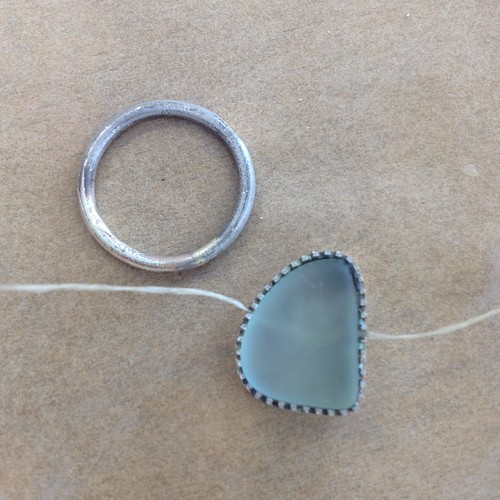
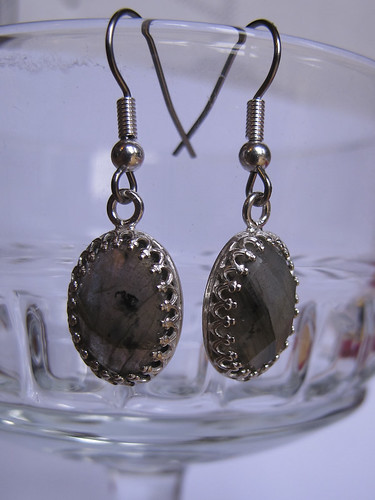
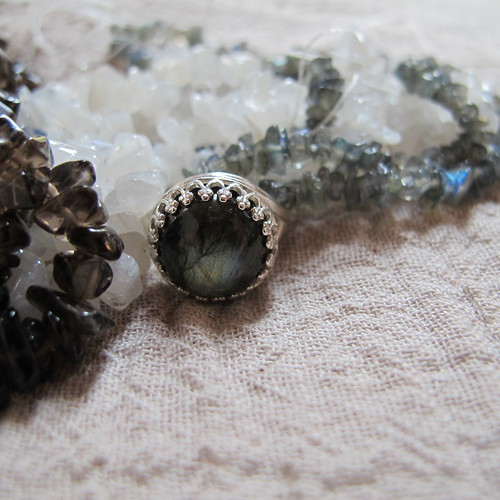
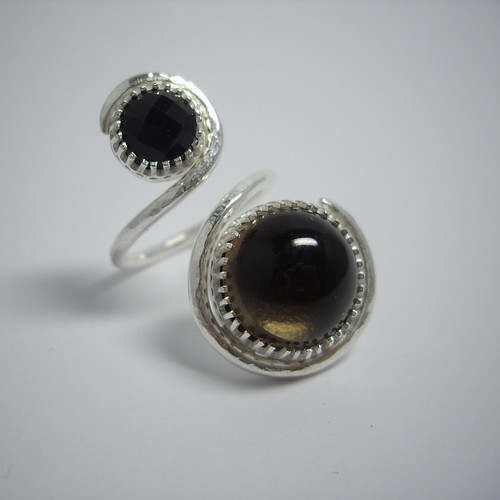
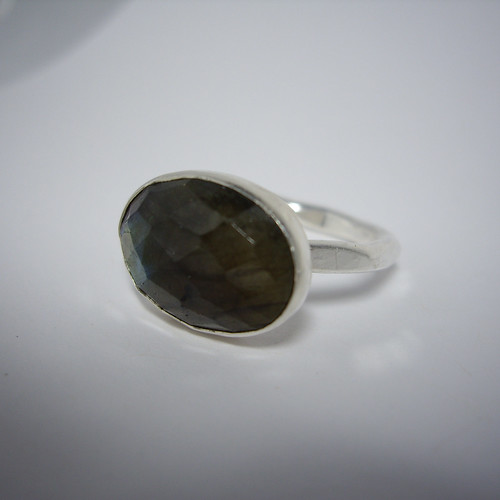
Towards the end of the second day, I started work on setting a piece of sea glass to mount onto a ring. I’d taken the little piece of gallery wire with me “just in case”, and was really pleased to have the opportunity to use it. I had to work at lightning speed to get it finished, and made a potentially catastrophic soldering error (using the same grade of solder for two joins very close together), but thankfully I got away with it!

Sea Glass & Silver

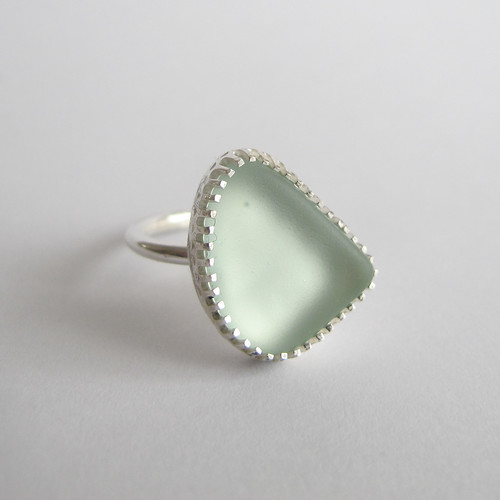
And here it is! Isn’t it pretty? I’m really, really pleased with how it’s come out. Yes, the finishing leaves a lot to be desired – there’s lumpy solder, lots of file marks, and a bit of fire stain that I didn’t have time to polish out. And the angle of the setting isn’t even slightly what I’d intended – the ring moved as I was soldering, and I didn’t have the time (or the skills, let’s face it!) to try and correct it.

Sea Glass & Silver

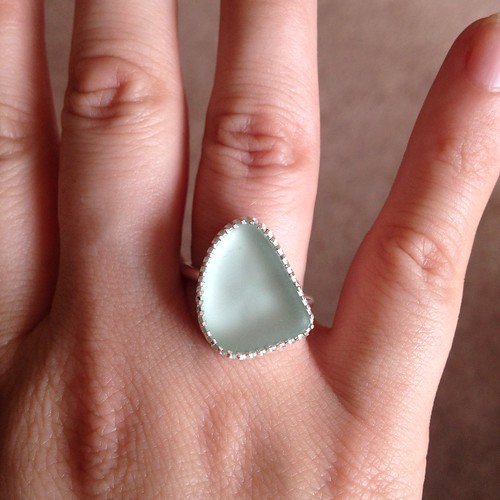
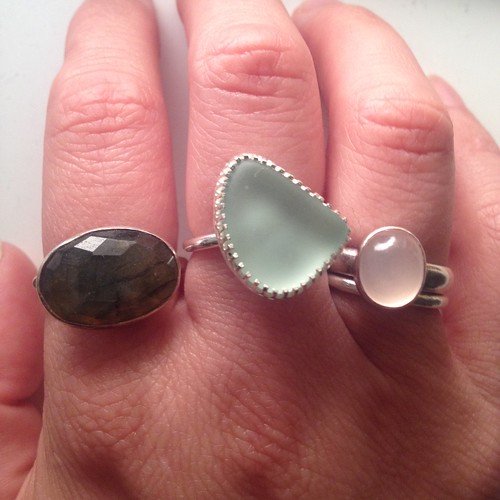
But, it looks nice on the hand at this jaunty angle, and nobody but us knows that I didn’t set it this way on purpose!

I have to say that I really, really enjoyed this course. It was great to come home with such a quantity and variety of work at the end of just two days, and as always it was fascinating to see what everybody else had put together using exactly the same materials and techniques.

Having the opportunity to try out the sand casting was brilliant, as that’s something you’d never be able to achieve at home with a domestic blowtorch – you simply wouldn’t be able to generate enough heat. I’ve decided that the more I try and use PMC, the less I like it, so I’ve decided to sell my hoarded metal clay stash so that I can use the money to buy some silver sheet and wire. That way I can concentrate on doing the thing I enjoyed most – setting stones.

Now I need to look out for more courses featuring different stone-setting techniques, I think. There’s one on Saturday at South Hill Park, on tube setting, which I hope will come around again, and one of my fellow students mentioned a gypsy setting course that she’d been to, I think in Oxford. Ideally I’d like to be able to go back to Cathy’s evening classes, but at the moment my budget won’t allow a whole term’s worth of sessions plus materials. Time to clear a suitable space, and be brave about firing up the blowtorch at home, perhaps!

Felted layers

Felted brooch bases

Progress on the fleecy hats is slow. Hand-sewing the bands and brims is taking about half an hour per hat, and there’s a limit to how much I can do in one go before my hands start to complain.

I’d been thinking about making some felt brooches, so not being one to do things by halves, here are twenty-two little circles. I had planned to work blanket stitch around the cut edges, but I actually really like the way you can see all the layers of colour showing through.

They’re made from half a dozen rectangles of wonky, uneven felt that I made as practice pieces. They’d been sitting in a cupboard for about a year, gathering dust and moths, so I decided to chuck them in the washing machine and see what happened. After a quick whiz through a hot wash and a tumble dryer, they’d shrunk down from about A4 size to about A5, become nice and thick, and developed a lovely crinkly texture.

I have some little pieces of Harris Tweed that I’m hoping will needle felt nicely onto the top of the circles, perhaps with a little button each to finish them off. (And a pin on the back, of course.)

Much as I love the bright colours in these, I can also imagine them in nice muted, natural, sheepy shades. Maybe with some Wensleydale curls and semi-precious stones stitched on top. Something to think about after Christmas, definitely.

Felted gemstone pendant

Felted pendant

A little experiment for a Tuesday afternoon – a felted pendant.

This nugget of purest green has been hanging around on my desk since January 2010. It sort of did what I wanted it to (the polymer clay encased the stone, took texture and paint well, and provided an anchor for a bail), but I was never quite happy with the finish of it.

Interestingly though, I’ve just found the piece of fimo that I added fragrance to at the same time, and it just about still smells. So now I know that the fragrance lasts roughly three years before it wears off. Not bad!

Given that this pendant had effectively become a waste product, in that I didn’t like it enough to either wear or sell, I decided that I had nothing to lose by seeing what would happen if I took my little rotary drill to it. The stone (aventurine) engraves quite nicely, though it’ll take a little more practice and experimentation with different shapes of diamond point to discover what works best.

Once that was done I thought I might as well carry on experimenting, so I rummaged about in my little bag of coloured wool. Less than an hour later I had this – an engraved gemstone encased in felt.

Now this I do like, very much.

The wool has shrunk nice and tightly around the stone so that it can’t fall out, and you can see the inner layer of dark green felt just poking out around the edges of the opening. The polymer clay that I didn’t like has been hidden away completely, and I love the soft edges of the new shape. I might do a little experiment with fragrance on this one as well, by adding a couple of drops of essential oil to the back of the pendant. I doubt that will last for three years, but I’ll let you know!

Jewellery Day

Labradorite earrings

Today was going to be Candle Day, but Paul’s at home with some horrible lurgy, so it seemed rude to make the house smell when he’s feeling poorly. They may be nice fragrances once they’re in a candle, but they’re very strong while you’re actually making them!

I’m not feeling too brilliant myself, so I thought I’d start the day gently by making a couple of pieces of jewellery. The earrings above are a little treat for me, and I bought all of the necessary bits from Kernowcraft. They took less than five minutes to put together, and I’m really pleased with them. Despite having three pairs of holes in my ears, I’m always bemoaning my lack of nice earrings – so now I have some lovely faceted labradorite cabochons. They were so easy to put together that I might just have to treat myself to a few more.

Helen's bracelet

This lovely bracelet belongs to my friend Helen, the Bright Lady. It just needed extending a little bit, so I added a couple of extra jump rings, and replaced the original fiddly little fastener with a better one. Again, a simple five-minute job, with all the necessary bits coming from Kernowcraft.

I feel a little bit like a walking advert for them sometimes, but I’ve been shopping from their catalogue since I was a teenager and my Mum had to write cheques for me to send off in the post! Yesterday they announced a job vacancy on their Facebook page, for somebody to design the catalogue and look after the website, and I must admit I spent a little while looking up the price of houses in Perranporth just in case.

Spoke too soon…

Harris Tweed cufflinks - heather pink & orange

Well, the purple cufflinks were going to be mine, all mine… and then I posted a picture of them to Facebook, where my friend Patrick made the persuasive argument that they’d go perfectly with his purple Blaqua shirt.

So now the purple ones will belong to Patrick, and these lovely orange and lilac heathered ones can go into the cuffs of my shirt with the pink, purple and orange flowers. Perfect!

If anybody’s looking covetously at this pair, I do have another piece of identical Harris Tweed, so I will be making some more! I’m going to try not to make too many duplicate sets, as I want these to be as individual as possible.

Harris Tweed cufflinks

Harris Tweed cufflinks - purple

I recently bought a packet of teeny-tiny offcuts of Harris Tweed, from a seller on Ebay.

Today I was feeling thoroughly overwhelmed by the amount of things I need to do and the amount of time I’m spending doing admin-type tasks instead of being creative, and I simply had to MAKE SOMETHING.

So, here’s a pair of Harris Tweed cufflinks in an absolutely glorious shade of purple.

There will be future Harris Tweed cufflinks available for sale, but this is the only pair in this colour, and they’re mine, all mine!

Amber necklace

Mum's amber pendant

This is a little amber pendant, made for my Mum.

It replaces one that I made for her several years ago, although I think this one’s a little bit smaller. The pendant settings and stone all came from Kernowcraft.

I don’t quite know what to say about this one.

I made it because my parents’ new house was broken into, and almost every single piece of my Mum’s jewellery was stolen. She still has the matching earrings to this pendant only because she happened to be wearing them. Unfortunately the rest of her jewellery can’t be so easily replaced, but at least for now she’ll have one matching set to wear.

Beaded scarf – sneak preview

gemstone beads

Remember the Blackcurrant Surprise fabric I dyed back in August? The one that came out a lovely shade of grey? Well, it turned out to have another surprise in store for me. I’d folded it up and put it away while I decided what I wanted to do with it… and when I got it out, it had changed colour again! It’s now a pretty neutral beigey shade, and it still smells very faintly of blackcurrants.

It’s destined to be divided into three little scarves, each measuring about 50 x 150cm, with beading on the ends. The beads in the photo are all semi-precious stones. Smoky quartz on the left, moonstone in the middle and labradorite on the right. The sterling silver ring in the middle is set with a 12mm labradorite cabochon, and it’s adjustable so the scarf can be styled in different ways.

I chose the smoky quartz because its brown tones blend nicely with the fabric, but now I’m not sure whether or not it’s too dark. Perhaps once the beads are more spread out, with all three colours sprinkled in together, it won’t look quite so dramatic.

These are going to be Christmas presents, so  won’t be able to show you the finished scarves for a little while. In the meantime though, I do have some plans for these pretty little adjustable rings, so watch this space!

Leather earrings

Leather earrings
Pretty little oak leaves, ever so slightly metallic.

Did you know that Ren, she of the incredible Fairysteps, also sells her offcuts of leather? Ever since I bought my amazing gold boots, I’ve been terribly paranoid about scuffing the toes and making a hole in them. Not due to any lack of sturdiness in the boots, I might add – I’m just very clumsy! So when I saw that there was a bag of metallic leather pieces for sale I snapped it up, thinking it would be useful to save a piece for the eventual mending of the boots.

Leather earrings

I think these are my favourite. I might try a pair with the colours the other way round.

And then the parcel got lost in the post, Ren gave me a refund, and I was a little bit sad for a while. No shiny leather for me. Until last week, when the parcel unexpectedly arrived! Hooray!

While the parcel was on its mystery travels, I’d been thinking about what else to make with the little leather bits. The first thing that came to mind was earrings, as leather’s so light.

Leather earrings

I’m not sure about the proportions of these. I think smaller jump rings would be better.

I had some craft punches that Paul’s Mum had given to me, and they turned out to be perfect for cutting out little matching shapes! It was a bit of a faff though, I have to admit. The punches are really designed to be hammered into card, and the thick leather was a little bit of a challenge. The pieces are quite fiddly too – the dragonflies are about an inch across.

The antique gold findings are all from Hobbycraft, made by Beads Unlimited. They say low nickel, so I’m hoping I won’t be allergic to them. I thought they suited the colours of the leather better than a bright gold. Apart from being a little unsure about the proportions of the gold dragonfly pair, which I’ll probably change at some point, I’m really pleased with how these have come out. I don’t think I’ll be making many more – my poor cutting mat can’t stand the hammering – although I do have plenty more ideas for things to make with the leather.

Corsages, doll shoes, perhaps a belt… watch this space!

Silver Jewellery

Silver Jewellery Class

Looking through my photos on Flickr, I realised that I made quite a lot of things towards the end of last year that I didn’t show you! These pieces were all made on a silver jewellery course at Maiden Erlegh School, with tutor Cathy Newell Price.

The piece above is an adjustable ring featuring two smoky quartz cabochons. The top one’s faceted and the bottom one’s smooth. The band is slightly hammered to give it a bit of texture. I bought the fancy bezel strip, I didn’t make all those teeny-tiny prongs from scratch!

Silver Jewellery Class

This was an experiment with reticulating the surface of sterling silver to create a textured effect. You have to heat and re-heat the silver enough times so that the silver and copper begin to separate, with the silver molecules coming to the surface. Once that’s happened, you can use the blowtorch to create ripples – you just need to be very careful not to melt everything!

Silver Jewellery Class

Which, as it turns out, is what happened here. I got a bit carried away with the blowtorch on one of these little pieces, and melted one end. Because I wanted the two pieces to match, I then had to very carefully and deliberately melt the other one until they were sort of similar. I don’t mind that they’re not exactly the same – I quite like having fraternal rather than identical earrings. Shows they’re made by hand.

I’d originally intended to make a pair of cufflinks, using the larger pieces of reticulated silver for the front, and the smaller pieces for the back. Unfortunately I very quickly ran out of patience while trying to make a chain to join the large and small pieces together. All those tiny little links were so fiddly! So I decided to quit while I was ahead, and ended up with two lovely pairs of earrings instead.

Silver Jewellery Class

This was actually the first piece I finished, a labradorite ring. It’s ever so slightly too big for me, but I couldn’t bear to part with it. I wear it with a plain ring over the top to hold it in place, and the large stones prevents it from spinning around on my finger.

The course finished in December, and I promised myself that I’d do more work with silver back in the Shed. I have all the tools, and lots more stones to set… I just haven’t got around to actually buying any more silver. I’d love to make a pendant to match the labradorite necklace though. Kernowcraft have just got in a beautiful teardrop-shaped cabochon that would complement it perfectly!