Another fuchsia pink hat!

Helen's Custom Cloche

This is the latest hat (almost) off the blocks – another fuchsia pink cloche with black guipure lace trim. I was asked to amend the shape of the back, so that it wouldn’t catch on the back of Helen’s coat collar.

Helen's Custom Cloche

As you can see, the cutaway flattened out a little bit once I’d added the brim wire, but I think it’s still a nice shape. Hopefully it will be shaped enough to accommodate Helen’s coat!

Helen's Custom Cloche

All I need now is a really nice button to finish it off, and to cover the join in the lace. (Where the pins are, although I was careful to make the join as discreet as possible.)

I’m looking forward to having a little more time on my hands when next month comes around, all this hand sewing is very slow. I lost the best part of a week to being ill, and I’m on a course with work this week, which is more sewing time gone, and I’ve got a backlog of hats waiting to be trimmed!

Don’t forget that all of the felt hats in the Etsy store will be going up in price at the end of the month, when the introductory offer comes to an end! I’ll try and get a few more finished before the deadline, so you’ve got plenty to choose from.

More Making

Untitled

At long last, a new cloche hat for the shop! I’ve been waiting for the lovely guipure lace to arrive, and also for a full day off work when I didn’t feel too ill to to anything. (Back to the dentist today for a face full of iodine. Yuck.) This one’s now up in the Etsy shop, at a bargain price because it’s not quite as perfect as I’d like. It was the first hat that I blocked, and my trimming of the edges wasn’t perfectly straight, which has resulted in a slightly uneven hem on the inside of the brim. It’s not at all noticeable when you’re wearing the hat, so this is a great opportunity to grab it for a silly price. The custom listing is also available, if you fancy a different colour.

Untitled

This cowl was a bit of an experiment, and it’s one that I’m quite pleased with! You can wear it with the buttons at the front or the back, to keep any stray draughts away from either your neck or your throat. (This one’s in the Etsy shop too.) I’m pleased with the lovely yellow vintage buttons, but rather than snap fasteners I think I might work hand-stitched buttonholes in the future.

Untitled

Unfortunately, it’s proved rather difficult to take photos of a large draped neckerchief on a mannequin that doesn’t have any shoulders! I don’t think the pictures do it justice, so I’m going to need to find another way. I’d love a torso mannequin, like this slightly abstract one from Morplan, but that’s definitely out of my budget until I’ve sold a lot more hats! (Any hats. Selling any hats would be nice.)

And now, if you’ll excuse me, I need to go and get an early night. It’s half term this week, which means I’ve got an extremely busy day ahead of me at work tomorrow!

What I Did At The Weekend

Paul's Birthday Cupcakes

I know it’s Wednesday already, but I had a few days off work at the end of last week and the beginning of this one, so it all blurred into one lovely long weekend where I basically did nothing. Well, I was ill for a couple of days, which is what really prompted me to think that Doing Nothing for a while would be a really good idea. And it was.

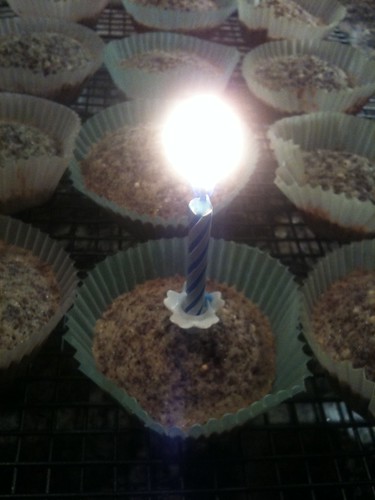
During these days off, Paul had a birthday. While he was out I thought I’d try a little experiment, and I baked a batch of cupcakes! To be perfectly honest, they didn’t turn out that well. They didn’t really rise, and the chocolate didn’t really melt, so they looked a bit funny, and they weren’t light and fluffy so much as dense and a bit strange. But, they tasted nice, and several people have eaten them without complaining of a stomach ache, so perhaps they weren’t as bad as all that! Still, I think I’ll stick to sewing.

Poole Twintone Dinner Service

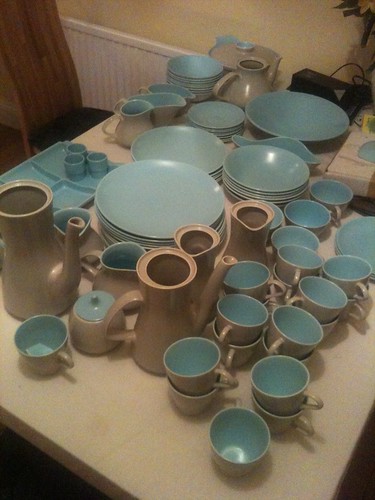
After a lovely birthday lunch with Paul’s parents, we brought back with us several boxes of crockery which used to belong to Paul’s Nan. She couldn’t take all of this with her when she moved into residential care, so we are now the very excited owners (well, let’s be honest, I’m a lot more excited than Paul is!) of a Poole Twintone dinner service! We must be missing a box though, as none of the coffee pots have their lids, and we have one rectangular lid with nothing to sit on. The set is so extensive because it was added to over many years, received as gifts, and picked up at antique shops and car boot sales. That explains the seventeen (seventeen!) tea cups…

yarma

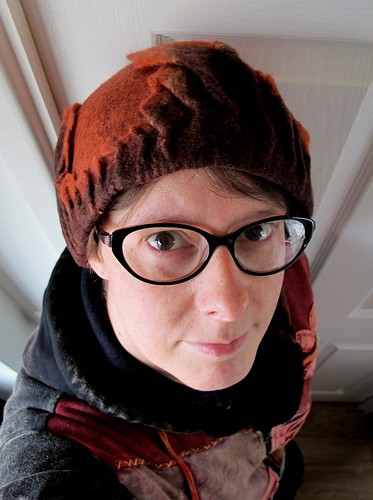
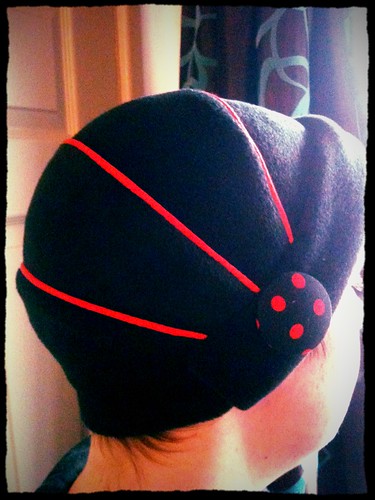
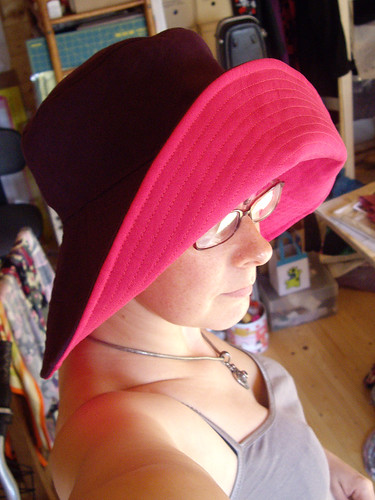
While all of this nothing was going on, I managed to make myself a Very Bright hat. The picture above is from Yarma, a $0.99 app that allows you to upload photos to Ravelry straight from your phone. It does have filters built into it, but the hat really is that bright!

yarma

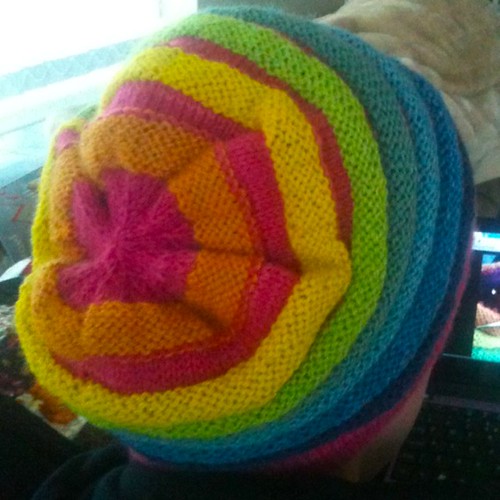
The yarns are all hand dyed. The pink background is a cochineal-dyed cashmere from Elisabeth Beverley at Plant Dyed Wool, and the stripes are hand-spun Blue-faced Leicester mini-skeins by The Outside. (I wrote about them over here.)

The hat was going really well, until I reached the very last decrease row. Somehow I managed to pull one of the circular needles out of the stitches, and because the row below was also full of decreases I couldn’t figure out how to get all of the stitches back onto the needles again in the right order. (Hence the mess you can see in the Yarma photo above.) Thankfully the stripes gave me an excellent place to rip back to, so I very carefully picked up the last row of orange stitches and worked the decrease section again. Phew! The pattern is Wurm, which I’ve knitted I think three times now.

I still don’t quite know how I ended up with a hat though. I’ve been spending weeks walking to the bus stop in the cold thinking, “I must knit myself a pair of gloves or mittens, these fingerless ones are too cold”. I had every intention of working up a pair of lovely rainbow-striped gloves that would keep my fingers warm on the way to the bus stop. But then I would have needed to divide all of the little skeins in half… and work out how many rows to knit in each colour, so that all the stripes were the same size… and the next thing I knew, there was a nice, simple hat flying off the needles.

I do have a little bit of yarn left over though, in all eight colours. Just enough to knit yet another pair of fingerless mittens, knowing my luck!

Experimental Hat’s first outing

Felted hat

Turns out it’s quite difficult to take a photo of yourself in a hat – my arms aren’t long enough!

I took the hat for a test-drive this morning, after I’d spent a while blasting the brim with a hairdryer to make sure it was properly dry. It took ages to get all the pins out, and it was half way through the day, when I was showing the hat to a friend, that I inevitably found the one that I’d left in. Thankfully I discovered it before I stabbed myself in the head!

Felted hat

I do need to stab the hat slightly though. Now that I’ve worn it a bit, the brim has succumbed to gravity and the corners have started to stick out in a way that reminds me of the leaves of a cabbage! It’s also got a slightly thin patch on the top, which is covered by one of the long parts of the brim, so I think a bit of needle felting will help to overcome both of those issues.

So far I have been described as looking like a flower fairy and a “woodland creature” in the hat, so as far as I’m concerned, that makes it a complete success!

Prototype hat

Prototype fleece cloche hat

If you follow me on Facebook (hint, hint!), you’ll have already seen that I spent Sunday making a prototype hat. I used Simplicity 1736 as a starting point, because I thought the cloche-like style and piped details made it an interesting Steampunk-Casual (if such a thing exists) type of hat.

I learned a few things while I was making it, not least how to make my own piping and then insert it into the seams – two things that I’d somehow managed to avoid in all my years of sewing. Turns out it’s much easier if you coincidentally manage to make the flange on the piping 15mm wide, then you can use it as a guide for sewing the seams.

I also learned that you need to trim the piping cord out of the way of the seam allowances, that three piped seams coming together in one place is extremely awkward, and that my machine won’t sew through three layers of fleece without skipping stitches.

Next time round I’ll be altering the pattern so that the crown pieces don’t come together into one point at the sides. You can’t see that detail anyway, it’s hidden under the brim, so why not make the whole thing easier to sew? I also want to alter the brim itself, as I’m not very fond of the way it stops half way round. I’d also like it to be more curved, and much larger at the front. Taking the brim all the way around the hat will also mean that I can attach it in a different way, eliminating the need to sew through so many layers of fleece in one go. In fact I might face the brim with something lighter, and get rid of one layer of fleece altogether.

Having said all of that, I am actually very pleased with this hat! It’s going to be my daywear hat for the Steampunk Extravaganza, hence the red and black colour scheme, and the combination of spots and stripes. It’s extremely comfortable and warm, and fits beautifully over my very short hair. I might try out the next iteration in black and pink, so that it goes with my spotty coat. Or maybe a brown and blue version to go with my long winter coat… yes, I can see myself making quite a few of these!

Spotty bolero and apron…

Spotty bolero

Here’s what I’ve been up to this week – making a spotty bolero from Simplicity 1819. I was intending to make a stripy one, to match the red and black outfit I wore to the Wild Boy’s Ball at Kensington Palace a couple of years ago. Unfortunately the fabric shop was out of stripes and, being too impatient to wait for an order to arrive, I decided to go with spots instead. As you do. This had a knock-on effect as the matching black trim (also unavailable) would have been invisible on the spotty fabric, so I had to go with red. I think it stands out rather nicely! It’s the first time I’ve done this sort of decoration, and although it was a bit fiddly in places, I’m pleased with the way it looks.

(I have to confess that I also love the way it looks with this yellow skirt. The temptation to wear these together is now almost irresistible.)

Spotty bolero and apron

And here’s what it’s supposed to look like, complete with matching spotty apron. That’s only pinned into place because I still haven’t decided whether it’s actually going to be an apron or a bustle. I think an apron though, as I rather fancy tying it with a ridiculously oversized bow at the back. As you do. The apron is also made from Simplicity 1819, a rather loose interpretation of the overskirt.

I think during the day I’ll probably wear this with a plain black shirt, and I have just enough spotty fabric left over to make a matching tie or bow tie. Then for the evening I’ll switch to the dress shown above, and swap the bolero for the black taffeta coat. If I’m feeling fancy, I might put the feather collar back on.

Then, of course, all I’ll need to make is a MASSIVE HAT. I have Lynn McMasters‘ top hat/riding hat pattern, some spare black taffeta, and a magpie skull on order. Watch this space…

Milly’s Monkey Hat

Now that we’re into the New Year, I think it’s safe to reveal some of the things I made as Christmas gifts.

I don’t have photos of all the knitting because I wrapped and posted it as soon as it was finished. But I made a pair of socks and a pair of wristbands and a cowl and a pair of fingerless gloves. And a hat and mittens.

I do have a picture of Milly’s Monkey Hat and Matching Mittens:

Milly's Monkey Hat and Mittens

The pattern was one of Ann Budd’s basic hats, and I made up the ears as I was going along. The mittens are from a Ravelry pattern by Anke Klempner, designed for newborns. The pattern calls for 3.5mm needles, so I used 4mm to make the mittens slightly larger. I managed to get the hat and mittens out of one 50g ball of Sirdar Snuggly, and I used the leftovers to make the mitten string. The cream parts on the monkey’s face and ears are made from fleece, blanket stitched into place, and the eyes, nose and mouth are simply embroidered on.

I made the string for the mittens on my knitting nancy, and I think it’s probably long enough to last Milly until she’s at least eight. I was a bit worried that the hat would be too small, but it seems to be okay:

Milly's Monkey Hat

The ears do make it ridiculously easy for Milly to grab the hat and chuck it across the room, but apparently that happens to all hats at the moment – and she was far more interested in the crinkly wrapping paper anyway!

Giant Ridiculous Hat.

Vogue 8405

This is Vogue 8405, view A.

I was a bit worried that it might be hot while I was in London so, as I tend to fall over with sunstroke at the slightest provocation, I thought it would be a good idea to make a massive sunhat.

One side is the same purple linen as the Regency-ish dress. The other side is an offensively pink cotton that matches my hair. It’s fully reversible.

The pattern called for two layers of fabric and a layer of hair canvas. This still seemed a bit floppy for my liking, so I interfaced the pink layer. Still a bit floppy, so I quilted the entire brim in a spiral. Much better!

Still knitting…

Debbie Bliss Andes

I did quite a lot of knitting in the run-up to Christmas, but haven’t been giving myself much time for it lately. I started a new Clapotis last weekend, and yesterday I dashed out to buy some yarn for a new hat.

(I dyed my hair bright red last week, and I thought a little hat might be a good idea, so I don’t startle everyone at work too much.)

I decided on Bree by Britanny Wilson, which is a plain-ish skullcap. It has a purl rib every nine stitches, and a pretty little bow. Hopefully it should sit neatly on the back of my head, and just let a little bit of red hair poke through at the front.

The yarn is Andes, by Debbie Bliss. I’ve been gently fondling this every time I’ve walked past it in John Lewis, waiting for the right pattern to come along. It’s made from 65% baby alpaca and 35% mulberry silk, and it’s incredibly soft and lovely. Two skeins was enough for the hat, so I snapped them up and brought them home.

The photo above was taken after knitting about half of the first skein.

I must admit that I’ve had problems with dye leaking out of black yarns before (I’m looking at you, Colinette), but this is ridiculous! I’m not even sure if I want to finish knitting the hat. I put a lot of effort into dyeing my hair pillarbox red, and whilst I am knitting the hat to cover it up, I don’t want it to be dyed black at the same time!

Also, as I commented on Facebook last night, I could not have more fluff up my nose if I’d stuck my face in a baby alpaca. This yarn sheds like mad. I’m sure it’ll turn into a lovely soft halo when I’ve blocked the hat and started to wear it, but this yarn is definitely going onto the “never again” pile.