Meet Miss Mouse.

Miss Mouse

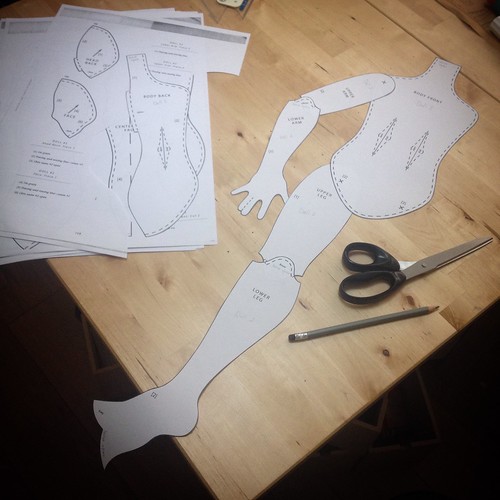
This is a project I’ve been meaning to get around to for a long time. I started with a Patti Medaris Culea pattern (well, a combination of two patterns), enlarged from A4 to A3 on a photocopier. I’d already worked out that this would result in a doll that was about three feet tall, which seemed about right for the scale I wanted to be working at.

Miss Mouse

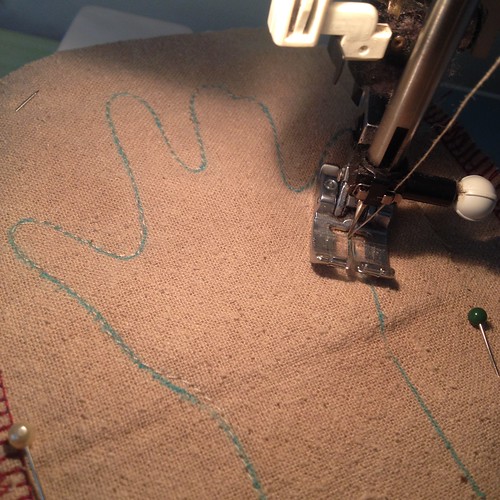
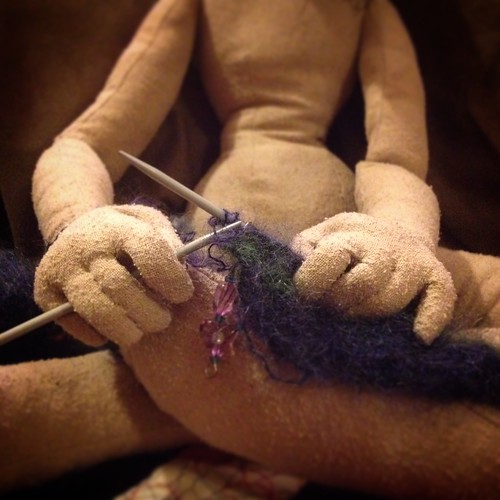
This still resulted in some of the trickiest sewing I’ve ever done – and you can see that I wasn’t totally accurate! I used the hand wheel a lot to manoeuvre the needle slowly around the fingers, which seemed to work pretty well. The fabric is silk noil that’s been dyed with tea, and it was absolutely perfect for this project. Nice and soft, easy to sew and sculpt, and not in too much danger of unravelling along tiny little seams.

Miss Mouse

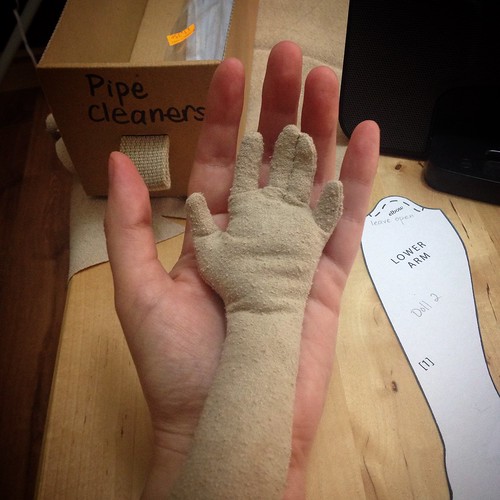
I started with the most fiddly part of the doll – the hands. I don’t have haemostats or tube turners, but at this scale the fingers were easy enough to turn through with ordinary tweezers. I made a pipe cleaner armature for each hand, which fitted into the fingers perfectly. I still needed to add a little bit of stuffing, which was quite fiddly, but I’m really pleased with how the hands came out. They’re just poseable enough, and I kind of wish I’d been brave enough to go with the option that had all five fingers sewn separately. (Next time.) I’m pleased I decided to go with this enlarged version of the pattern though – I really don’t fancy making these little hands at their recommended size!

Miss Mouse

Limbs and body made, I had a momentary crisis when I came to the end of my bag of toy stuffing with one lower leg left to fill! Thankfully, being a ridiculous hoarder who used to work in a fabric shop, I knew I had another half bag lying around somewhere in the back of a cupboard. It’s a slightly different texture and density, but as this doll’s most definitely not for sale, it doesn’t matter too much. 

I also had another minor crisis when I discovered that I’d completely failed to read the instructions for the elbows and knees correctly before I sewed them closed. So the arms and legs are jointed in a somewhat experimental manner, but again, it works for me and my plans for the doll, so it won’t be a problem.

Miss Mouse

And here she is, giving us a little wave! I do love those hands. You’ll notice that she’s missing one rather vital body part – her head! As you can see, it was rather late at night by the time I got to this stage, so I decided to go to bed and think about her head the next day.

Miss Mouse

And here it is! I spent a long time looking up pictures of wood mice from lots of different angles, which I then tried to translate into a three-dimensional pattern. Spatial awareness is really not my strong point, so it took a lot of scribbling and crossing-out and trying again before I got to this stage. I’d anticipated having to make three or four heads before I got the pattern right, but I’m very pleased to report that this was the first one! Her nose is perhaps a tiny bit over-pointy, but I’m very pleased with how she’s come out.

Miss Mouse


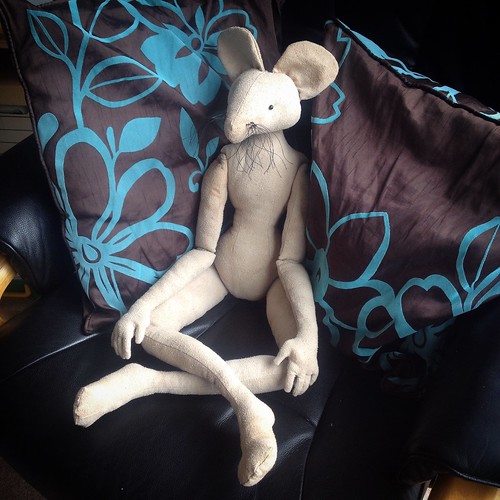
And here’s the completed Miss Mouse, relaxing in the big armchair. Doesn’t she look sweet?

Miss Mouse

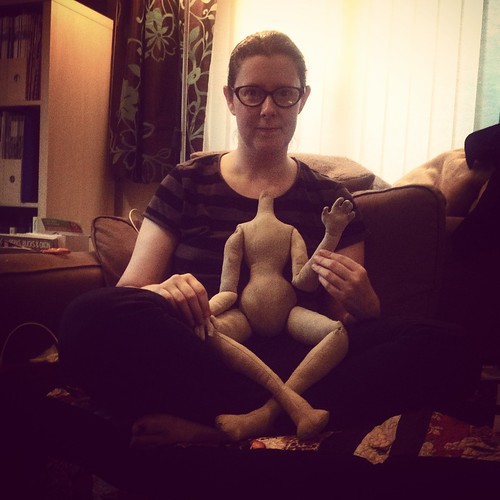
And to give you a sense of scale, here she is relaxing on the sofa with Paul.

(They were watching Terminator. I think Miss Mouse found it a bit scary, but at least she’s got her own little Universal Aunt to cuddle.)

The markings on her upper arm and foot are from the tea-dyed fabric. She has more on her back. I’m slightly disappointed that she doesn’t have more staining, but I somehow managed to avoid the most mottled parts of the fabric.

Miss Mouse

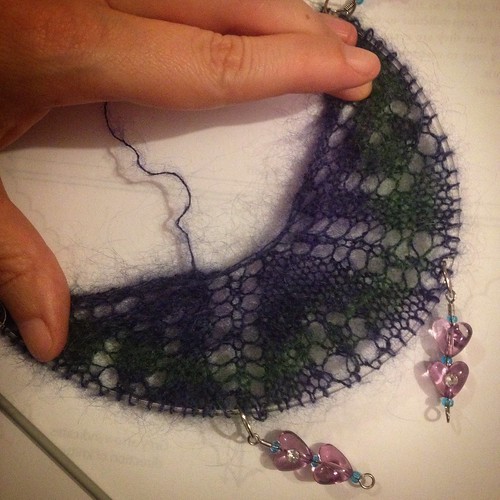
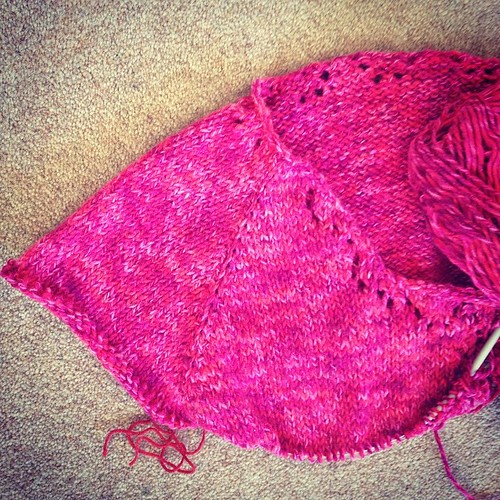
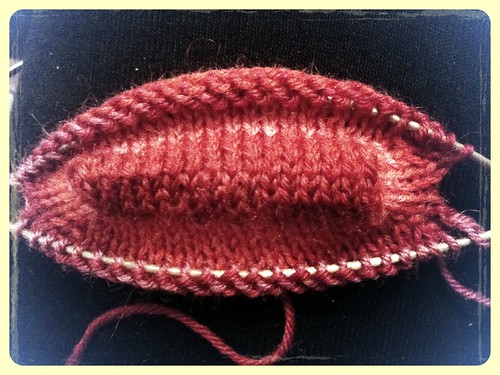
Of course, what Miss Mouse needs now is a little outfit. I don’t know yet exactly what she’s going to wear, but I do know that she needs a lacy shawl. This led to a long search through my knitting magazines to find a pattern that I could scale down to fit a doll. This is Leona by Anniken Allis, designed to be worked in a 4-ply yarn on 3.5mm needles. I’m making it in lace weight on 2.75mm needles, and I can reduce the number of repeats in the main section without messing up the border if it starts to look a bit big. It’s going to take flipping ages to knit though…

Miss Mouse

…wouldn’t it be so much easier if Miss Mouse could knit it herself?

Miss Mouse

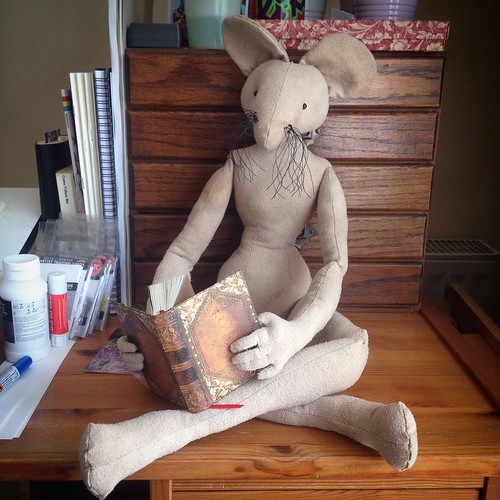
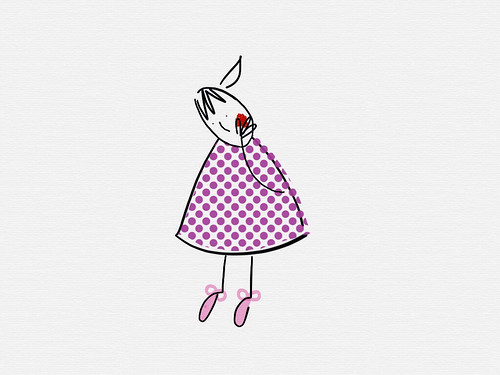
Oh look! She’s found a perfectly mouse-sized sketchbook on my desk! I wonder what she’s going to write or draw in it?

Miss Mouse

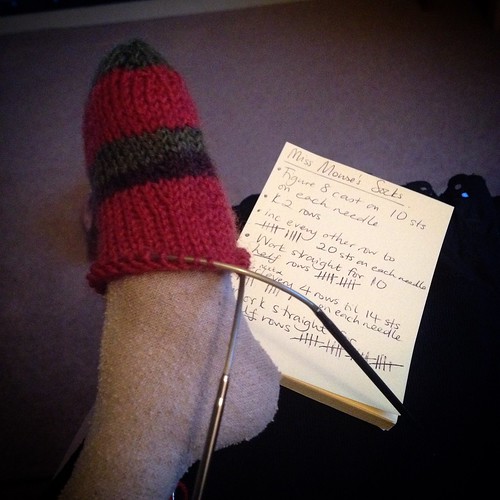
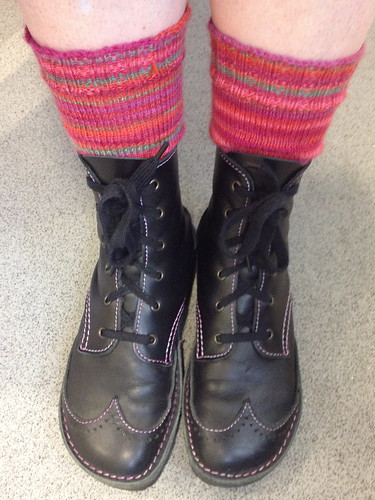
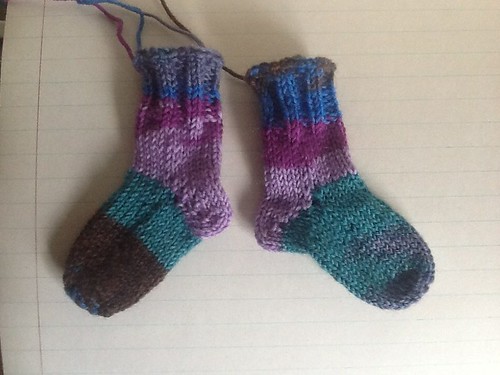
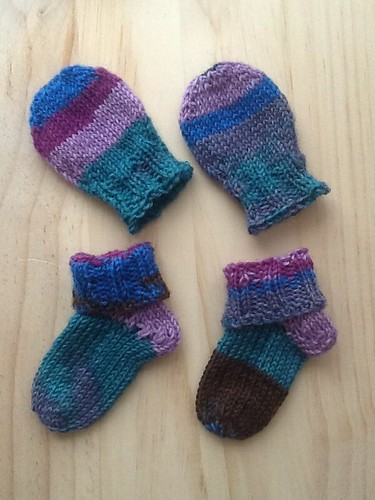
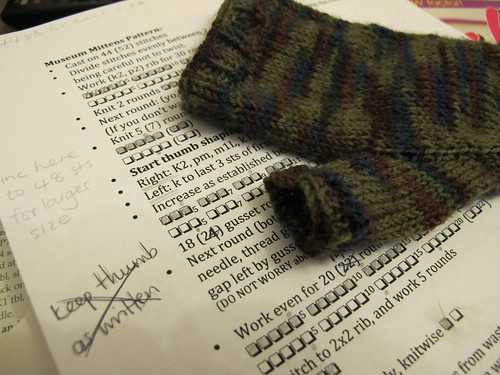
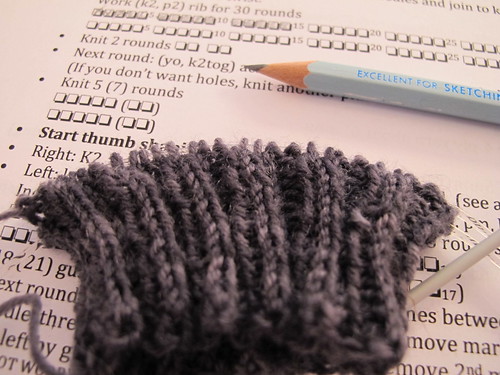
I’d been thinking about mouse-shoes as I was making her (as you do), but it wasn’t until I started knitting the shawl that I realised she’d need socks as well. Obviously. Because mouse-feet aren’t the same shape or size as people-feet, I’m working out a pattern from scratch as I go along. The handy thing about toe-up socks is that you can try on your work in progress!

I still haven’t decided what the rest of her outfit’s going to be like, but at least she’ll be well-served for knitwear…

New Old Knitting

lister-lavenda-lady-s-cardigan-knitting-pattern-c1277-1960s-5424-p

I was absolutely convinced I’d blogged about this last summer, but apparently not! Anyway, way back in July or August, my friend Chris sent me a parcel full of knitting patterns. Some I kept, some I passed on to my Mum, but the one that really stood out to me was this one. A probably-1960s raglan cardigan, with a smart cable detail, that should fit over the top of the 1950s dresses I’d been making at the time. One of the problems with new knitting patterns, even vintage-style ones, is that they tend to be very fitted. When you’ve got a dress or a blouse with quite wide sleeves, you need a roomier cardigan to go over the top!

2007BM6318_jpg_ds
Image © Victoria & Albert Museum

The pattern calls for 18 ounces of double knitting yarn, in my size. That translates to roughly 525 grams, which seemed a little on the light side. I wanted to check on the yardage in those 18 ounces, as it varies from yarn to yarn, and I wanted to make sure I’d have enough. The yardage wasn’t stated in the pattern, so I went online to have a look. I didn’t find much in the way of helpful information, as it turned out – although the V&A do have this lovely shade chart. Remember those? I used to love choosing wool with my Mum, from the little tufty shade charts that she used to keep in the sideboard. Wouldn’t it be nice to have those again now, so that we could see what we were getting before we ordered online?

Anyway, I digress.

10414450_10153106962778829_244072257356306818_n

What I did find, eventually, was this. The exact wool called for in the pattern, a grand total of 18 ounces, all in the same dye lot, and in absolutely perfect condition! And to top it off, a rummage in the button stash turned up the perfect set. I still can’t believe the serendipity of it!

The thing I still don’t know, sadly, is the yardage of each of those tiny one ounce balls of wool. It’s not stated on the label, so the only thing I can do now is unravel one, and measure it. I might also, for the first time in my knitting life, actually make a gauge swatch and measure that too. Given that I have precisely the amount of yarn called for, I can’t even entertain the possibility of running out. After all, it’s not as though I can pop down to the shops and buy some more!

Satisfying Saturday

Look what I just found for the princely sum of TEN PENCE at my local church fair! It explains all the things I never quite understood about dart manipulation, plus I love the 1980s styling. Brilliant!

Now this is what I call a bargain. Paul and I popped into our local church’s fair on the way home from the Post Office, where I managed to pick up this excellent book for the princely sum of TEN PENCE. I had a quick flick through, and suddenly the mysteries of dart manipulation seem a lot clearer. Once the Vintage Night’s out of the way, I feel inspired to draft myself a new bodice sloper and do some experiments!

The start of a Miette cardigan - my first top-down seamless knit. Though I'm a bit worried I'm going to run out of this great sparkly yarn!

And this, the product of about a week’s knitting (on and off) is the yoke of a Miette cardigan in a lovely mottled pink yarn with a sparkly strand running through it. I’d thought that seeing everyone else’s photos from Me-Made May would make me want to rush out and buy lots of sewing patterns. Thankfully that’s not the case, but seeing lots of different versions of this cardigan did make me want to cast on immediately! It’s a cropped style, which is good for me as I’m very short-waisted, and also good as I don’t really have enough yarn for the pattern. It’s supposed to have three-quarter length sleeves, but I’m definitely going to end up with short ones. Once I’ve finished the body, I’ll knit the neck and front bands. Then I’ll know I can use all the remaining yarn on the sleeves – assuming there is some!

I don’t know whether I’ll get it finished in time to wear it as part of Me-Made May, but I’m going to give it a good try.

(Oh, and both of these photos are also on Instagram. If you’d like to follow me there, I’m “inexplicableemporium”.)

Me-Made May: A Scruffy Start!

1/5/14

Oh dear. The Me-Made May Flickr group is filling up with all sorts of lovely smart people showing off their finest hand made clothing for the occasion. And then I go and post this.

Typically, yesterday I was wearing an almost entirely me-made outfit. Today, not so much.

  • Trousers: Black cords with buttons on the pockets, John Rocha for Debenhams
  • T-shirt: An ancient black long-sleeved Hanes men’s skinny fit, from back in the days when we used to print t-shirts. (Though this one’s always been plain.)
  • Jumper: Me-Made black fleece cowl-neck tank top.
  • Bracelet: Honey & Ollie, with added dangly bits
  • Glasses: Gok Wan for Specsavers. (I need an eye test soon, which almost certainly means I need new glasses. I’m avoiding that possibility because I love this pair so much and they’ve been discontinued.)

I took the photo at work, in the very untidy cloakroom, because I don’t currently have an accessible full-length mirror at home. I suppose I should remedy that, if I’m supposed to be taking pictures of myself for the rest of the month!

1/5/14

I did have one other bit of hidden me-made goodness though, which was my favourite socks. I love wearing handmade socks, there’s just something so warm and comforting and lovely about them. And yet I only own two pairs, because I keep knitting things for other people at the expense of my own feet! I think I need to be a bit ruthless, and just treat myself to a few new pairs of socks. It’s not as though I have any shortage of sock yarn (a new skein arrived today!), just a shortage of time. (I’m a slow knitter, so socks take ages.)

Comments from the Flickr group have so far been polite, with the key observation being that I look “comfortable”. Which I am, because that’s the entire point of the clothes that I make for myself! Living with fibromyalgia being the literal pain that it is, comfort is of paramount importance. If I want to have enough space in my brain to be able to get on with my life, I need to reduce my external sources of pain as far as possible. Which means comfortable clothes, at all times.

I do think I need to up my game from today’s outfit though. Otherwise “comfortable” could all too easily be synonymous with “frumpy”, “boring”, “shapeless” and “scruffy”. I may well be all of those things in myself, but I don’t necessarily want that to be reflected in my clothes!

Socks and salt dough

Untitled

I’m so bored of saying this, but I’m ill, AGAIN! Just a cough and a cold, no doubt brought home from one of the hundreds of children who came to take part in activities at the museum over half term. But as a result, there has been a great deal of languishing on the sofa, and a need for some extremely simple knitting. So, I used up some leftovers of sock yarn and made these teen-tiny newborn sized baby socks!

Untitled

When they were done I still had a little bit of yarn left over, so I improvised a pattern for some matching mittens. They’re so cute, I might have to start knitting baby socks with all of my leftover sock yarn! And even though I was looking for easy knitting, I still managed to learn something – these little socks have my first ever short-row heels. I don’t think I managed to close up all the holes very neatly, and I didn’t wrap the stitches, but I know that once these socks have been through the wash a few times, any little irregularities will disappear.

Salt dough experiments

This afternoon I had a little bit of a play with some salt dough, which is currently waiting to go in the oven. I tried two recipes, both of which I’d found on Pinterest, but one was significantly better than the other. These are made from my usual combination of 2 parts flour to one part salt, but with the addition of a small amount of cornflour. This made the dough feel extremely smooth, and it certainly picked up the detail from the leaf cutters (designed for fondant icing) very well.

Salt dough experiments

The second recipe… well, that just made a great big mess. It called for cornflour and bicarbonate of soda, but while the proportions of the recipe were provided, there were no instructions. I knew the split second I’d added too much water because I didn’t have dough so much as this…

I’ve made cornflour gloop with the toddlers enough times to know that I was never going to make anything useful out of it, and I don’t know why I didn’t realise sooner that this is what would happen! Perhaps the state to be aiming for with this recipe is something more like damp sand rather than actual dough. Although I don’t know whether that would hold together enough to cut shapes out of it. (It does work for bath bombs though, so perhaps it would be okay.)

The reason I’m mucking about with salt dough is that I’m looking for an alternative to polymer clay. I did an experiment several years ago using essential oils to scent Fimo, but now I think I want to use something a bit more natural as my base material. I’ve had limited success with papier mache, so I’m thinking that air drying clay might be my next best option. We’ll see. If these little leaves and flowers survive their baking and a little bit of paint, perhaps salt dough will be fine!

Ups and downs

"My face hurts"  First drawing with Sketches on the ipad, 17/02/14

So, last Friday was Valentine’s Day. In our continued tradition of unequal gift-giving, I gave my husband a card, and he gave me an iPad! Admittedly he was going to give me the iPad anyway – he’s just upgraded to a new one, and I’ve inherited his old one with a nice new case. But he certainly gained a great deal of brownie points by wrapping it up in lovely paper!

I’ve been downloading lots of exciting new apps, mostly ones for drawing and sketching with. I’ve chosen a few free ones that I can try out, before I decide which ones I like best and want to pay for. The drawing above was done with an app called Sketches, and it mirrors the theme of this past week. It’s titled “My Face Hurts”.

Fibromyalgia + toothache = unhappy face.

Also on Valentine’s Day, I had to go to the dentist. Luckily we didn’t have a romantic meal planned for the evening, because I ended up having a tooth taken out! Four days later it’s still really painful, and the fibromyalgia doesn’t like it at all. Much to my frustration my face now acts as a warning beacon when I’m in a lot of pain, and this is how I came home from work today. Lovely! Given that I have a public-facing job, and it’s half term this week, I can only hope that I’m not scaring too many children away from the museum!

Green Cardigan

This rather different picture of me, from all the way back in 2008, is the cover photo for the first knitting pattern I designed. After a comment left on the blog by someone trying to track down a copy, I was prompted to open my own Ravelry store, and this is currently the only pattern in it.

I do have three existing patterns that I can add (also available in the Tutorials section to the right there), but I need to work out how to do that without duplicating the original patterns, as I seem to have done with this cardigan. I also have two completely new patterns ready and waiting, but they’re both waiting for photographs. All of my test knits were given away as Christmas presents, so I need to sit down and knit some new ones so that I can have a photo shoot. The temptation to dye my hair pink for the occasion is now extremely high!

What I Did At The Weekend

Paul's Birthday Cupcakes

I know it’s Wednesday already, but I had a few days off work at the end of last week and the beginning of this one, so it all blurred into one lovely long weekend where I basically did nothing. Well, I was ill for a couple of days, which is what really prompted me to think that Doing Nothing for a while would be a really good idea. And it was.

During these days off, Paul had a birthday. While he was out I thought I’d try a little experiment, and I baked a batch of cupcakes! To be perfectly honest, they didn’t turn out that well. They didn’t really rise, and the chocolate didn’t really melt, so they looked a bit funny, and they weren’t light and fluffy so much as dense and a bit strange. But, they tasted nice, and several people have eaten them without complaining of a stomach ache, so perhaps they weren’t as bad as all that! Still, I think I’ll stick to sewing.

Poole Twintone Dinner Service

After a lovely birthday lunch with Paul’s parents, we brought back with us several boxes of crockery which used to belong to Paul’s Nan. She couldn’t take all of this with her when she moved into residential care, so we are now the very excited owners (well, let’s be honest, I’m a lot more excited than Paul is!) of a Poole Twintone dinner service! We must be missing a box though, as none of the coffee pots have their lids, and we have one rectangular lid with nothing to sit on. The set is so extensive because it was added to over many years, received as gifts, and picked up at antique shops and car boot sales. That explains the seventeen (seventeen!) tea cups…

yarma

While all of this nothing was going on, I managed to make myself a Very Bright hat. The picture above is from Yarma, a $0.99 app that allows you to upload photos to Ravelry straight from your phone. It does have filters built into it, but the hat really is that bright!

yarma

The yarns are all hand dyed. The pink background is a cochineal-dyed cashmere from Elisabeth Beverley at Plant Dyed Wool, and the stripes are hand-spun Blue-faced Leicester mini-skeins by The Outside. (I wrote about them over here.)

The hat was going really well, until I reached the very last decrease row. Somehow I managed to pull one of the circular needles out of the stitches, and because the row below was also full of decreases I couldn’t figure out how to get all of the stitches back onto the needles again in the right order. (Hence the mess you can see in the Yarma photo above.) Thankfully the stripes gave me an excellent place to rip back to, so I very carefully picked up the last row of orange stitches and worked the decrease section again. Phew! The pattern is Wurm, which I’ve knitted I think three times now.

I still don’t quite know how I ended up with a hat though. I’ve been spending weeks walking to the bus stop in the cold thinking, “I must knit myself a pair of gloves or mittens, these fingerless ones are too cold”. I had every intention of working up a pair of lovely rainbow-striped gloves that would keep my fingers warm on the way to the bus stop. But then I would have needed to divide all of the little skeins in half… and work out how many rows to knit in each colour, so that all the stripes were the same size… and the next thing I knew, there was a nice, simple hat flying off the needles.

I do have a little bit of yarn left over though, in all eight colours. Just enough to knit yet another pair of fingerless mittens, knowing my luck!

Cowls and snoods

Gold silk feather & fan snood

According to my definition (I don’t know whether it’s the same as anybody else’s), a cowl and a snood are both a tube of fabric that sits around your neck. The difference between them is that a cowl stays there, whereas a snood is long enough that it can be pulled up and over the top of your head. The snood above is one that I knitted for a Christmas present, and I have to admit I was quite sad to give it away. Thankfully there’s enough yarn left over (Fyberspates Scrumptious Laceweight) that I might one day get around to knitting another one for myself.

Grey & black snood

This one I made today, from a remnant of soft cotton/viscose blend jersey, and half an old t-shirt of Paul’s. It needs to be a smidge longer, so that it can cover the head without creating a chilly gap at the back of the neck, but its size was determined by the materials available. Next time I’ll start with yardage, and make it a little bit longer. I quite fancy a fleecy version of this as well, as long as it doesn’t bunch up too much under the chin.

Black & floral cowl

The main endeavour of the day has been drafting a pattern and making up a few cowls, which are now listed in the Etsy shop. I’ve been wondering for ages what on earth I could make from the remnants of jersey fabrics in the stash, and sitting with a very cold neck at work the other day prompted these cosy little neck warmers! They just pull on over the head, and you can either drape them in an artistic and casual fashion, or fold them down neatly like a turtleneck. The floral one is the same on both sides, and the spotty & stripy one is reversible. I’ve listed two of those on Etsy, though I’m extremely tempted to keep one for myself. (I’m keeping the stripy snood though, so perhaps two grey neck-warming things is a bit much.)

Grey & black spotty & stripy cowl

One of the things I really need to improve this year is the photos for my Etsy listings. Despite my endless wittering on Facebook, the vast majority of the visitors to my little shop are coming from within Etsy itself, so I need to upgrade my listings to attract as many views as I can. I like the white face with the white wig – I think it gives a context to the photos whilst keeping the emphasis firmly on the product. However, I am aware that the polystyrene lady looks a little… well… cheap. Sadly, having spent all my money on hat blocks, I can’t afford to upgrade her for a classier model any time soon, so I’ve been thinking about how I could get rid of the polystyrene texture. Papier maché, perhaps, with a layer of white paint over the top? I also need to improve my listing photos generally. They look fine on my Mac at home, but on any other computer they seem very grey and dull, which isn’t quite the look I want to go for! Perhaps a little re-calibration is in order.

I’m aware that everything I’ve posted here lately has been “Look, I made a thing!”. This must be especially dull if you’re already following The Eternal Magpie page on Facebook, as I tend to post all my Things over there as I go along. There is other stuff rumbling along in the background (I broke a tooth, my job is changing, the new house keeps throwing challenges our way, my health is still a mess), I’m just not quite sure what to say about it all just yet. I have a few days off work at the end of this week and the beginning of next, so I’m hoping to take some time to have a bit of a think. (Probably enforced by dental anaesthetic, yuck.) I’m really enjoying all of the Things I’m making at the moment though, and I hope you are too.

Progress on the pattern, and a sock cheat-sheet!

Re-writing the pattern

Well, the knitting pattern’s still in progress. I finished knitting the first test-mitten in the larger size yesterday, and when Paul came home and tried it on for me, it was revealed to be ENORMOUS. So, after consultation with regard to how exactly Paul likes his mittens (apart from Not At All, which he doesn’t really get a choice about, being married to a knitter), I have now re-written the instructions for the larger size. I could have unravelled the Very Large Mitten, but I spent ages working out how to make a cable pattern fit on the back of the hand, and it seems a shame to let all that work go to waste. So I’m knitting the matching one anyway.

I’ve now printed out several copies of the pattern, so I can keep notes about each pair of mittens and any alterations I might continue to make. I have two test-knitters ready to go, but if anyone else would like to give the pattern a try, please let me know! I can email you a pdf file of the latest draft, but you’ll need to supply your own needles and yarn.

Judy's Magic Cast On

This is a sock toe, my first knitted using Judy’s Magic Cast On. At first I couldn’t get the hang of it, but now I’ve got the crossing-over part figured out, it really is like magic! Next I need to figure out how to cast on two socks at once using this method. That would really knock Second Sock Syndrome (where you absolutely can’t face knitting the second one) on the head. And make sure they both come out the same. (Harder than you might think.)

When I first learned how to knit socks, I made myself a cheat sheet. I use the slip-stitch heel pattern from Wendy D. Johnson’s book, Socks from the Toe Up. I very heartily recommend this book – it has lots of different options for casting on, three different types of heel, and lots of patterns to plug into your socks once you’ve got the basics figured out.

But, I don’t want to carry the entire book around in my sock-knitting bag, which is where the cheat sheet comes in. I know how to knit socks now, but I need reminders of how and when to turn the heel, and how to do a stretchy cast off, and how many rows I knitted on the first sock, so I can make the second one the same. Hence the cheat sheet.

Because I find it so useful I thought it would be nice to share it, so I’ve uploaded it to a tutorial page. I should say that the original pattern obviously remains © Wendy D. Johnson, and you really do need her book for the full instructions! The sheet isn’t a full sock pattern in its own right, it’s just some helpful reminders for when you haven’t got the book in front of you.

Meanwhile, I’ll be knitting yet another test mitten, and hoping that this one turns out to be a normal human hand size!

Mitten pattern…

Mitten pattern

So, the weekend’s knitting was derailed a little bit, when I decided it would be a good idea to invent a pair of mittens, knit them, and write up the pattern for publication. As you do.

I’ve knitted the first pair of mittens, in the smaller size, and have written up the pattern. (Easier said than done, maths has never been my strong point!) I like tickyboxes in my knitting patterns, so I can easily scribble all over them and keep track of what I’m doing. I’m currently knitting the mittens in the larger size, so I can make sure it’s definitely possible to get two mittens out of one ball of wool.

The design is extremely simple, and the pattern’s hopefully written in such a way that a beginner can understand it. Because the mittens are so plain, I think the back of the hand would make an excellent place to practice simple lace motifs or cable patterns. If I can figure out how to write up some modifications without making the pattern a dozen pages long, I might give that a try too. Meanwhile… back to knitting these cuffs!