Lace & Ribbon Choker

Lace & ribbon choker

I was going to write a tutorial for this, but I honestly can’t imagine how anybody could need one.

  1. Take a piece of lace that fits around your neck.
  2. Take a piece of ribbon three times as long as the lace, and narrow enough to fit through the holes.
  3. Thread ribbon through holes in lace.
  4. Add a pendant if you happen to have one lying around.
  5. Tie it around your neck.

Ta-daa!

Elderflower Cordial time again!

Elderflowers

Paul and I had the day off work today, and the first thing we did was go for a little walk around the lake and pick some elderflowers. We’ve been watching them open for weeks, and today there were just enough to fill a bag and bring them home.

After a quick trip to the supermarket for sugar, lemons and limes, we now have a big saucepan full of ingredients just waiting to turn into cordial. The nicest thing about this recipe is just how simple it is. Combine ingredients, ignore for 24 hours, remove bits, drink cordial! I think the hardest part is waiting for it to be ready.

Here’s the recipe that we use.

I have a sneaking suspicion that we picked enough flowers for two batches, but I’ve put them all into a litre and a half of water, the same as we did last year. Hopefully it won’t be too strong – although as it’s cordial, I suppose we can just keep diluting it until it tastes nice!

Dorset Buttons

Dorset Buttons

Slightly larger than actual size (they’re about an inch across), here are three Dorset Buttons that I made at the weekend. I was too tired to make the waistcoat that these will eventually be sewn onto, so I figured that making the buttons was at least a start.

I followed a tutorial in a 1935 sewing book that I picked up in Oxfam a few weeks ago, but because Everything Exists on the Internet (even if you’d rather it didn’t), I can offer you a link to some instructions from the British Button Society. Mine’s a rather measly “Blandford Cartwheel” with only eight spokes. There’s also a rather lovely picture tutorial at Craft Stylish.

Speaking of tutorials, it’s nice to see that people are actually using some of mine! Becca at Pink Toad Designs made some flower brooches. The buttons she’s used for the centres are gorgeous!

These three buttons are all the sewing I’ve had time for in the past few weeks. A combination of starting a new job in the mornings and helping out at Paul’s office in the afternoons has left me with the time and energy for nothing but working and sleeping.

This is why I write tutorials.

Pink Salamander's Bird Skirt

Pink Salamander made a skirt, using my Gathered Skirt Tutorial.
The bird fabric is from IKEA – isn’t it adorable?

You can read all about the project over on Burda Style.

British Cowgirl's Flower Brooches

Ariane had a go at the Flower Brooch Tutorial, and came up with these gorgeous creations.
Not having a huge stash of buttons, she got creative and gathered up a strip of fabric to make the centre of the flowers. Beautiful, and clever!

You can see how Ariane did it over at her LiveJournal, British Cowgirl.

This is why I like writing tutorials – because I get to see what comes back from them. All of my projects use the absolute simplest of techniques, but you can come up with such an amazing variety of results. As Ariane demonstrated with her flower brooches, it doesn’t even matter if you don’t have all the “right” materials! You can use your own imagination and ingenuity, to make exactly what you want.

That, for me, is what sewing’s all about.

If you want to, you can learn professional techniques and make astonishingly complicated things. But these simple projects show that even as a complete beginner, you can pick up a needle and thread and make something beautiful.

This is not a jeans dyeing tutorial.

I have a confession to make. The very day after I wrote about Value versus Cost, I went out and bought a pair of cheap jeans. There are some garments that are going to wear out just as quickly whether you pay £10 or £100 for them, and jeans fall into that category for me.

I went into H&M to look at the Matthew Williamson smocked dresses and shirts, and whilst they didn’t suit me (and the smocking was cheated, with elastic) I did rather fall in love with a pair of his men’s jeans. I liked the fabulous bright pink colour, and the studs around the waistband. I tried them on, but the style was not especially flattering on me. So, I sadly left them behind.

By that time I couldn’t get pink jeans out of my head. Could I find a pair in any other shop? Of course not. But then I remembered that New Look sell white jeans, so I grabbed a pair in my size (and a much more flattering cut!), and set about dyeing them in the washing machine.

I had planned to write a tutorial on how to dye your jeans, using Dylon machine dyes. Then I realised that the tutorial would read:

  1. Buy a pair of white jeans.
  2. Buy a packet of Dylon Machine Dye in your preferred colour.
  3. Measure out 500g of salt.
  4. Follow the instructions.

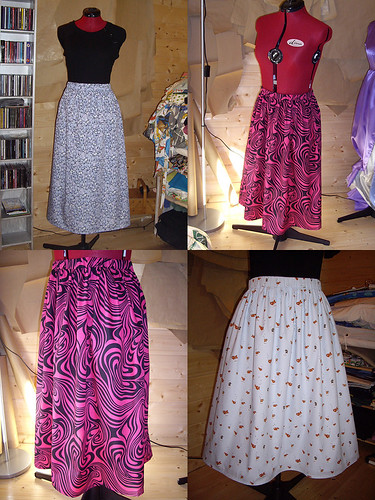
That didn’t seem like much of a tutorial really, so you’ll just have to believe me when I say that I am now the proud owner of a pair of EXTREMELY pink jeans!

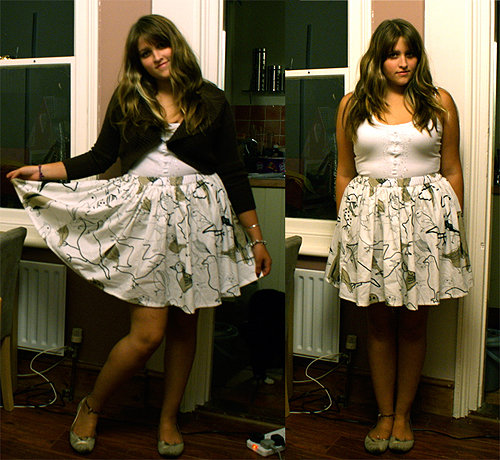
Don’t forget that you don’t have to start with new jeans, or go for such a bright colour. I’ve often used Dylon’s black machine dye to revitalise an old, faded pair of jeans. These dyes also work really well on cotton sheets, t-shirts… anything made from cotton that can safely go through the washing machine. The only thing you need to watch out for is the polyester stitching you find on most garments – that won’t pick up the dye at all. But if you choose your colours carefully, or add a bit of embellishment to match the stitching, you can make it look as though you planned it that way all along.

Suffolk Puff (Yo Yo) Flower Brooch Tutorial

Flower Brooch Tutorial

This is what I’ve been up to today – making an enormous flower brooch using suffolk puff (yo yo) techniques.

I’ve written up a tutorial for you, if you’d like to make your own!

Tutorial Time Again!

Gathered Skirts

I was making a very simple gathered skirt with an elastic waist yesterday, and I remembered that I already had a tutorial for that style.

The tutorial is over here, and you can also download a PDF version.
There are no pictures in the version on the blog (computer failure, oops), but there are pictures in the PDF.

I’ve also uploaded a PDF version of the elasticated skirt tutorial that I posted a while back.

Thanks to everyone for such positive feedback on my previous tutorials – I really appreciate it! Comments and questions help me to make them better for you in the future.

I’ve had several requests to write up a tutorial for the wheat pads and lavender bags, so that’s going on the To-Do list.

I’m also considering giving away the secret of how I draft my underbust corsets. One of the most common searches which leads to this blog is “how to draft a corset pattern”, and that information isn’t even here yet! (Although you can get some clues from looking at the pictures.) I think it’s about time I rectified that situation.