Silk Waistcoat

Scot's Silk Waistcoat

This is Simplicity 4923 again – a waistcoat to go with the pirate shirt.

It took me a whole day to hand-work fifteen buttonholes and then sew on fifteen buttons. Blimey. I know I’m quite slow at hand-sewing, but I didn’t expect it to take so long! It was worth it though. The waistcoat looks really lovely with the matching buttons, and although I had no choice about making the buttonholes by hand (stupid sewing machine), I think they look quite smart.

(I have a horrible sneaking suspicion that I’ve accidentally sewn the buttons on the “women’s” side… but there’s nothing I can do about it now.)

I only made one change to the pattern, and that was to make the pockets functional. I hate pocket-flaps without pockets underneath, and this waistcoat definitely looks better with pockets than without. I broke out my trusty Reader’s Digest Complete Guide to Sewing and learned how to make a bound pocket with a flap. It’s not the neatest sewing I’ve ever done, but the slightly wobbly corners are completely hidden by the flap, and it looks lovely from the outside. Possibly it’s not the best idea to try out a new technique for the first time on somebody else’s clothes… but hooray for functional pockets!

Pirate Shirt

Scot's Pirate Shirt

This is Simplicity 4923, in white cotton lawn. I only made two pattern alterations to this one – I shortened the front facing, and made buttonholes in the cuffs so that they can be fastened with cufflinks.

Purple linen Regency-ish dress

Simplicity 4055

This is Simplicity 4055 again, this time in a lovely deep purple linen. I did make a couple of amendments to the pattern, mostly to the fit of the bodice. I widened the sleeves by an inch, to allow room for my biceps and to make it easier to lift my arms. I also made a full bust adjustment (a novelty for me!) to allow me to wear a modern bra rather than Regency stays. Next time I need to bring the gathering a little more towards the middle, but the fit is still very much improved.

Simplicity 4055

I also altered the back of the bodice, to eliminate the buttons. Not having a maid to dress me, I couldn’t fasten the buttons between my shoulder-blades without some serious yoga practice, so I decided to get rid of them. Instead I added a rather anachronistic zip into the side seam, which was much easier to manage. I really like the back of the bodice without the buttons, it looks much neater.

I did have a brief look around the internet and in some of my costume books, to see whether there were any examples of Regency dresses that didn’t fasten at the back, and was very interested in this tutorial for making a bib-front style. The wraparound section at the front would eliminate the need for separate stays, and you could make lots of different detachable bibs with embroidery and smocking and all sorts of details. That idea is now looking very tempting for my next big dress project!

Regency-ish Dress and Bloomers

Regency-ish dress & bloomers

(Sorry about the terrible picture, trying to take photos of black lace is a nightmare.)

Today I have finally finished all the hand-sewing on this Regency-ish dress based on Simplicity 4055. Some of it was of my own making – I had to bind the edges of the armholes to stop the seams of the net sleeves from being scratchy. Originally I’d put poppers at the back, but it turned out to be a bit tight and every time I moved they’d pop open. Not good for dancing. So I unpicked the poppers, put in eyelets, and now it laces up. Not very Regency. Ah well. The length’s hardly period – and it’s even shorter than I’d intended, hence the definitely not-Regency bloomers to go underneath.

The bloomers started life as Simplicity 2777, view E. I left off the waist casing, and finished the top edge with picot edged lingerie elastic. I also left off the leg bands and ruffles, because I found a piece of very extravagant garter elastic in my stash. It was much too stretchy to use as an actual garter, but absolutely perfect for trimming these little shorts.

I’m still trying to get used to the shape of the dress. It’s pretty and I know it’s basically the same shape as me, but I’m so conditioned to believe that every woman should have a neat little waist that I feel as though it looks a bit frumpy. Hopefully that’ll wear off when I put it on and discover that it’s actually comfortable rather than digging into the waist that I haven’t got, which is what happens with most of my other dresses. Which is why I never wear them.

I’m wearing the outfit on Friday evening, so hopefully I’ll be able to ask someone to take a better photo for me!

Regency Bodice

Regency Bodice

Remember me saying that I fancied making a Regency dress for the summer? Well, I went and grabbed myself a copy of Simplicity 4055, read a number of reviews online, and started sewing.

Normally in a Simplicity pattern I’d cut a size 18, but I’d read that this pattern came up large, and I knew I wasn’t going to be wearing umpteen layers of Regency underwear underneath it. So I checked the measurements, took a deep breath, and cut out a size 14. I made a muslin, and it fitted absolutely perfectly!

I have to say that this is the first pattern I’ve ever made that I haven’t had to alter in the bust, or at least think “oh well, I’ll just have to wear a padded bra”. I suspect this means that almost everybody else who makes this dress is going to need to make a full bust adjustment, or actually wear Regency stays underneath.

The bodice is made from three layers. The spotty mesh is basted to plain black poly-cotton, which are treated as a single layer. It’s then lined with another layer of the same poly-cotton. The sleeves are also underlined, with black dress net (crinoline). The spotty mesh is very light and floppy, and I knew that I wanted the sleeves to stand up by themselves. I also wanted to keep the translucent quality of the mesh, so the net seemed like the perfect solution. Structurally it’s worked really well, but the armscye seams are incredibly scratchy, despite being run through the overlocker. I think I might have to bind them with tape, to enclose the edges of the net completely.

Unfortunately I didn’t make a muslin of the sleeves, which have come out just a tiny bit too tight. I’ll be alright as long as I don’t want to go around waving my arms above my head, but next time I’ll make them slightly larger around the bicep.

I plan to make the skirt in plain black poly-cotton, overlaid with the spotty mesh again. The slight spanner in the works with that plan is that the spotty mesh is only a metre wide (40″), and the pattern uses the full width of 115cm (44″) fabric. I haven’t had a good look at the pattern pieces yet – I might be able to lose a little bit of width at the hem of the skirt. Alternatively I think I have enough of the mesh to put a seam at the centre back, and leave the the centre front hanging in two pieces. I’ll have to see.

I’m trying to make this dress completely from materials already stashed in my Shed, so now I’m hoping that I’ve got enough narrow lace to trim the mesh layer of the skirt. It also needs three buttons for the back of the bodice, but I don’t think I’m going to have any trouble finding three black buttons in here!

Pintucks and ruffles

Pinktucks and ruffles

This is just a little sneaky peek at something I’m working on at the moment. It’s a costume for Aldbrickham Clog & Step Dancers. I play recorder and concertina for them, and I’m helping out a friend who needs a new blouse.

We wear roughly Edwardian costumes, based on the working clothes worn in the countryside until about 1914. I’m putting this one together based on a Renaissance pattern, a steampunk-Victorian pattern, measurements taken from two existing blouses, and a bit of imagination!

Pirate Shirt

Simplicity 4923

Today, rather than sewing something I actually need, like a dress for work or a winter coat, I decided to make a pirate shirt. As you do. (If you’re me.)

The pattern is Simplicity 4923, view C. I made a size Medium.
The fabric is just a plain black polycotton, and the cuffs are trimmed with flat broderie anglais lace – all from my stash. The collar size and length are just right, but the sleeves are absolutely ridiculous – even by 18th century standards. I could easily shorten them by four or five inches and they’d still be enormous!

Next time I think I’d like to make one in a nice soft white linen. I’ve found the perfect linen buttons too – just like the ones on the smocks at MERL. In fact, I might employ a technique I saw on a number of the MERL smocks, and make some horizontal tucks in the sleeves to shorten them.

I also want to have a look at The Cut of Men’s Clothes by Norah Waugh, and see what I want to do about the front fastening. I don’t really want to add eyelets and ribbon, so I might go for thread loops and little buttons. I should have done that on the sleeves, but for the sake of convenience (and maybe a touch of laziness) I went for snap fasteners instead.

There’s another goth night in a couple of weeks, so I plan to wear this with Paul’s old leather trousers. If I have time, I might make a waistcoat to go over the top. I’ve still got a piece of black and silver brocade that should be just about big enough.

Brotherhood of the Wolf

Last night I watched Brotherhood of the Wolf, and now I find myself wishing that I had a masquerade to go to, so that I had an excuse to make a couple of really exciting 18th century costumes.

Simplicity 3637 would be an ideal starting point – although it might be rather an expensive one. The dress takes almost nineteen metres of fabric! In a pretty brocade or embroidered silk… actually, I don’t even want to work out how much that would cost.

And then of course there’s Simplicity 3635, to go underneath. Ten metres of steel boning for the panniers… and twenty-eight metres for the stays! Wow.

I don’t know though, whether I’d want to wear such an enormous dress, or whether I’d choose to go for a fancy gentleman’s coat instead.

Simplicity 4923 looks rather drab in these pictures because it’s intended as a pirate costume, but again in an embroidered silk it could look absolutely stunning.

I think I’d probably make the shirt, trousers and waistcoat from the men’s pattern, but use Simplicity 3677 for the coat.

I’ve made both the men’s and the women’s versions of the coat before, and the women’s version has a princess seam at the front which makes for a better fit.

Obviously none of these patterns are terribly accurate, historically speaking, but for a masquerade or a costume party, they’d be an excellent starting point.

Then I’d just need to find somebody who was willing to go with me, of course. Paul really doesn’t do dressing up.

Corduroy and Velvet

Corduroy and velvet

This weekend I’ve been sewing the waistcoat to go with the Dorset buttons I made last Sunday. The pattern is McCalls 8285, and the fabric is a sage green cotton velvet. It’s almost finished – I just need to make the buttonholes, and sew a little silver buckle onto one of the straps at the back.

The trousers I actually made a few weeks ago. I didn’t photograph them because as soon as they were finished I put them on, and I’ve been wearing them (or washing them) ever since! They’re another pair of Vogue 1034, this time in black needlecord with a bit of a stretch to it. The pockets and waistband are lined with the remnants of the Sea of Holes fabric – just so I could feel amused by having pockets full of holes. (Yes yes, groan, I know.)

The trouble with wearing both cord and velvet is that they both act a bit like velcro when it comes to fluff. The cords accidentally went through the washing machine with a stray tissue which left them all white and fuzzy, and now they’re covered in green dandruff from cutting the velvet.

This outfit is two-thirds of what I’ll be wearing when I go out playing the recorder with the clog dancers. I now have just less than three weeks to either make or buy a shirt with long sleeves and no collar. I’ve got miles of white polycotton that’s suitable for shirting, and two patterns that would be fine. One is Folkwear 117 that I’ve made before, and the other is McCalls 5976. It just remains to be seen whether I’ll have time to make one of them, or whether I’ll need to dash down to the shops. Thankfully pintucked shirts seem to be in fashion at the moment, so hopefully I won’t have too much trouble finding one that’s suitable.

Three weeks until my first recorder-playing performance in about eighteen years. Gosh.

Paris Promenade Dress

I was invited to a 1920s Tea Dance, so of course I took the opportunity to make a 1920s dress!

Tea Dance, Rising Sun Tea Dance, Rising Sun

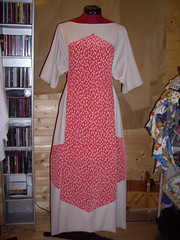
It’s Folkwear 261, the “Paris Promenade Dress”.
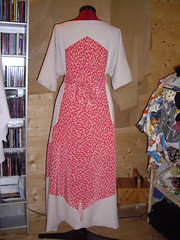
That’s front and back – you can tell the back by the tassels on the ends of the sash. (Look closely – they’re camouflaged, but they are there.)

Folkwear are apparently very accurate with their period sewing patterns, and this one assumed that you weren’t going to be using a sewing machine for anything but the long, straight seams. This meant that it was constructed in such a way that you couldn’t use a sewing machine for anything but the long, straight seams, and so I spent a Very Long Time doing a heck of a lot of hand sewing.

I’m very, very pleased with the work that’s gone into this dress. There was a lot of hand sewing, and the construction was like origami, but I’m (mostly) happy with the results.

Tea Dance, Rising Sun

I also made a last-minute hat which apparently made me look like some kind of demented floral sous-chef, which wasn’t quite the look I’d been going for. Pretend you didn’t see that, if you like. 😉

Tea Dance, Rising Sun

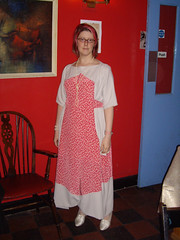
Here’s the dress, complete with bad hair moment after I’d decided that I couldn’t tolerate the stupid hat any longer.

That front apron part actually works as one truly ENORMOUS pocket, by the way. (Not all the way down to the point, there’s a seam about half way across the wide part, on the inside. That I sewed by hand. Aargh.)

That poofy bit at the hem is REALLY ANNOYING. Doesn’t do it on the dress form. Doesn’t do it on the coathanger. Doesn’t do it on the ironing board. Put the dress on? Poof. Grrrrr.
The hem is actually on a very deep fold of the fabric, so even though it’s been pressed into place, it’s draping differently because I’m not the same shape as my dress form. I think the best way to fix this is going to be to have someone else pin the hem into place while I’m wearing it, and then I can press the fold in the same place that it’s going to fall when the dress is being worn.

I have to say that the dress was absolutely FABULOUS to wear. I’m not usually a fan of synthetic fabrics, but the main body of the dress is a polyester crepe lightweight suiting, and it flows and drapes absolutely beautifully. Because the sash is also slippery (polyester georgette), you can lift your arms up very easily, and the dress just slides around. So floaty, so comfortable, and very glamorous-feeling.

Possibly also very comfortable because the narrowest part of the dress measures 68″ around, with the widest part clocking in at 84″. (That’s roughly twice as big as me.) I’d been a bit worried that all that fabric might make it look as though I’d gone to a party in a big beige sack, but thankfully that wasn’t the case at all!

I’m half considering making another one, perhaps in black. And without the silly hat.