“Fun-time Ensemble” part one…

Advance 8990

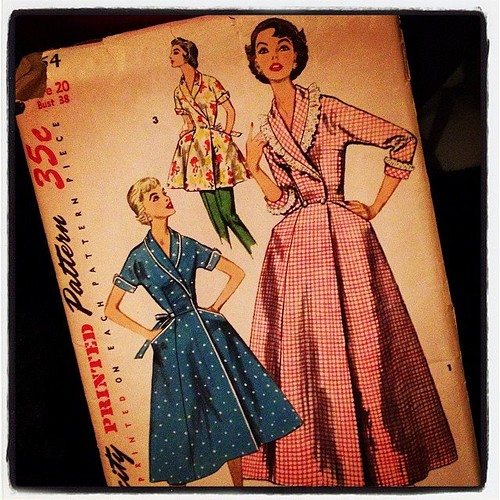
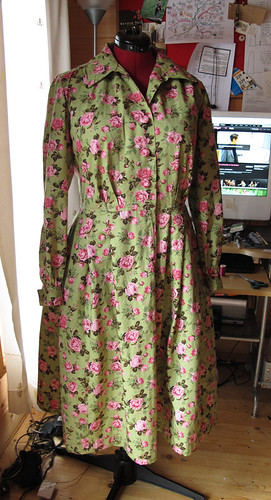
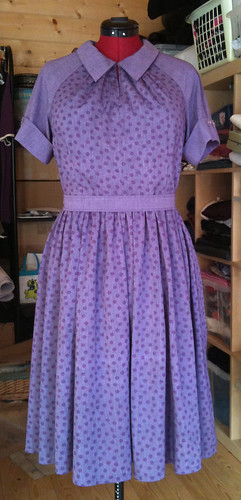
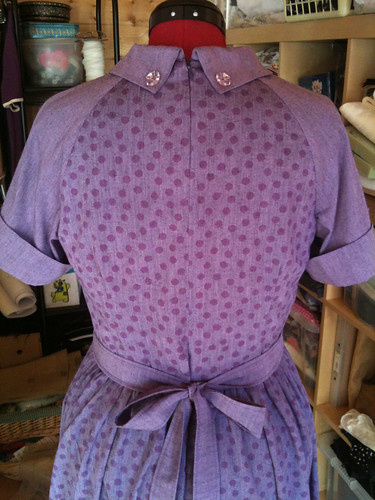
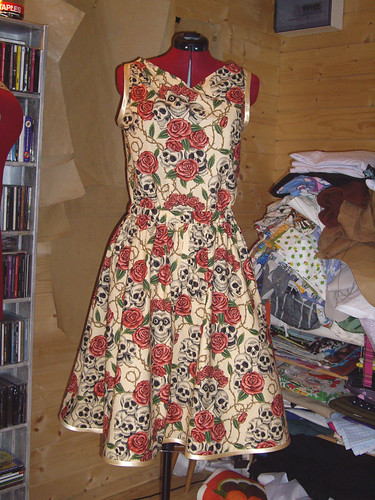
Say hello to the lovely ladies of Advance 8990 – a 1959 pattern for a playsuit and skirt. I did have a momentary pause about making what is, after all, a glorified onesie, but it looked like a useful garment for wearing in the heat. I like that it’s quite a formal-looking romper, what with the collar and turned-back sleeves, but I particularly like the idea of popping a matching skirt over the top so that you’ve instantly got a nice smart dress!

Advance 8990

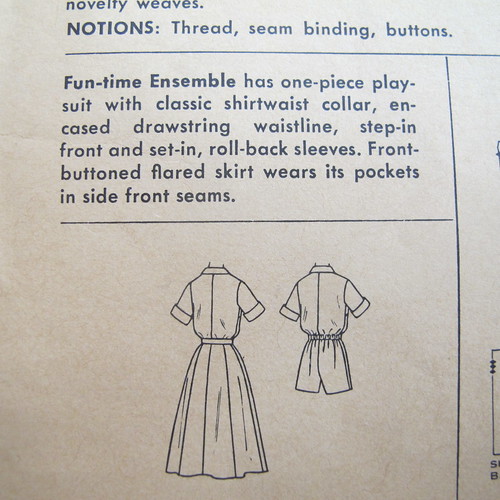
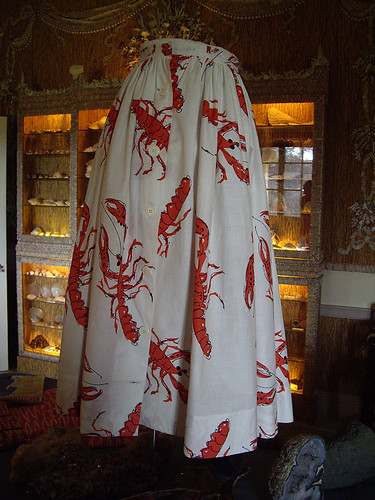
I asked for Paul’s opinion (as I usually do) before I bought the pattern, and was met with an emphatic shaking of the head. Oh dear. To be honest, I think he was put off by the rather alarming hat-and-balaclava combination, which I definitely won’t be attempting to carry off! But honestly. How could I possibly resist a pattern that describes itself as a “Fun-time Ensemble”? I’m only disappointed that it doesn’t list “novelty prints” amongst the suitable fabrics. (Rest assured though – a novelty print version will be forthcoming at some stage.) It could only be better if it had a raglan sleeve.

Advance 8990

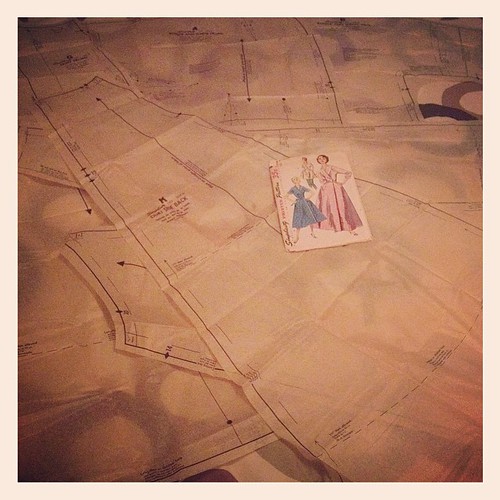
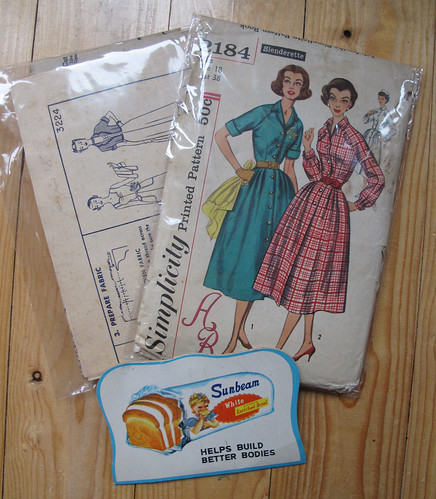
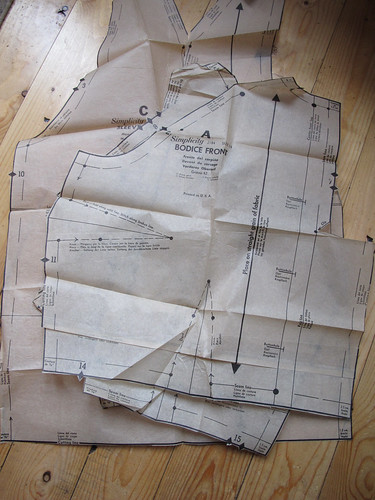
I was quite excited to discover that the pattern, despite being 56 years old, was actually brand new and still in its factory folds! Unfortunately, it looks as though it perhaps hasn’t been stored in the best conditions, because the paper was incredibly fragile – more so than any other vintage pattern I’ve come across so far. I managed to tear the pieces several times as I was unfolding them and cutting them out, so I think drastic measures are going to be called for. I expect to be using this pattern more than once, so I think I’m going to iron the pieces onto some lightweight interfacing to stabilise them. I know this will effectively destroy the original pattern, but it’s in such poor condition that it’s pretty much ruined anyway. Normally I’d trace the pieces onto stronger paper, but the originals are just going to fall apart in the envelope, so I might as well make sure that I can use them for the purpose for which they were intended.

(The museum/conservation person in me is writhing in horror at the prospect of ironing these pattern pieces onto adhesive interfacing. But I do believe that these things are made to be used, and this particular example is no longer of a quality worth trying to preserve in its original state. So, I’m doing it anyway.)

Advance 8990

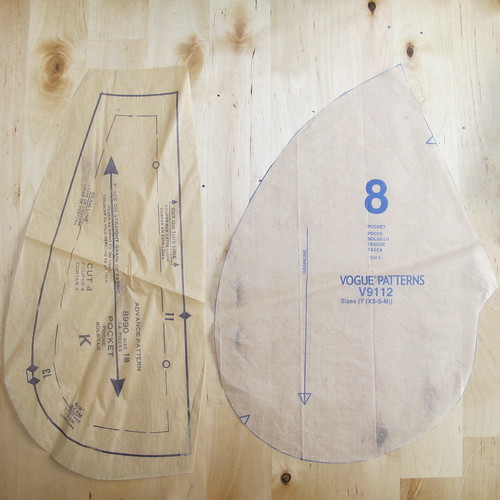
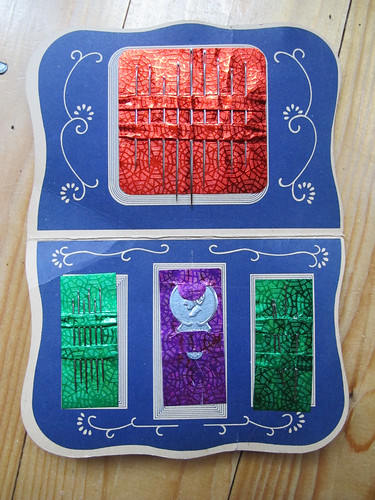
According to the envelope, the “Front-buttoned flared skirt wears its pockets in side front seams.” I spent ages looking for the pocket pattern, thinking that the piece on the left was some kind of cuff or trim. Nope – it’s the pocket. But it’s tiny! The innermost dashed line marks the seam allowance, which will be the finished size of the pocket – and I can’t even get my hand inside it! What were the designers thinking?! I don’t know what the lady of 1959 was expecting to be able to keep in there, but it must have been very small.

When I make the skirt, I’m going to substitute the pockets from my new Marcy Tilton pattern, Vogue 9112. You know, ones I can actually fit my hands into. I’ll probably add slightly smaller pockets to the playsuit as well, just because. You can never have too many pockets.

Advance 8990

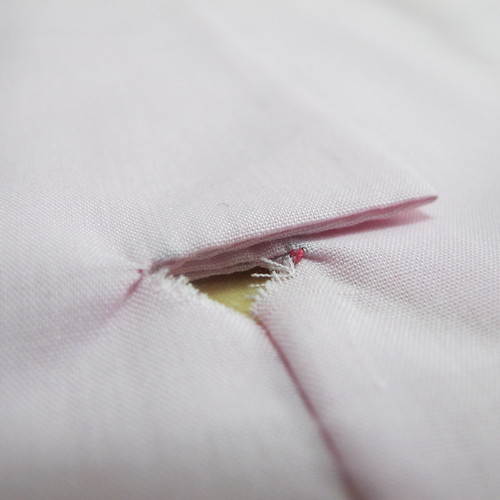
I have to say that the instructions for this pattern are pretty sparse. They basically say “cut out pieces; make playsuit”. So when I followed an instruction that said “clip to small dots”, I did so… but apparently in the wrong direction. This extremely neat little triangular hole is at the bottom of the front placket. I can patch it so that it looks deliberate, but it’s not the best place for a hole in a pair of shorts, really! I will now be annotating the instructions on a separate piece of paper, as I go along.

Advance 8990

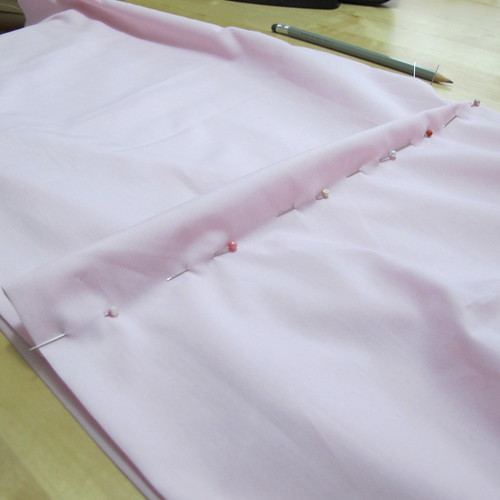
This attractive pale pink poly-cotton was just a piece of left-over fabric sitting in the stash, and I’m very glad that I decided to use it to try out the pattern before cutting it out in decent fabric! These pins represent a slightly unusual alteration, in that I’m taking 6cm out of the length at the too-long centre front, and then tapering it out to nothing at the side seams because the back is the perfect length.

I was a bit confused about this at first – how could the back length be fine, but the front be far too long? However, I think what I’m actually doing here is making a sway back/big bum alteration in reverse. Normally I’d expect to lengthen the centre back to create extra room, but I’d also expected the playsuit to be too long overall, because I’m very short in the body. As a result, the back is fine as it is, which makes the front too long by comparison. It’s all very complicated!

The only other alteration I’m going to need to make is to add a couple of inches of width at the hips. The shorts fit, but they’re quite snug, and it looks a bit out of balance with the rest of the garment being so loose. Adding a little bit of extra ease will give me the space to include the pockets, too.

I have to admit that the temptation to run down to the local fabric shop and snap up five metres of lots of different cheap novelty-print cottons is very high. But I do have some fabric in the stash that I can use up first, and I’m still trying as hard as I can not to buy non-organic cottons. We’ll see how long my resolve lasts.

Sewing Bee Show-Off

the-original-1950s-walkaway-dress

Hands up, who watched last night’s Great British Sewing Bee? I must confess to getting a bit over-excited when they announced that the challenge was going to be the Walk-away dress! The idea was that the dress was so simple to make that you could, as the ad above says, “cut it out at 9 o’clock… wear it out at noon!”

The illustrations also show the use of a binding foot to make all that trimming easier. We may think of all these gadgets as new and modern, but they’re really not. The machines may have only been able to do one straight stitch, but the amount of extra presser feet that came with them was phenomenal. Bias binding, lace insertion, quilting, ruffles… all sorts of things!

Hallowe'en dress

I thought it was ridiculously popular when the pattern was re-issued a few years ago (seriously, the dratted thing was everywhere), but during the 1950s according to Butterick, “Sales of the pattern were so great, that at one point manufacturing of all other patterns ceased, and only the ‘walk-away’ dress was produced until all back-orders for this dress could be filled.”

20061028_00003_5.jpg

I’ve certainly made my fair share of these dresses, although I don’t think I ever followed the pattern exactly, and I certainly never made one in only three hours! The Hallowe’en version, above, tied with ribbons at the front because my weight used to fluctuate a lot, so I knew buttons would be no good. This skull print one had a deep lace trim around the bottom of the circle skirt, which I was really pleased with. I seem to remember that I also added a layer of net inside the skirt, to give it a bit of extra body.

Nicola's Katie Jump Rope walk-away dress

This one’s in a lovely Denyse Schmidt quilting cotton, with the binding continued all the way around the hem, and three gorgeous little flower buttons…

Nicola's Buddha's Cloud walk-away dress

…and this one has a contrast front section in a plain cotton. One thing it is important to note if you’re making this dress from a printed fabric, is that you need to choose a design that’s non-directional. If your print only works one way up, it will turn out to be upside down at some point on a circular skirt! Thankfully nobody was caught out by that on last night’s sewing bee, but it’s something I had to learn the hard way…

20070606_00020_15.jpg

And of course, I’ve saved my favourite version for last – my “camouflaged elephants” dress. You can see that I’ve modified the neckline to make it lower (boat necks really don’t suit my narrow shoulders), and I’ve also shortened the bodice. Unfortunately I eventually had to resign myself to the fact that no matter how many alterations I made, this dress simply didn’t suit me, and was a nuisance to wear as a result. If it doesn’t fit very tightly around the waist, the heavy circle skirt pulls the much lighter inner layer up and back, and it’s really annoying to keep fiddling with it all day!

For me, this was a lesson in being seduced by the popular pattern of the day, regardless of whether it actually suits your body type or will be comfortable to wear. Turns out this is a lesson I’m going to keep having to learn, as I just can’t resist a lovely pattern. Or a novelty print… I really want to make another dress with those elephants now!

I finally finished something!

Style 3349, 1971

I bought this sewing pattern for the grand total of £2 in my local Sue Ryder charity shop, although the general consensus of the internet was that I’d overpaid. Charming! A few weeks ago – or is it actually months now? – I started making the 1970s smock-style overdress, and was distracted half way through by other things.

All it needed was the top stitching and the buttonholes, which I’d been putting off because making them by hand (oh, and doing the hemming by hand too) was going to take so long. In the end I bit the bullet and risked making the buttonholes on my notoriously uncooperative sewing machine. They’re not perfect, but they’re lot better (and involved a lot less swearing) than I expected, which was a pleasant surprise!

Untitled

Unfortunately this is the best picture I could get of me wearing it. This house is so dark, the mirror’s propped up in my sock drawer because there’s nowhere to actually hang it on a wall… and I’ve found out today that we’re not going to be building the beautiful new sewing room that we’ve been planning for the year since we moved in here, because the quote from the architect was rather a lot more money than we can afford. So, until the clocks change again and we start getting a bit more daylight into the house, crappy pictures of sewing (or Instagram filters) it is!

Untitled

This is my newest old pattern (dating from 1955), and I bought it specifically for view 3, the short one at the top. When I unfolded the pattern pieces I was amused to note that it’s not actually mid-thigh length, as shown in the illustration, it actually reaches almost to my knees. But that’s what I want – something to wear over my many pairs of coloured trousers, that’s a bit smarter than a t-shirt. (Whether my colleagues will consider the 1970s smock top an improvement over a t-shirt remains to be seen, in fact I’m a bit nervous about wearing it, but it’s rather a waste of time and fabric if I don’t!)

Untitled

The pattern only gives fabric requirements for non-directional prints, so I had to work out the yardage that I’d need for a fabric which can only go one way up. Because the skirt is made up of six very wide gores, the answer turned out to be A LOT! Five yards for a knee-length dress, in fact! I didn’t have enough of the fabric I’d had in mind (I suspect that will now become another 1970s smock), so I’ve started it off in a lovely organic cotton check. I’m currently deciding whether it needs a contrast trim (collar, cuffs, pocket yoke and tie belt), or whether it would be better in just the one fabric. In fact, as I haven’t actually traced the skirt pieces yet, I’m wondering whether to make the most of having quite a lot of this cotton, and actually making the calf-length version instead. I’m leaving the bodice on the dress form while I have a bit of a think about it.

Given my current sewing speed, you’ll probably see it again next year!

Simplicity 3042

Simplicity 3042

Yes, I’m still here, just about. The last few weeks at work have been somewhat stressful, and I’ve spent a lot more time out of the Shed than I normally prefer, so things have been a bit quiet on the sewing front.

So, this is Simplicity 3042, a pattern from the late 1950s or early 1960s, in a Slenderette size 18½. Not my Holy Grail sewing pattern, because I wanted to make a test version in a size that should theoretically be absolutely perfect for me, so I could make the relevant alterations without too much guesswork.

Simplicity 3042

So, on the plus side, the fit of a Simplicity Slenderette size 18½ is indeed absolutely perfect! I didn’t make a single alteration to the pattern, the waist is in the right place (and the right size), and the length is spot on too.

On the minus side, I don’t really like this fabric now it’s a dress (maybe Paul was right about it looking like a sofa?), and there are quite a lot of mistakes that happened when I thought I already knew how to make a dress and so didn’t read the instructions properly.

Simplicity 3042

To begin with, I simply didn’t read the instructions for the front facing. That had implications for the collar, which now looks nothing like the illustration. I didn’t bother to unpick that, because I don’t plan to walk around with the pattern envelope pinned to my chest, so I don’t think it matters too much. Annoying, though.

The skirt, on the other hand… I knew I was going to need to make alterations to the pleats, because the side front/back panel piece was slightly larger than the fabric I had left… because I didn’t follow the layout given with the pattern. On top of that I somehow managed to sew the skirt to the top in such a way that it didn’t fasten properly, so I unpicked the waist seam and started again. I thought I’d done really well to get it to all fit back together again… and then I noticed that the left front (as you wear it, so on the right in the picture) has three pleats in the skirt, while the right front only has two. I also didn’t turn the binding of the skirt placket to the inside, so a) you can see it, and b) the skirt front doesn’t sit quite right.

Simplicity 3042

I am quite pleased with these cufflinks though. Two pairs of covered buttons, linked together by several strands of thread that’s covered with a simple buttonhole stitch. Now I just need to make the eight buttonholes in the french cuffs to fasten them through. Sadly I think that’s going to have to wait until tomorrow. The amount of hand sewing I can do in one day is gradually getting less and less. Making seven covered buttons and the three buttonholes in the front of the dress is all that I can manage for now.

This dress will be worn, mainly because I don’t want to waste four metres of fabric and two days’ work. I have a pink v-necked pullover that will go nicely over the top, and enough wool to knit a pink cardigan too. I’m also waiting for the arrival of another pattern, Simplicity 4838, which is a pinafore (jumper) dress.

Simplicity 4838

I’d planned to make a couple of these in wool or suiting fabrics, to wear over my smart shirts for work. Conveniently, it will also cover up the botched centre front of the dress I’ve just made, and lessen the impact of the sofa-like fabric. I think I even have some dusky green suiting which will go perfectly.

Next time, I might even read the instructions, too.

Simplicity 2184 – it’s here!

Patterns from HoneymoonBus

Wow, that was quick. It took less than ten days for my PERFECT PATTERN to reach me, all the way from Canada! Bless her, Zoe from HoneymoonBus had already sent me a lovely convo via Etsy, to say thank you for mentioning her on my blog, and to let me know that she’d included a little gift. I didn’t know it was going to be a second pattern! That one’s Simplicity 3224, a sundress from 1950 with the options of fantastically enormous pockets and a matching bolero jacket. Fantastic! That one doesn’t have its original envelope, but thanks to The Magic of the Internet I’ve been able to track one down, so I can see how much fabric I’ll need to make it.

And just look at this simply gorgeous promotional needle case from Sunbeam Bread:

Vintage needle case

Isn’t it a beauty? Almost completely intact, you can just see where a couple of needles are missing from the right-hand green panel. On the back is a little paragraph explaining that adding vitamins to bread doesn’t affect its taste or texture, and reassuring us that it’s the best way of staying healthy.

The Pattern!

And here’s the pattern itself! I’m really pleased that Simplicity patterns were printed ones by the 1950s, as unprinted dress patterns tend to confuse me a bit. This one seems to have been made up as a short-sleeved blouse – the long sleeve and skirt pieces remain uncut. The previous owner had also done exactly what I was going to do, which is to take about an inch out of the bodice length to make it smaller – her original folds are still in place!

Once I’ve given all the pieces a gentle smoothing with the iron, I’ll trace them to keep the original safe for future use. I also need to make a few alterations, and it’ll be much better for me to scribble all over a new brown paper pattern than on this original one.

I popped into town yesterday to buy some frog fastenings and sequin trim to finish off my velvet cape, but both were out of stock and I had to order them in. Now I don’t feel so bad about putting the coat to one side while I start work on these lovely dresses!

Oh, and the reason I ended up buying from HoneymoonBus, rather than one of the many other vintage pattern sellers out there? Her Etsy store is arranged by size. I appreciate that if you’re looking for a pattern from a particular decade, that might be a bit annoying. But I’ve spent so many hours looking at vintage pattern sites, finding something I like, and discovering it’s too small, that to be able to go a place where I could just look in one section and find something in my own size was such a relief! So thanks again to Zoe, I can’t wait to get sewing!

Simplicity 1755

Simplicity 1755

This is Simplicity 1755, my new favourite dress. Fifties-inspired style? Check. Pockets? Check. Raglan sleeves? Check. Pretty collar? Check. Perfect!

Well, sort of.

Although the dress itself has come out lovely, the pattern leaves a fair bit to be desired. To begin with, the instructions for the button loops and sleeves are wrong. Somebody’s had a little centimetres versus inches confusion, because the instructions say to cut the button loops 2cm long, when they actually need to measure 5cm – about 2 inches. And the instructions for the placement of the button loop are wrong as well. In the end I decided to abandon the loops completely, and used a couple of sparkly buttons on each sleeve to hold the cuffs in place.

Simplicity 1755

I also added a couple of sparkly buttons on the back of the collar, because the pattern didn’t seem quite right there either. The instructions call for hooks and eyes to close the two halves of the collar together at the back, but the pattern pieces simply aren’t the right shape for that to happen. So, the sparkly buttons are holding the back of the collar down to the dress, to stop the corners from flying away.

Simplicity 1755

I’m pretty pleased with the invisible zip, considering it’s only the second one I’ve ever put in. It gaps a little bit at the waist, but the belt covers it, and all the seams match which is good. The waist isn’t terribly defined for a 1950s-inspired dress, but that’s because I had to grade it from a size 16 at the top to a size 20 at the waist to make it fit. I only hope that doesn’t make it look too frumpy, but the most important thing for me is that it’s comfortable.

The fabric is an organic cotton and bamboo mix, in heather and heather splash spot. I’ve used this bamboo fabric before, and it’s fantastically soft and luxurious. Bit crinkly though, so I foresee a fair bit of ironing in my future.

I’ll definitely be making this dress again, probably with a couple of modifications. The pockets are a little on the small side, so I’ll replace those with my own pocket pattern. I also have a shirt pattern with the most fantastically enormous raglan sleeves, and I can definitely imagine a long sleeved version of this dress. In fact, I may have just ordered three metres of this lovely stripy bamboo/cotton, to go with the leftover plain purple… perfect!

Lobster Skirt!

Basildon Park

I managed to miss the Horrockses exhibition at the Fashion & Textile Museum, so I was delighted to pick up a leaflet for Basildon Park and find out that I could see them a little closer to home. The dresses were beautifully displayed throughout the house, but the highlight for me was this lobster-print skirt – ideally placed in a room full of shells!

It was really nice to be able to get so close to so many of the dresses. I learned a lot about the intricacies of their construction just by being able to look at them in such detail. Most of the dresses featured an underarm gusset with tiny topstitching, which was something I hadn’t seen on any of my 1950s sewing patterns.

We also got to chat to the housekeeper, who was doing some conservation work on a pair of beautiful silk curtains. She’d had some very fine net dyed to the same colour as the fabric, and was carefully removing some older, more coarse netting and replacing it with the new. It was really interesting to be able to see the work in progress, and to compare it with some of the work around the house that had already been done.

The gardens and house were very beautiful, but mostly I just want to know where I can get hold of some lobster fabric!

Gingham dress and a price list.

Gingham dress

This is the second incarnation of my new dress pattern – this time in a black and white polycotton gingham. This one’s a bit longer than the first one, and trimmed with black broderie anglais/eyelet.

I’ve now worked out my pricing structure, and it looks like this:

  • Reclaimed/recycled fabric: £90
  • Hand dyed organic cotton: £120
  • Novelty print quilting cottons: £140
  • Hand woven Yorkshire silk dupion: £285

Other fabrics can be used, but I’d like to try and concentrate on the organic, reclaimed, recycled and locally produced as much as I can.

My next task is to build a web page and a gallery, so you can start to place your orders!

Terracotta Dress

Terracotta dress

This is what’s been keeping me busy this week – designing, drafting and making a new dress.

Once I’ve sorted out a pricing structure and a size chart and some other information, I’ll be putting this up for sale, and taking orders.

(Assuming that anybody else thinks it’s a nice dress, and that the credit crunch hasn’t crippled everyone’s dress budgets!)

I’ll be starting off with a range in UK sizes 10-22. Smaller and larger sizes will come later, when I’ve done a bit more work on the proportions of the patterns.

The basic incarnation is designed to fit a B/C cup, but I will eventually be offering larger cup sizes.

It will also be orderable in three different waist lengths. So, if the waist always sits in the wrong place when you buy clothes, you can have the bodice made longer or shorter, for a better fit.

The dress fastens with poppers, with buttons sewn over the top. It comes with a matching sash belt. There are pockets hidden in the side seams. (They don’t add bulk to the hips, because the skirt’s already enormous.)

I’ll be making a few more versions for myself, so that I can build up a picture gallery.

This dress is making me excited and happy every time I look at it across the Shed.

Now I just need to find the people who want to wear it…

Rose Tattoo Retro Dress

Alexander Henry dress

Yesterday I finished off a dress that’s been almost done for far too long.

It was mostly already finished. I just had to add the waistband, sew the top and bottom halves together, and add elastic and binding. Ta daa.

I have a sneaky suspicion it’s going to be too long in the bodice for me, and therefore might need to be re-homed with somebody taller. I hope not, because I’ve just bought a buckle on Etsy, for making a matching belt!

It started life as one of my many versions of Butterick 6582. I don’t think I’ve ever made this dress exactly as per the pattern, and this incarnation is no exception.

This time I’ve left out all of the waist darts on the bodice, and gathered it into the skirt with an elastic waistband. The arms and hem are trimmed with bias binding, and there’s also a layer of tubular crinoline in the hem, to help it stand out without an extra petticoat.

The fabric is Alexander Henry’s “Rose Tattoo”.