The right tools for the job.

Upholstery & Lampshade Needles

No, I haven’t been sewing upholstery or lampshades. But I did find myself in need of a curved sewing needle today, and I knew I had a packet somewhere. I hadn’t realised that they’d be older than I am! They’re in perfect condition, and they were just what I needed to sew through multiple layers of fabric that couldn’t be done by machine.

Pleats & Pins

I’m in the process of making a costume, which is going to be an extremely sumptuous ball gown. The starting point was my (first) wedding dress, which has been sitting in my loft for almost fifteen years. Thanks to an extremely generous seam allowance, I was able to let it out enough to make it fit again! I’m replacing the ivory skirt with a matching burgundy one, but  rather than dismantling the original dress I’m simply adding an extra layer of fabric. So this is five metres of satin, draped and pleated into place.

Clearly there was no way I could have even considered doing this kind of alteration using the sewing machine, but working by hand directly on the dressform (to maintain the shape of the draping as I worked) was rather awkward. Thankfully the curved needles were strong enough to push through all those layers as I sewed down the pleats, and the perfect tool for this kind of fiddly work.

Time permitting, I’m intending to make a matching hat. I have a feeling that these curved needles are going to come in handy again!

Swarovski & Silk

Beaded Collar

This is what reminded me that I hadn’t shown you the silk steampunk outfit – I finally found the time to make one of the accessories to go with it!

In our original sketches, we’d talked about a beaded silk collar and matching wrist cuffs. I haven’t made those yet (I’ve run out of gold eyelets!), but I did manage to make the collar.

The silk is an offcut from the original dress, lined with an offcut of the bodice lining which was heavily interfaced. The Swarovski crystal beads were all unpicked from the original dress, and then sewn onto the collar in two sessions in front of the telly – taking a total of seven and a half hours. That’s just the beading, not the original unpicking, or the sewing of the collar itself. I knew all that time I spent sewing on beads in the bridal shop would come in useful eventually!

I deliberately didn’t take the beads all the way up to the edge, partly to allow a little bit of the lovely fabric to show through, and partly so that there was nice soft silk against the skin.

Beaded Collar

When the collar catches the light, it really sparkles. These photos really don’t do it any kind of justice at all – you really need to see it move. The silk has a beautiful lustre of its own, and with the beads on top… wow. I know that sounds as though I’m blowing my own trumpet, but really, it’s the materials doing all the hard work!

Beaded Collar

And this is how it fastens – three eyelets on each side at the back, and a simple ribbon. Nice and long, so you can just skip it off over your head rather than having to re-lace it every time.

I’ve still got loads of beads left over, more than enough for the matching cuffs. I might ask to borrow the jacket, so I can use up the remaining beads on the sleeves.

I’m really tempted to make one of these for myself… although where I’d go wearing a sparkly crystal collar I’m not too sure! Maybe I’ll just wear it to work.

Steampunk Silk

Steampunk Silk

This is a costume that I made for a friend, way back last October for a Hallowe’en event. She already had a corset and a mask, so they dictated the copper, gold and brown accent colours.

The ivory silk had a previous incarnation as her wedding dress. The slightly distressed texture is a result of putting it through the washing machine, but it left the fabric amazingly soft and a joy to work with. There was enough to make a jacket and a bustled skirt, with some left over for accessories.

Steampunk Silk

The jacket is a modification of two Simplicity steampunk patterns – 2172 and 2207. The back and sleeves were taken from 2207, with the front from 2172. I added lacing into the princess seams at the back, and beading to the cuffs. The buttons were from the original dress, as were the Swarovski crystal beads.

Steampunk Silk

The bustle and swags are in sections, all interchangeable so they can be worn in lots of different ways. They simply tie at the waist with ribbons. The skirt itself is bustled at the back, using ribbons sewn through channels in the centre back seam. This can be let down into a train. There’s a little bit of ruching at the front too, conveniently placed to disguise a stain that wouldn’t come out! (Shhh, don’t tell…)

I also made a petticoat to go underneath, to give  the skirt a little bit of extra fullness. I don’t know why I didn’t take a photograph of that, but you can just see the ruffle peeking out, here. There are better photos of the outfit being worn to stunning effect, but I need to get permission before I post them here. Thankfully it was well received, and looked absolutely fabulous!

As always, I wish I’d had a bit more time to make this. The bustle and swags were a bit rushed, and I would have liked to add much more beading to the cuffs. But I absolutely loved making it. It was a real treat to work with such sumptuous silk duchess satin, and to swap creative ideas with a friend. In fact, it’s inspired me to modify my own wedding dress for an event I’m attending in May.  You’ll have to wait and see how it turns out!

A Message from Neil Gaiman

Message from Neil Gaiman

Which reminds me, I must get on with editing all of my photos!

Vaguely Victorian: Part Two

Victorian-ish outfit

Here you go – for those who were wondering, this is what the vaguely Victorian outfit looked like at the end of a long day, in a lovely Victorian staircase hall.

Contrary to a few people’s concerns, I did not boil to death with so many layers of clothes on. The skirt was quite heavy, but the bustle was so comfortable I kept forgetting I was wearing it and trying to squeeze through spaces that were impossible to negotiate with such an enormous bottom!

At the end of the day I also learned that it is possible to run for the bus in a corset and bustle – although I wouldn’t recommend it! In fact it’s not the ideal outfit for bus travel generally. You can’t get upstairs, for a start, and I was a bit worried that the driver would ask me to buy two tickets for taking up so much room!

I must admit that, without the complicated underpinnings, I’d actually quite happily wear this outfit (or something very similar) to work on any old not-particularly-Victorian day.

Vaguely Victorian

I’ve been asked to work an extra day this week to help out with a school visit, for which I may have heard myself ask my boss “would you like me to come in dressed as a Victorian?”. The session goes with the Victorian part of our building, Palmer House, which was designed by Waterhouse (of Natural History Museum and Reading Town Hall fame) and built in 1880-82.

Paul, bless him, has managed to rein me in from “I NEED TO MAKE A COMPLETE PERIOD-CORRECT VICTORIAN OUTFIT BY TUESDAY” to “please can we have a look in your wardrobe first”.

Victorian-ish outfit

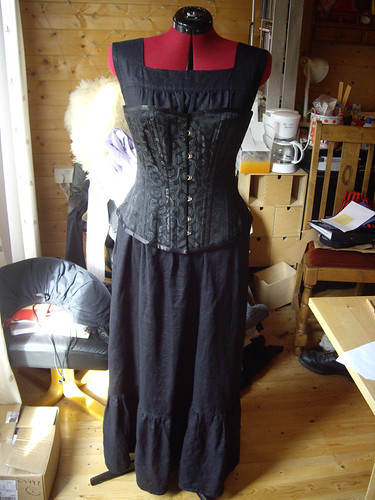
However, I may have used “dressing up as a Victorian for work” as an excuse to buy a corset. I chose a black brocade one which was on the “corset of the day” offer for £25. It ended up costing me almost £40 by the time I’d paid vat and extra for super-fast shipping, but I still call that a bargain. It’s not expertly made, but it’s no worse than any Vollers corset I’ve owned in the past, and it gives a “Victorian enough” shape under all those layers, so I’m happy with that.

The website was a bit weird – I kept finding other people’s things added to my shopping cart and at one point it kept telling me that I was logged in as somebody else, which made me very nervous about giving them my credit card details. But I placed my order at five to three on Friday, 3pm being the cut off for next day delivery, expecting it to arrive on Monday. The postman knocked on the door at 9:30 on Saturday morning, with my corset! So that was extremely impressive. (He also brought my lingerie-sewing book which I thought had got lost in the trans-atlantic post, so hooray for that too!)

Victorian-ish outfit

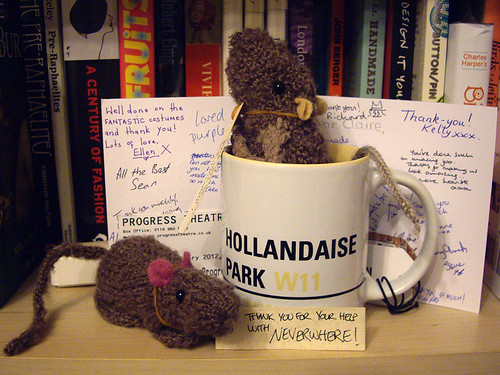
I posted on Facebook about making a Victorian outfit in a hurry, and Chris from Progress Theatre offered to lend me a bustle pad from their wardrobe. I replaced the worn-out elastic with cotton tape, and I think it’ll make quite an acceptable late-Victorian silhouette.

Victorian-ish outfit

Next I added my lilac petticoat, for volume, and a plain white vest to cover up the black dress and corset. I went for black foundation layers because I’d originally intended to wear a black blouse, but the two I thought might be suitable turned out to have inappropriate sleeves.

Victorian-ish outfit

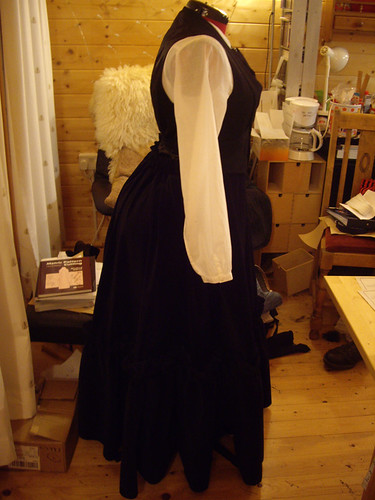
Here’s a side view with the bustle. Is my bum going to look big in this? 😉

Victorian-ish outfit

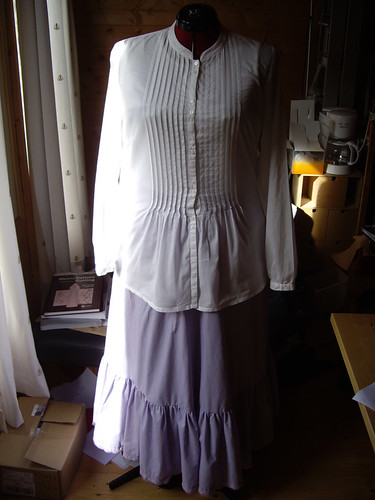
Next layer: the ivory lawn pintucked blouse that I usually wear for being a rural Edwardian when I’m out with the clog dancers.

Victorian-ish outfit

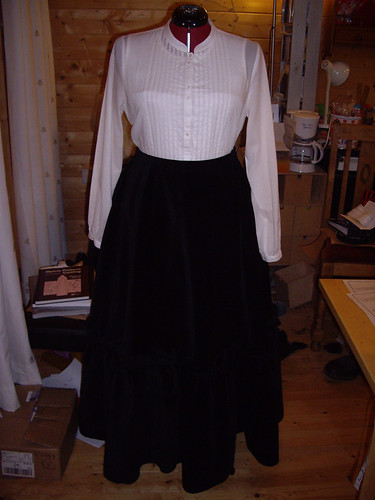
I spent all day making this skirt, but unfortunately velvet doesn’t photograph at all well in poor light so I can’t show it to you properly. It’s Simplicity 2207, the same as my red and black stripy one.

Victorian-ish outfit

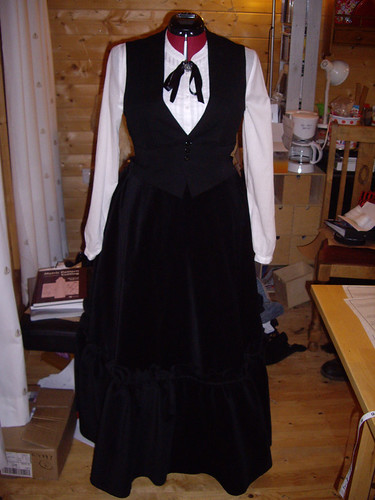
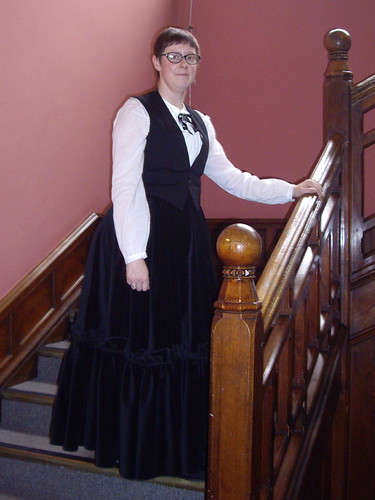
And for the finishing touches: a black wool man’s dress waistcoat, a length of black ribbon, and a marcasite brooch in the shape of an owl. I wear this waistcoat to work quite often, usually with the owl on the lapel.

Victorian-ish outfit

I must admit that I’m not completely convinced by the bustle, even though it’s much smaller with the weight of the velvet skirt on the top. I was looking at photographs of Victorian teachers and the more I see the less I’m convinced that a bustle, even a small one, was worn underneath everyday workwear.

I’ll try the whole outfit on together, and hopefully I’ll be able to get some better photos while I’m at work tomorrow. I can’t do much about my extremely un-Victorian hair and glasses, sadly, but I think this is not too bad, considering I had almost all of it lurking in my wardrobe already!

End of the Line…

Gifts from the cast & crew

Saturday January 28th was the last day of Neverwhere at Progress Theatre. We saw the final performance, which was followed by a party. Louise and I were given mugs and cards from the cast, as a thank you for working on the costumes. The gorgeous rats were knitted by Kate – one for every member of the cast and crew!

Neverwhere get-out

The theatre bar stayed open until 2am, and a mere eight hours later most of the cast and crew were back (in varying states of sobriety!) for the Great Dismantling. Anything that was too covered in fake blood to be retrievable was simply chucked in the bin. Most of the costumes were re-homed in the theatre’s wardrobe, and the dressing rooms ended up even cleaner than before we’d started!

The set though… watching it being torn apart was heartbreaking. Some of the elements have been kept – the metal stairs, the handrail, and all the ladders have been stored until they can be used again. But every single roof tile, every brick, every platform… it all had to go so that the next production (Art, by Yasmin Reza) can get into the theatre and start building their own set and rehearsing in the space.

I have something in the region of three hundred photos to edit, so I can show you what I’ve been so busy with these past few months! Since before Christmas I’ve been saying “never again”… but seeing it all come together was so amazing that I might have volunteered to at least consider helping out with the summer Shakespeare production, Henry IV Part 1. You can keep the “I Told You So”s to yourselves, thank you!

Vandemar’s Raven Skull Rings

Vandemar's Raven Skull RIngs

Oh dear, I’m doing it again. Blogging all enthusiastically, then disappearing for a week. In my defence I’m still working on the costumes for Neverwhere which, as well as doing the odd day or two of overtime at work, is taking up every spare minute of my time and then some.

These are three raven skulls that I made the other day – and in the process of doing so I managed to pull a muscle in my shoulder that trapped a nerve, leaving me wearing my arm in a sling because everything hurt and I couldn’t feel my fingers. Oops. That’s what happens when you spend upwards of seven hours pinching a layer of Fimo into place over an armature of masking tape and paper clip wire, apparently. I won’t be doing that again in a hurry!

You can see the development of the skulls over on Flickr. I did the sculpting and, once the shapes were baked and hardened, I passed them on to Paul who painted them for me. We wanted them to look as though Vandemar had been wearing the rings for years, so Paul’s painted them to look somewhat aged and cracked.

In an ideal world I would have smoothed and sanded out all of those fingerprints, but time was of the essence! If anyone can see the fingerprints from the stage, I’ll be very surprised. Although Louise did spend part of last night’s rehearsal shortening Vandemar’s coat sleeves, otherwise nobody would have been able to see the skulls at all!

They’ve now been mounted onto rings, with glue that I can only hope will be strong enough to last through the entire run. Performances start next week, and I keep thinking that we must be into the final straight with the costumes by now. But Louise and I spent yesterday evening at the theatre and each came back with a to-do list longer than the one we’d started with, despite having sewed our way through the entire rehearsal.

We must be nearly there though, surely?

Spare Batteries

Spare Batteries for Owen's Wig

Happy 2012, everyone!

I’ve done a little bit of goal-setting and resolution-writing, but my personal New Year is going to have to wait. We’re eighteen days away (not that I’m counting!) from the first night of Neil Gaiman’s Neverwhere at Progress Theatre, and there’s still so much left to do on the costumes!

You can see some sneaky peeks of what we’ve all been up to over on Tumblr, and I’ve uploaded some costumes-in-progress photos on Flickr. The costume team are going to a rehearsal tomorrow, to spend the afternoon doing fittings and making a massive list of all the things we need to get finished in the next couple of weeks.

I’m mostly ploughing on with my to-do list, ticking off each little thing as soon as it’s done, and trying not to panic about it all. Most of the big things are now sorted out (with the exception of one complete costume, eek!), so my list is mainly comprised of odd little things like “bring sandpaper” or “buy brown boot polish”. Oh, and “don’t forget the batteries for Owen’s wig”.

Obviously.

Making Progress

Costume-sewing Day

This is what a costume-sewing day at Progress Theatre looks like. On the floor is Louise, making a start on Door’s costume. Standing at the back is Laura (Door), working on the Angel’s costume. Pam is running up monks’ robes on the overlocker, and Liz (Old Bailey) is painstakingly hand-sewing feathers onto her own costume.

The costumes are for Neil Gaiman’s Neverwhere, which runs from the 19th to the 28th of January. Last Friday evening we interrupted rehearsals for WriteFest and The 39 Steps to take over the stage for a photo shoot. The publicity shots are being sorted and edited, and I can’t wait to show them to you as soon as they’re released. A lot of the costume pieces we used for the shoot are only temporary, but the overall atmosphere of the photos is absolutely brilliant.

I’ll be posting more little bits and pieces on here, but I won’t be showing you full pictures of the costumes – we’d rather you came to the theatre to see them! For sneaky peeks, your best bet is to follow @RdgNeverwhere on Twitter.

Tickets are on sale now, but you might have to be quick – a tweet from Neil Gaiman toppled the theatre’s website and generated an awful lot of extra interest! I’ll be involved in costume fittings throughout the rehearsal process, but I’m really looking forward to going along as a member of the audience and seeing the whole show for myself.