Stef’s Silk Scarf

Stef's Silk Scarf

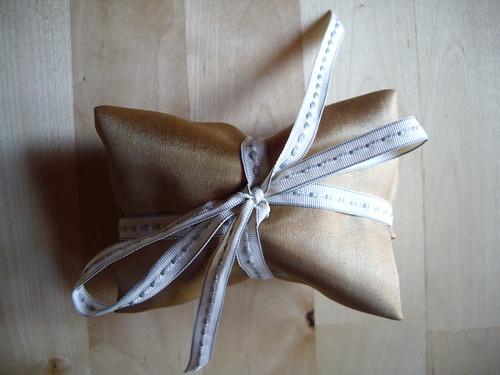
Okay, so I did manage to get a little something done in between my increased hours at work. This was an extra little birthday gift for my mother-in-law.

I dyed the silk with tea, which came out a little bit paler than my previous experiment, but still a lovely colour. Very interesting on the silk too, as the tone seems to change in different light.

Stef's Silk Scarf

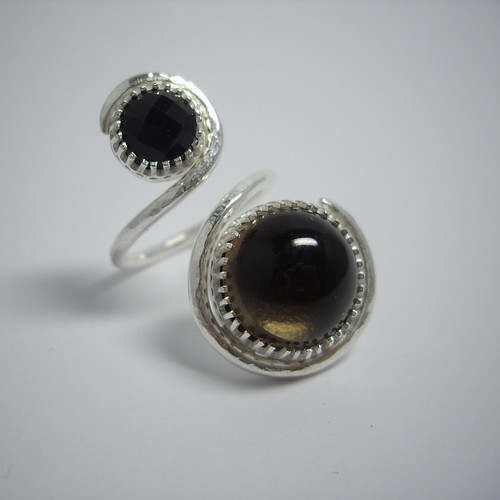
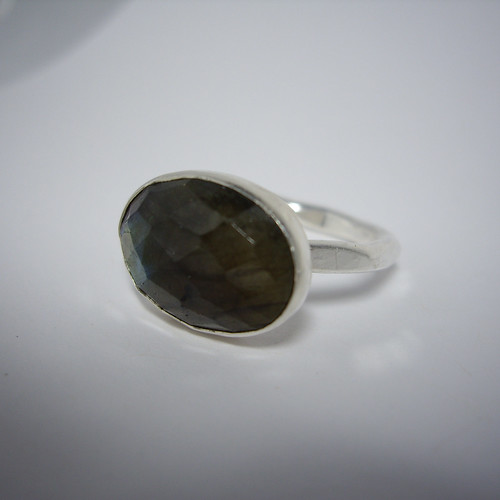
I hemmed all four edges by hand, using teeny-tiny slip slitches. Each corner has an equally teeny-tiny briolette bead dangling from it. The gemstones are labradorite, and the facets catch the light beautifully.

Stef's Silk Scarf

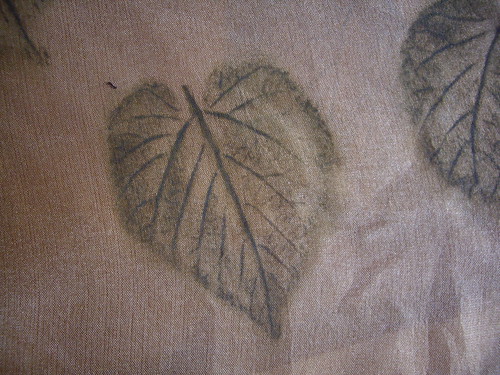
Each end of the scarf is embellished with leaf rubbings. Done using Inktense pencils, they picked up the detail of the leaves beautifully. Appropriately for a silk scarf, the leaves came from the mulberry tree at the Museum of English Rural Life.

Stef's Silk Scarf

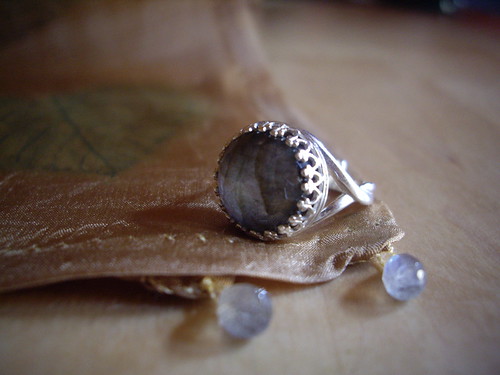
Because no scarf is complete without a scarf ring, I set a matching faceted labradorite cabochon into one of Kernowcraft’s new easy-to-set rings. Because the band is adjustable, it’s perfect to use as either a scarf ring or to wear on your finger.
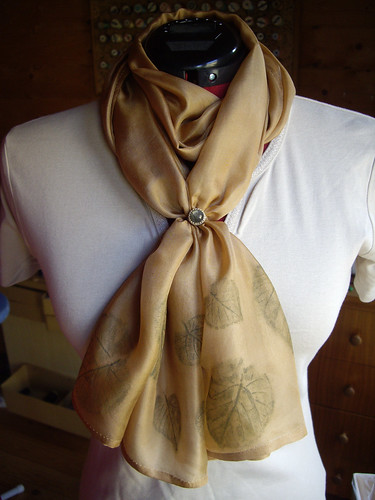
Stef's Silk Scarf

And here it is!

I’ve also been working on a tie-dyed turmeric scarf for myself. I did wear it last week, but I haven’t hemmed the long edges yet, so it needs a little bit more work. I’m so pleased with how Stef’s scarf ring turned out, and how incredibly easy it was to make, that I’m thinking I might need a brass and labradorite one for myself…

Silver Jewellery

Silver Jewellery Class

Looking through my photos on Flickr, I realised that I made quite a lot of things towards the end of last year that I didn’t show you! These pieces were all made on a silver jewellery course at Maiden Erlegh School, with tutor Cathy Newell Price.

The piece above is an adjustable ring featuring two smoky quartz cabochons. The top one’s faceted and the bottom one’s smooth. The band is slightly hammered to give it a bit of texture. I bought the fancy bezel strip, I didn’t make all those teeny-tiny prongs from scratch!

Silver Jewellery Class

This was an experiment with reticulating the surface of sterling silver to create a textured effect. You have to heat and re-heat the silver enough times so that the silver and copper begin to separate, with the silver molecules coming to the surface. Once that’s happened, you can use the blowtorch to create ripples – you just need to be very careful not to melt everything!

Silver Jewellery Class

Which, as it turns out, is what happened here. I got a bit carried away with the blowtorch on one of these little pieces, and melted one end. Because I wanted the two pieces to match, I then had to very carefully and deliberately melt the other one until they were sort of similar. I don’t mind that they’re not exactly the same – I quite like having fraternal rather than identical earrings. Shows they’re made by hand.

I’d originally intended to make a pair of cufflinks, using the larger pieces of reticulated silver for the front, and the smaller pieces for the back. Unfortunately I very quickly ran out of patience while trying to make a chain to join the large and small pieces together. All those tiny little links were so fiddly! So I decided to quit while I was ahead, and ended up with two lovely pairs of earrings instead.

Silver Jewellery Class

This was actually the first piece I finished, a labradorite ring. It’s ever so slightly too big for me, but I couldn’t bear to part with it. I wear it with a plain ring over the top to hold it in place, and the large stones prevents it from spinning around on my finger.

The course finished in December, and I promised myself that I’d do more work with silver back in the Shed. I have all the tools, and lots more stones to set… I just haven’t got around to actually buying any more silver. I’d love to make a pendant to match the labradorite necklace though. Kernowcraft have just got in a beautiful teardrop-shaped cabochon that would complement it perfectly!

Vandemar’s Raven Skull Rings

Vandemar's Raven Skull RIngs

Oh dear, I’m doing it again. Blogging all enthusiastically, then disappearing for a week. In my defence I’m still working on the costumes for Neverwhere which, as well as doing the odd day or two of overtime at work, is taking up every spare minute of my time and then some.

These are three raven skulls that I made the other day – and in the process of doing so I managed to pull a muscle in my shoulder that trapped a nerve, leaving me wearing my arm in a sling because everything hurt and I couldn’t feel my fingers. Oops. That’s what happens when you spend upwards of seven hours pinching a layer of Fimo into place over an armature of masking tape and paper clip wire, apparently. I won’t be doing that again in a hurry!

You can see the development of the skulls over on Flickr. I did the sculpting and, once the shapes were baked and hardened, I passed them on to Paul who painted them for me. We wanted them to look as though Vandemar had been wearing the rings for years, so Paul’s painted them to look somewhat aged and cracked.

In an ideal world I would have smoothed and sanded out all of those fingerprints, but time was of the essence! If anyone can see the fingerprints from the stage, I’ll be very surprised. Although Louise did spend part of last night’s rehearsal shortening Vandemar’s coat sleeves, otherwise nobody would have been able to see the skulls at all!

They’ve now been mounted onto rings, with glue that I can only hope will be strong enough to last through the entire run. Performances start next week, and I keep thinking that we must be into the final straight with the costumes by now. But Louise and I spent yesterday evening at the theatre and each came back with a to-do list longer than the one we’d started with, despite having sewed our way through the entire rehearsal.

We must be nearly there though, surely?