Spotty bolero and apron…

Spotty bolero

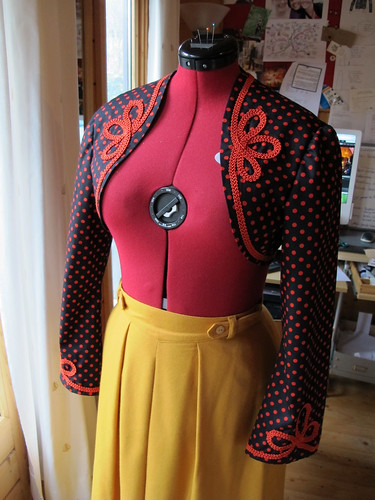
Here’s what I’ve been up to this week – making a spotty bolero from Simplicity 1819. I was intending to make a stripy one, to match the red and black outfit I wore to the Wild Boy’s Ball at Kensington Palace a couple of years ago. Unfortunately the fabric shop was out of stripes and, being too impatient to wait for an order to arrive, I decided to go with spots instead. As you do. This had a knock-on effect as the matching black trim (also unavailable) would have been invisible on the spotty fabric, so I had to go with red. I think it stands out rather nicely! It’s the first time I’ve done this sort of decoration, and although it was a bit fiddly in places, I’m pleased with the way it looks.

(I have to confess that I also love the way it looks with this yellow skirt. The temptation to wear these together is now almost irresistible.)

Spotty bolero and apron

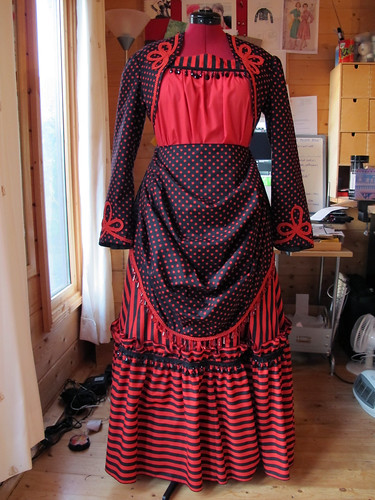
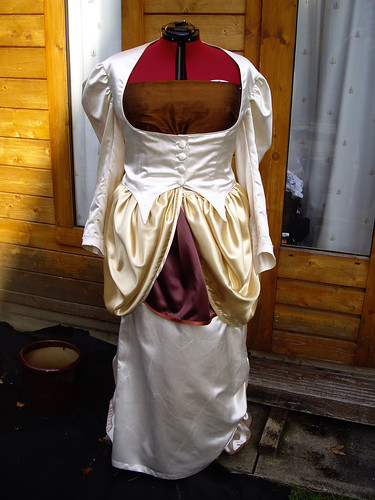
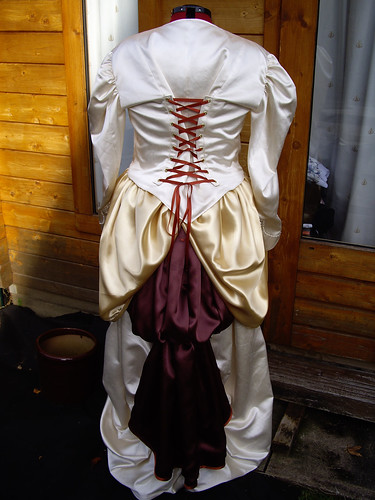
And here’s what it’s supposed to look like, complete with matching spotty apron. That’s only pinned into place because I still haven’t decided whether it’s actually going to be an apron or a bustle. I think an apron though, as I rather fancy tying it with a ridiculously oversized bow at the back. As you do. The apron is also made from Simplicity 1819, a rather loose interpretation of the overskirt.

I think during the day I’ll probably wear this with a plain black shirt, and I have just enough spotty fabric left over to make a matching tie or bow tie. Then for the evening I’ll switch to the dress shown above, and swap the bolero for the black taffeta coat. If I’m feeling fancy, I might put the feather collar back on.

Then, of course, all I’ll need to make is a MASSIVE HAT. I have Lynn McMasters‘ top hat/riding hat pattern, some spare black taffeta, and a magpie skull on order. Watch this space…

Steampunk Silk

Steampunk Silk

This is a costume that I made for a friend, way back last October for a Hallowe’en event. She already had a corset and a mask, so they dictated the copper, gold and brown accent colours.

The ivory silk had a previous incarnation as her wedding dress. The slightly distressed texture is a result of putting it through the washing machine, but it left the fabric amazingly soft and a joy to work with. There was enough to make a jacket and a bustled skirt, with some left over for accessories.

Steampunk Silk

The jacket is a modification of two Simplicity steampunk patterns – 2172 and 2207. The back and sleeves were taken from 2207, with the front from 2172. I added lacing into the princess seams at the back, and beading to the cuffs. The buttons were from the original dress, as were the Swarovski crystal beads.

Steampunk Silk

The bustle and swags are in sections, all interchangeable so they can be worn in lots of different ways. They simply tie at the waist with ribbons. The skirt itself is bustled at the back, using ribbons sewn through channels in the centre back seam. This can be let down into a train. There’s a little bit of ruching at the front too, conveniently placed to disguise a stain that wouldn’t come out! (Shhh, don’t tell…)

I also made a petticoat to go underneath, to give  the skirt a little bit of extra fullness. I don’t know why I didn’t take a photograph of that, but you can just see the ruffle peeking out, here. There are better photos of the outfit being worn to stunning effect, but I need to get permission before I post them here. Thankfully it was well received, and looked absolutely fabulous!

As always, I wish I’d had a bit more time to make this. The bustle and swags were a bit rushed, and I would have liked to add much more beading to the cuffs. But I absolutely loved making it. It was a real treat to work with such sumptuous silk duchess satin, and to swap creative ideas with a friend. In fact, it’s inspired me to modify my own wedding dress for an event I’m attending in May.  You’ll have to wait and see how it turns out!

Satin Bustle Skirt

Bustly skirt - front

To go with the silk corset, I made a satin bustled overskirt. The idea was to have something that could be worn over several different skirts, and could be varied in style.

The top layer is from Simplicity 2207, with a bit of modification. Instead of using a single layer, I doubled the fabric to give a bit more volume. Rather than making ruffles, I gathered a pretty wide lace along the centre back and the lower edge.

Bustly skirt - back

The under layer is made from two widths of fabric joined together in a french seam and gathered in to the waistband. Left rectangular, all the edges were trimmed with the same wide lace, and then the sides were gathered tightly to create the draping at the front. The whole thing simply ties around the waist.

In between the two layers, below the waistband, are several plastic rings. These correspond with ribbons sewn onto the skirt. The ribbons can be pulled through the rings and tied in place to create different bustle effects, or left loose to create a train. I used six metres of satin in total, but because it’s such light fabric you get a lot of volume without too much extra weight.

The skirt, corset, pirate shirt and waistcoat all took a trip to the Summer Darkness festival, and I’m hoping to be able to show you some action photos soon!