This is why I write tutorials.

Pink Salamander's Bird Skirt

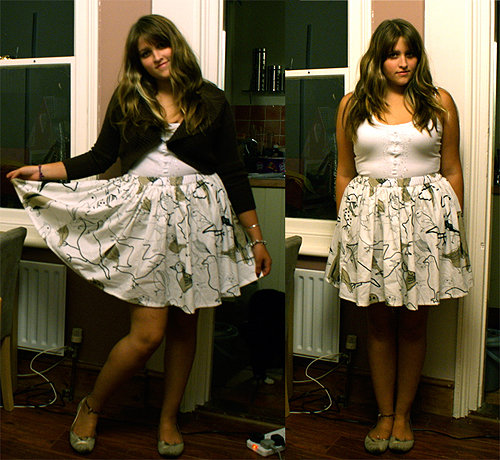
Pink Salamander made a skirt, using my Gathered Skirt Tutorial.
The bird fabric is from IKEA – isn’t it adorable?

You can read all about the project over on Burda Style.

British Cowgirl's Flower Brooches

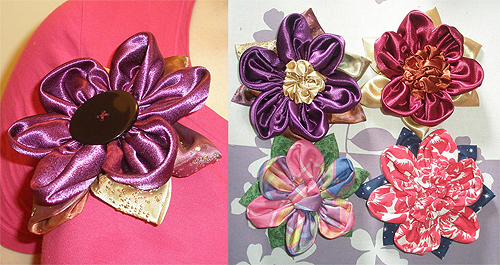
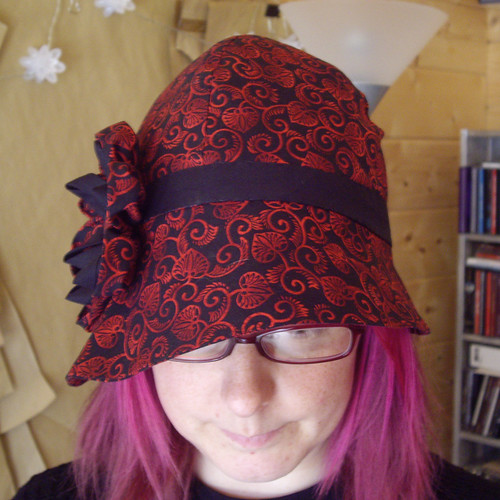
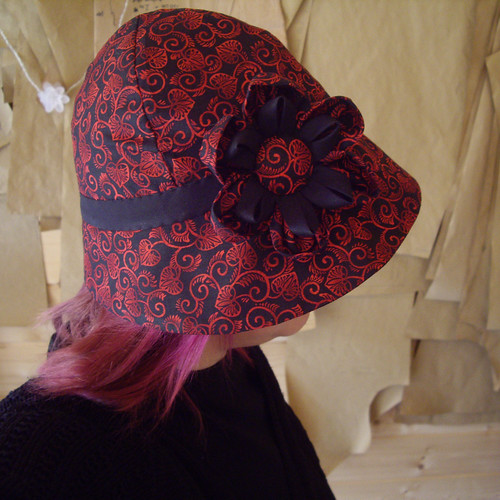
Ariane had a go at the Flower Brooch Tutorial, and came up with these gorgeous creations.
Not having a huge stash of buttons, she got creative and gathered up a strip of fabric to make the centre of the flowers. Beautiful, and clever!

You can see how Ariane did it over at her LiveJournal, British Cowgirl.

This is why I like writing tutorials – because I get to see what comes back from them. All of my projects use the absolute simplest of techniques, but you can come up with such an amazing variety of results. As Ariane demonstrated with her flower brooches, it doesn’t even matter if you don’t have all the “right” materials! You can use your own imagination and ingenuity, to make exactly what you want.

That, for me, is what sewing’s all about.

If you want to, you can learn professional techniques and make astonishingly complicated things. But these simple projects show that even as a complete beginner, you can pick up a needle and thread and make something beautiful.

Desigual

I went shopping with my sister at the weekend. (Hi Jo!) I don’t go shopping very often these days, so it was great fun to go round all the department stores and see what’s in fashion at the moment.

I almost fell down with excitement when we wandered into a new concession in House of Fraser. This coat is one of the more subdued designs from Desigual. Their tagline is “Atypical Spanish wear since 1984”, and everything in their range is amazingly bright and colourful.

Most of the coats I saw were in this asymmetrical style, but they were all made in different materials and colours. Some of them had mismatched buttons, some were lavishly embroidered, and there was only one which was made from a single fabric. (It was black brocade. Beautiful.)

It’s probably just as well that I couldn’t actually afford to buy anything. Not only would I have come away with one of these coats, I would have emptied the Therapy concession of all their novelty print dresses. They had bunnies, deer, and the cutest little umbrellas!

Hat the second…

Tweed hat

I spent Saturday afternoon making another hat.

It’s not finished yet – it needs a good steam pressing, a lining, and then a bit of trim.

I’ve cut out the pieces to make another one the same – except I’ll use a different interfacing and see what the difference is in the finished hat. This one’s interfaced with horsehair canvas, which shapes well, but is a bit floppy. And in combination with the tweed, makes the Shed smell like a damp farmyard when I steam it.

Speaking of which… I managed to explode yet another iron. There was a sort of a sproingy sound, and shortly afterwards the iron was cold. Oops. Paul kindly took me on an emergency trip to Asda, where I bought a new iron for the princely sum of £4. I never buy an expensive iron for sewing, on the grounds that domestic irons aren’t designed to be switched on and abused for eight hours at a time, so they’re going to break sooner rather than later. I never use the steam function (I prefer to generate steam by wetting the fabric and the ironing board), and I need something as small and light as possible because of my bad wrist. So, the cheapest iron in the shop wins the day.

I like this hat very much.
The only thing I’m not sure about is the placement of the pleat at the back. I think I’ve put it too close to the centre back seam, so it looks a bit like a mistake. I might move it a bit further round to the side on the next one.

I do love my sewing machine though. (A Pfaff 2024.) It chomped its way right through five layers of folded tweed and canvas as though it was nothing. Brilliant.

New hat!

New hat - finished!

For Christmas, skycarrots gave me a 1960s book on millinery. I keep leafing through it, but it’s taken me all these months to get around to actually making anything. There are several chapters on “dressmaker” hats. Rather than using felt hoods and a block to mould your hat into shape, you make a pattern and sew it up in the same way that you’d make any other item of clothing.

This is a sort of a cloche style, with a four piece crown and an asymmetric brim. The fabric is “Kyoto Hollyhock” by Alexander Henry – yet another quilting cotton. The brim is made from the same fabric on both sides, and the crown is lined with plain black polycotton.

As recommended by various online tutorials, I stiffened the main fabric with fusible interfacing. It works well for speed and convenience, as you don’t have to worry about a third separate layer, but next time I think I’ll try horsehair canvas or coutil instead. The fusible interfacing prevented the fabric from steaming into a nice rounded shape at the crown, and I think horsehair or coutil will be better for that.

I finished the main body of the hat last night and left it plain. I knew it needed a bit of livening up though, so this morning I added the band around the crown, and the flower trim.

The flower is a variation on my flower brooch tutorial. I’d been reading about kanzashi (traditional japanese hair ornaments) and was inspired by some of the multi-layered flowers that I saw. Once I’d made my basic flower, I added the second layer by folding strips of bias tape into place. I used a fabric covered button to finish off the centre of the flower, and here it is – my finished hat!

New hat - finished!

Maria’s Rose Tattoo Tunic

Maria's Alexander Henry tunic

This is my usual raglan tunic/mini dress pattern, in Alexander Henry’s “The Rose Tattoo”. It’s hand bound with black bias tape. Simple as that!

Maria contacted me after I’d made Chloe’s cupcake dress, originally asking for a dress of her own in the same style. I don’t take on custom dressmaking any more (and the pattern’s been discontinued), so I would have had to say no, but in the meantime I’d started making these tunic dresses. Maria decided that this was the perfect style, and sent me a piece of fabric that she’d been hiding away in her stash.

The fabric turned out to be this Alexander Henry quilting cotton in one of my favourite prints – The Rose Tattoo. Perfect!

I’ve also had an order for a top-length version in another novelty print quilting cotton – this Beatles Yellow Submarine print. I might have accidentally ordered enough of the Sea of Holes fabric to make a little something for myself as well. While I wait for it to arrive, I just need to decode what it’s going to be…

Desert Boots.

Desert Boots

The boots in the picture are all from the Clarks Originals collection. I don’t think I ever owned a pair of desert boots. Wallabees were popular when I was a teenager, and I didn’t like those at all, so I think I went straight from school shoes to Dr Martens. I think my Dad might have worn a sandy-coloured pair though, in the ’70s.

I feel as though I should love the Liberty print pair (top right) on principle (Liberty print shoes!), but they’re not quite my cup of tea. The gold filigree suede ones (top left), on the other hand… I have a bit of a thing for filigree suede at the moment. I also like what happens when you make a desert boot taller.

London College of Fashion have a course on how to make desert boots, which I have of course been coveting for some years. Sadly I don’t have £535, or the extra £200 it would cost to travel into London on ten consecutive Monday evenings. One day, perhaps I’ll have both the funds and the time when their Summer School comes around.

But I’m thinking that if I do decide to order a pair of polystyrene lasts, these are the kind of boots that I’ll attempt to make. In lovely fabrics, of course.

New boots for a new term.

Well, okay, I’m not going back to school, but I am applying for jobs. Assuming I’m actually invited for any interviews, I thought I’d better go for something a little bit smarter than the shiny Dr Martens I was looking at the other week!

These are Hush Puppies, and I bought them online from Cloggs. I took a bit of a risk ordering online, but Cloggs have a very simple returns process, so I thought I’d give it a try. Thankfully, they’re an almost perfect fit! They’re wide enough to accommodate all my toes, deep enough for my orthotics, and wide enough at the calf that I can actually do up the zip.

If I was going to be nit-picky (which you know I am), I’d complain that they’re a little bit more baggy than I would have liked around the ankle. But then Hush Puppies can’t reasonably be expected to know the precise dimensions of my ankles, so I think I’ll let them off.

Of course, now I’ve looked at the Hush Puppies website to paste in the link, and am desperately wishing that I could still wear high heels. I’d be running around in these or these, if that were the case.

Now I just have to hope that these boots last as long as the pair that they’re replacing. I’ve had my Think! boots for at least five years, and I love them dearly. Sadly they’re now beyond repair, and Think! haven’t made a similar style for a long time.

My new boots have a lot to live up to. Good luck, Hush Puppies.

Embroidery & Typography

Catherine Elizabeth

This is my latest embroidery, for Catherine Elizabeth May who was born just less than two weeks ago.

The font is Bickham Script Pro, and one of the things I liked about it (along with most of the fonts that I buy) is that it has proper ligatures. A ligature replaces a sequence of single characters with a single conjoined character, as shown in the example below:

Ligatures

(Quick typography fact – the most commonly used ligature is the ampersand, where et becomes &.)

What I didn’t notice until I was almost at the end of the embroidery, is that there are two th ligatures in “Catherine Elizabeth”, and they’re both different! In “Catherine”, the t is a single stroke, joining to the h from the crossbar. The upper loop of the h is also very wide, extending over the top of the following letter e. However at the end of “Elizabeth”, the t joins to the h from the bottom stroke, and the crossbar doesn’t join at all. The loop of the h is also much narrower.

I’m afraid that I’m not going to unpick an entire night’s worth of embroidery in order to make the two ligatures the same. What I am going to do is fiddle around in Photoshop, and try to work out why it decided to render the two ligatures differently.