More flower than hat…

Nicola's ORANGE hat!

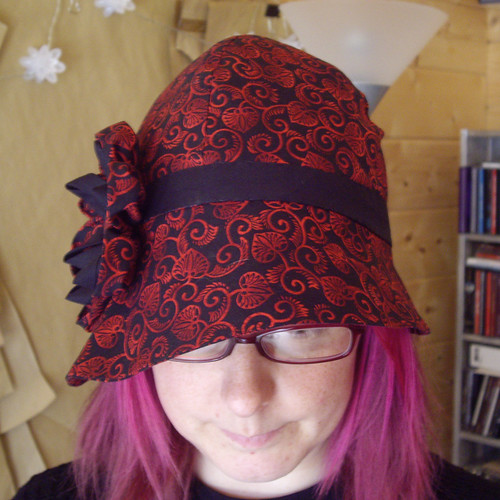
So, this is what happens when you order a hat in BRIGHT ORANGE, and then give me free reign to decorate it however I like. I blame Nicola, for agreeing that a massive “alien flower” would be a good thing to wander around wearing on her head.

Nicola's ORANGE hat!

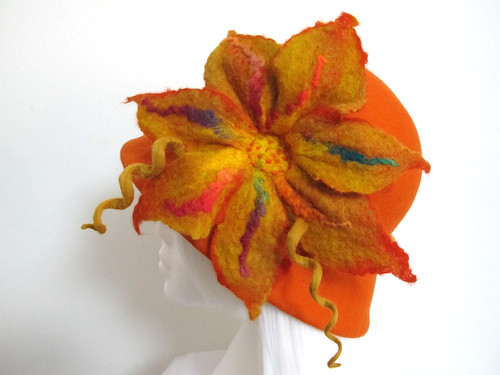
I have to say that I have absolutely LOVED making this. The opportunity to use a nice bright base colour, and the freedom to make something that I thought Nicola would like, has been really enjoyable. As has the process of making the felt itself. I’m learning something new every time I work with wool in this way, and I’m so excited about the possibilities. It’s good for me too – it keeps away my perfectionist streak, as there’s no such thing as “perfect felt”, and it changes all the time as you’re working with it.

Nicola's ORANGE hat!

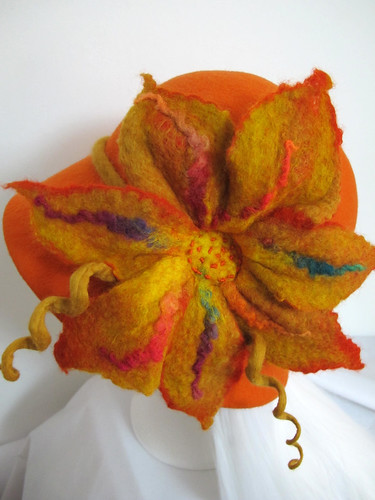
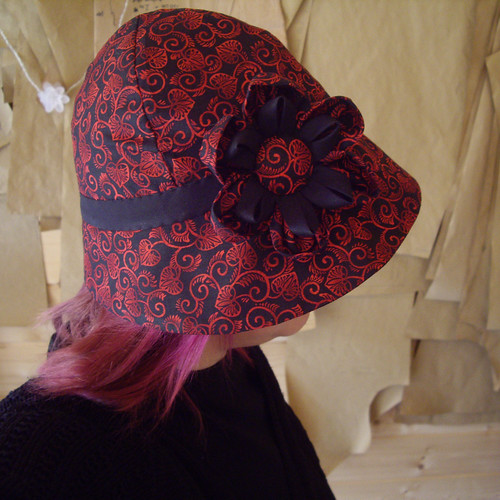
The centre of the flower is circled with bright orange bullion knots, to draw the colour back into the hat. The process of stitching through handmade felt is incredibly satisfying – almost therapeutic, somehow.

I had to take a bit of a break from felting today, as my shoulders and neck were complaining about all the rubbing and rolling, but I can’t wait to get back to it. My next day not-at-work is Tuesday, and that’s most definitely going to be another felting day!

New hat!

New hat - finished!

For Christmas, skycarrots gave me a 1960s book on millinery. I keep leafing through it, but it’s taken me all these months to get around to actually making anything. There are several chapters on “dressmaker” hats. Rather than using felt hoods and a block to mould your hat into shape, you make a pattern and sew it up in the same way that you’d make any other item of clothing.

This is a sort of a cloche style, with a four piece crown and an asymmetric brim. The fabric is “Kyoto Hollyhock” by Alexander Henry – yet another quilting cotton. The brim is made from the same fabric on both sides, and the crown is lined with plain black polycotton.

As recommended by various online tutorials, I stiffened the main fabric with fusible interfacing. It works well for speed and convenience, as you don’t have to worry about a third separate layer, but next time I think I’ll try horsehair canvas or coutil instead. The fusible interfacing prevented the fabric from steaming into a nice rounded shape at the crown, and I think horsehair or coutil will be better for that.

I finished the main body of the hat last night and left it plain. I knew it needed a bit of livening up though, so this morning I added the band around the crown, and the flower trim.

The flower is a variation on my flower brooch tutorial. I’d been reading about kanzashi (traditional japanese hair ornaments) and was inspired by some of the multi-layered flowers that I saw. Once I’d made my basic flower, I added the second layer by folding strips of bias tape into place. I used a fabric covered button to finish off the centre of the flower, and here it is – my finished hat!

New hat - finished!

Butterflies and Bees.

Painted Lady

To make the most of the fact that I happened to be off sick on the one day in the last fortnight when it wasn’t chucking it down with rain the entire time, I went for a very short walk with the camera – just down to the edge of the lake and back.

Paul’s taken the 300mm lens with him to Germany, so instead of struggling with the 200mm, I decided to have a play with the macro (70mm) lens.

Sitting on the teasels was a slightly ragged Painted Lady butterfly. I sneaked up on it with the camera, and it wasn’t bothered in the slightest.

A bit further along there’s a big bank of thistles, and they were covered in bees! I saw at least four different types of bee, although I wasn’t able to get decent photos of all of them.

I’ve been lucky enough to have a very positive response to my photos since I’ve been using a digital SLR. I do have some up for sale in my Etsy store, but I thought I’d simplify the process even further and make a page right here when you can buy prints and canvases in a number of different sizes.

Up at the top of the page, there’s a shiny new tab marked “Photos“. Have a look, and let me know what you think!

Suffolk Puff (Yo Yo) Flower Brooch Tutorial

Flower Brooch Tutorial

This is what I’ve been up to today – making an enormous flower brooch using suffolk puff (yo yo) techniques.

I’ve written up a tutorial for you, if you’d like to make your own!