Harvest Festival

Harvest Festival

Over the weekend Skycarrots hosted a harvest festival!

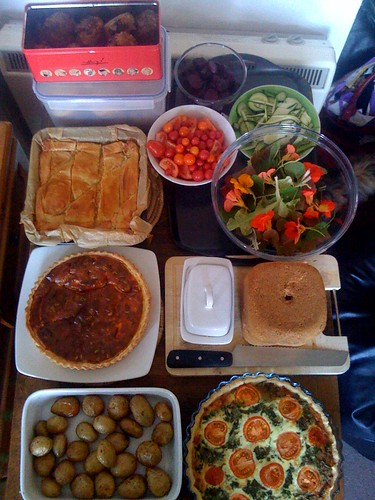
A small group of us got together and brought masses of food and drinks that we’d grown, foraged, brewed and baked. All of the salad and vegetables were from Sarah’s allotment, with the addition of my cherry tomatoes. The big square pie is pumpkin and feta, and the quiche at the bottom right is tomato and ground elder. The only cheat was the bacon quiche which Paul baked. He may have made the quiche himself, but he foraged for all the ingredients at the supermarket. šŸ˜‰

If you click on the photo it’ll take you through to Flickr, where you can see some notes about each item.

There were also drinks a-plenty. Mark and Kath had made wine, which they’d nicknamed “wynamite” because of its strength! There was also Sarah’s beech leaf noyau, some cherry-ish brandy, and the remains of our elderflower cordial – now rather fizzy, and probably pretty alcoholic by itself.

Half way through the evening we went on an impromptu foraging trip to a nearby tree, and we all ate raw almonds for the first time. Almonds are related to peaches, so you get a fuzzy fruit with a stone inside it that looks like a peach stone. Crack it open, and inside is an almond! Very exciting.

Our next food mission is to go out sloe-picking, so we can start getting some sloe gin ready for bottling at Christmas. We first made sloe gin two years ago, which was so well-received that people gave us back the bottles asking for a refill! Unfortunately there were virtually no sloes growing locally last year, so we had to disappoint everyone. Thankfully this year there looks to be a bumper crop, so we should be able to make enough for everyone.

Slender Loris.

Slender Loris Skeleton

This skinny little fellow is the skeleton of a Slender Loris.

One of the projects I’m currently working on as a volunteer is rebuilding the website for the Cole Museum of Zoology, so I thought it would be useful to go and have a look around. I’m so glad I did!

If you’re freaked out by skeletons or things-in-jars then you might not like it, but it’s a fabulously interesting place. The room is dominated by the skeletons of an indian elephant and a false killer whale.

Because I’m a lover of monkeys, I spent most of my time looking at the incredible variety in all of the different primate skeletons on display. The slender loris is a prosimian, which means that he’s related to lemurs. You can tell from those amazing eye sockets that he’s nocturnal. And just look at his adorable little hands and feet!

The slender loris is classed as a “vulnerable” species, but as of yesterday there’s one more – a baby slender loris was born at London Zoo!

Of course a loris in the zoo isn’t the same thing as a loris in the wild – but at least this little fellow can be studied in ways which might be of benefit to his Sri Lankan cousins.

If primates aren’t your preference, you can see plenty of other exhibits at the Cole Museum. I particularly enjoyed looking at the insides of a squid. A warning for the phobic though – there are plenty of snakes and spiders.

If you fancy going and having a look, the museum is on the Whiteknights campus of the University of Reading, on the ground floor of the AMS tower. (The tall one, to the left of the Palmer Building.) There’s a lot of building work going on at the moment, but the museum is still accessible through the right hand door. It’s open Monday to Friday, 9:30-5. Here’s a map.

I really enjoyed my quick visit this morning, and I’ll definitely be going back!

Completed Cloches.

Two completed cloches

The black corduroy cloche that I showed you the other day has now been livened up by a lime green bias tape band.

The red cloche is made from two layers of polar fleece. There’s also a black bias band on the inside, making it fully reversible. My brief for this one was to make it bright red, and soft enough to fold up.

The brim of the red hat is made from two layers of fleece and a layer of craft weight non-woven interfacing.Ā For some reason my sewing machine wasn’t too happy about sewing through the fleece and interfacing combination. I had to try several different needles before I stopped getting lots of skipped stitches.

I’m really pleased with how the finished hat’s turned out though, and I think it will be lovely and cozy to wear. I might make another one for myself.

Helena for Catherine.

Big Ted models Catherine's Helena Cardigan

Here’s my completedĀ Helena, fromĀ Knitty.

It’s beautifully modelled by Big Ted, who refused to take off his Ewok outfit for the picture.

I’m sure that baby Catherine won’t mind that you can see where I made the switch on the sleeves from working back and forth on one circular needle to working in the round on dpns.

I must confess that I’m still not a big fan of working in the round. Perhaps its because I come from a dressmaking background, but I do feel as though shoulder seams particularly give a structural integrity to a garment. This is especially important in larger knitted items as they can be heavy, and all the weight of a big jumper is carried by the shoulders. Then again,Ā my preference is for raglan sleeves which don’t have proper shoulder seams whether you knit them in the round or not.

Now I just need to decide what to knit next. I have a jumper a scarf and a lacy tank top all half-finished, and yet I’d much rather be designing a pattern for a pink and black stripy pirate jumper… possibly with this gorgeous “deathflake” motif across the front.

Corduroy cloche

Cord & fleece cloche

This is my second cloche hat, with a symmetrical brim this time.
(You’re looking at the side of the hat – front at the left of the photo.)

It’s made from heavy black cord, and lined with black polar fleece. This hat’s going on a honeymoon to Iceland in a few weeks, so it should be the perfect thing for keeping Clare’s ears nice and warm!

Scarves for bees!

Bee

No, not tiny little woollies to keep them warm. Instead, Seasalt in Cornwall are holding their annual “Go Knit!” charity drive.

This year they’re collecting donations of hand knitted scarves, and all proceeds from their sale will go to the Bumblebee Conservation Trust.

Bees and knitting are two of my passions, so obviously I’ve sent my scarf down to Cornwall. If you’d like to do the same, you can find the details here.

While I was thinking about scarves, I’ve re-listed a few on Etsy.

I have a whole pile of things that I’ve made which I haven’t got around to listing yet, so I should probably do that quite soon. Those badges and wheat bags aren’t going to sell themselves from the depths of my Shed!

Working on a baby cardigan

Helena - without sleeves

Aside from hats, this is the first baby garment that I’ve knitted.
The pattern is Helena, from Knitty.

I had originally planned to knit Elizabeth Zimmerman’s “February” baby cardigan, but I didn’t have access to the pattern when I wanted to start knitting (i.e. IMMEDIATELY!), so I went with this one instead. The construction’s basically the same, but the lace pattern and hem are different.

I’ve only changed one thing about this pattern, and that was swapping the front ties for three little buttons. I do wish I’d cast off on a larger needle, but that’s just a peculiarity of my knitting style not a complaint about the pattern. The same applies to the fact that it took me a whole hour to pick up and knit the stitches for the band. Ouch.

I have to confess that my motives for choosing the February pattern were entirely selfish. I’ve never knitted a top-down raglan cardigan before, and I wanted to try out the technique on something small. I’d really like to knit myself a February Lady cardigan, but I didn’t want to launch into yet another big knitting project only to abandon it because I didn’t like the way it was turning out.

All I need to do now is knit the sleeves, and finish them off with a neat little picot hem. Then it can be sent off to Catherine, who hopefully won’t have grown out of it before she gets to put it on!

Smocking workshop this weekend

Just a quick reminder that this weekend is my smocking workshop at the Museum of English Rural Life.

Today is the very last day that you can sign up – in fact you’ve got about an hour and a half left if you want to secure a place!

The course runs from 2:15-4:15 on both Saturday and Sunday, and you need to be able to attend both sessions. It costs Ā£35, and you’ll be provided with all of the materials you need to make a smocked bag.

All abilities are welcome! Even if you’ve never sewn a stitch in your life, this is a simple project that you should be able to manage over the weekend. If you’re an experienced needleworker, then you can used more advanced techniques to produce an intricate design.

To book your place you can call 0118 378 8660, send an email toĀ merlevents@reading.ac.uk, or fill in the online booking form.

Buttonholes

I haven’t been showing you very many of my wedding plans on here, but this is a little something I thought other people might be interested in. They’re not quite finished yet, but these are the basis of the buttonholes that our families and Best Man are going to wear on the day. The pink and purple ones are for the men, and the cream and peach are for the ladies.

All of the flowers came from Hobby Craft. The roses are paper, with wire stems. The fabric violets came as part of a big posy which I dismantled. I’ll be using the large leaves from the posy to go behind each of the buttonholes. The silver and gold holders are actually filigree aglets for corset laces, bought from Vena Cava.

The large leaves are currently being pressed underneath a pile of books, waiting for the glue to dry. I’ve attached a magnet to the back of each large leaf, and glued on a smaller leaf to cover it. That way there’s no need for pins – the back of the magnet simply goes underneath a lapel or inside a dress, and holds the buttonhole into place.

Once the glue is dry, the leaves will be held very simply by twisting around the wire stems from the flowers. Then I can trim the stems, crimp the top of the aglets, and they’re done!

Looking for the perfect bag.

Now that the honeymoon’s booked (hooray!), I’ve started to think about what I’ll need to take with me on our trip. We’ll be walking around the city all day, and we’ll be carrying heavy cameras, so I need a comfortable bag to fit everything into.

This is a bag that I have already – a Crumpler Sheep Scarer.
It was perfect for college, and for lugging my old laptop about. It’s also perfect for days out when I’m close to home and only packing the camera and not much else. Because of the triangular shape of the bag, once you’ve got the camera and a lens or two stashed in the bottom, you can’t fit anything else in the top without having to unpack it all to get the camera in and out. Not ideal.

This is my proper grown-up handbag – a Mulberry Bayswater.
I love it to bits, but it has two problems. One, if I’m wearing a jumper or a big winter coat, the straps are about an inch too short to fit over my shoulder, which means I have to carry it in my hand. If I’m using the camera a lot, I really need a bag that’s hands-free. Two, inside it’s just one great big enormous space, which makes it very easy to fill with heavy things, and I can never manage to find the thing I want because it’s always right down in one of the corners.

So, after a fruitless trip to the local shops, I did what any sensible person would do and had a look on Etsy for a new bag.

Browing the “backpacks” category was a bit daunting – it brought up 117 pages of bags that mostly weren’t backpacks at all. (I do hate it when people deliberately tag things incorrectly to get more views.) Thankfully, on just the third page, I spotted a familiar image and went to the Bohemian Cats store to have a look.

I’ve bought bags from Baba Studio before, for Christmas gifts, and I was delighted with the quality as well as the beautiful imagery.

This is one of theirĀ three-way messenger bags. They come in black or taupe as a base colour, and you can choose from a stunning array of images for the front flap. I particularly like the way you can convert this style from shoulder bag to messenger bag to rucksack with just the one strap. So clever!

But, at only a couple of inches wide this is quite a slim bag, and I wasn’t absolutely convinced that my camera would fit inside. I contacted Karen at Baba Studio on Facebook, and she suggested that the laptop bag might be a better choice.

And wow, I think she’s right.

There’s an Etsy store specifically for the laptop bags, which are kept in stock, or you can place an order for the design of your choice from the Baba Store. Again you can decide between black or taupe as a base colour, and there are more than twenty gorgeous images to choose from. The inside of the bag has been made with brilliant attention to detail. There’s a padded section for your laptop, of course, but there’s also a drawstring waterproof cover over the main body of the bag. There are two zipped pockets, one of which has sections for pens. This is very important, as I can almost never find a pen when I need one! All of the pockets are completely covered by the flap, which I think is held in place by magnets, making it all extra secure.

But it’s not a rucksack, which is what I thought I was looking for.

Now I just need to decide whether that matters… and which design to choose!