ORANGE wool jacket

Orange Wool Jacket

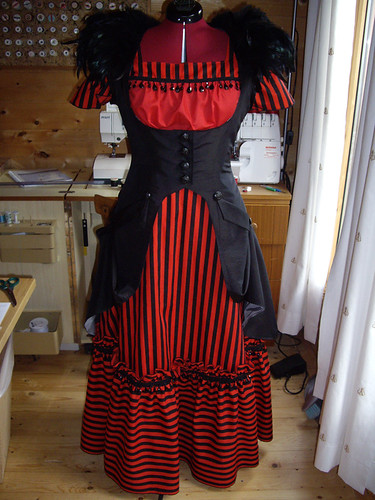
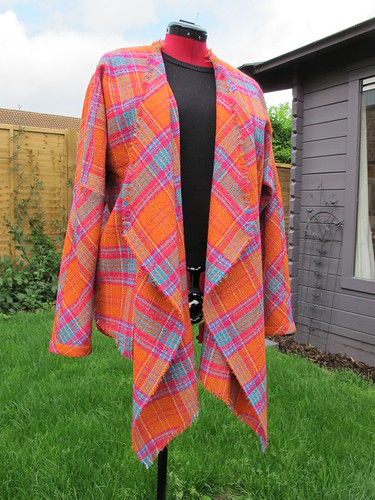
Words simply cannot do justice to how INCREDIBLY BRIGHT this fabric is. Ridiculously orange, with teal, magenta and a little bit of yellow thrown in for good measure. In case you hadn’t guessed, this fabric is LOUD.

I think I bought it in Chepstow last year, in a fabric shop that was absolutely piled to the ceiling with goodies. This was everything that was left on the roll – 160 cm long, 150 wide.

Orange Wool Jacket

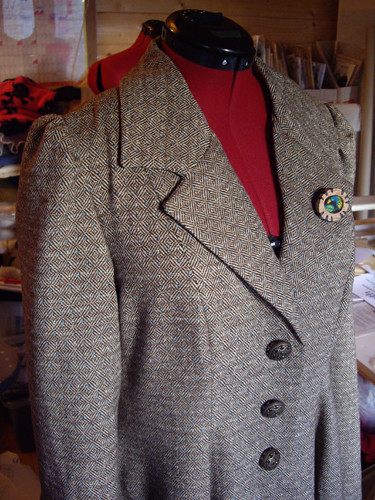
The pattern is one of my own, that I tested in cotton jersey earlier in the year. Irritatingly, I was so busy with the Emporium that I didn’t take any photos, but it’s very comfortable and I’ve been wearing it a lot. This style is perfect for wearing to work, where it can be quite chilly on the front desk, but it looks daft to be sitting there with your coat on.

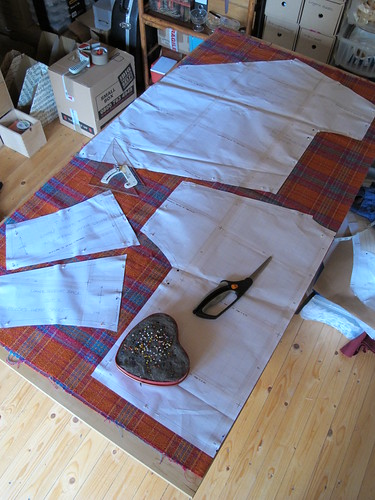
It’s a double herringbone wool tartan, with a little bit of boucle running through it, for those who care about such things. The lower sleeves are cut on the bias, with a little bias cuff. This allows them to stretch a little bit, but not too much. There are no fastenings at the moment, although I’m contemplating covered buttons and little loops of selvedge to pop them through. I’ll wear it a few times first though, and see how it goes.

Orange Wool Jacket

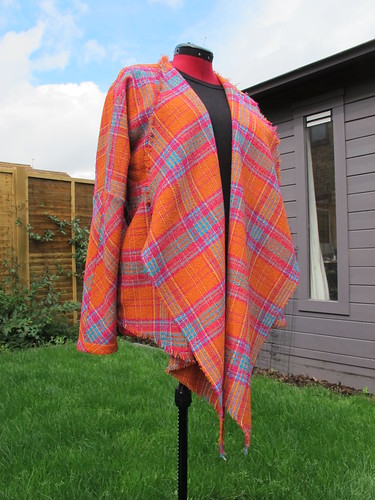
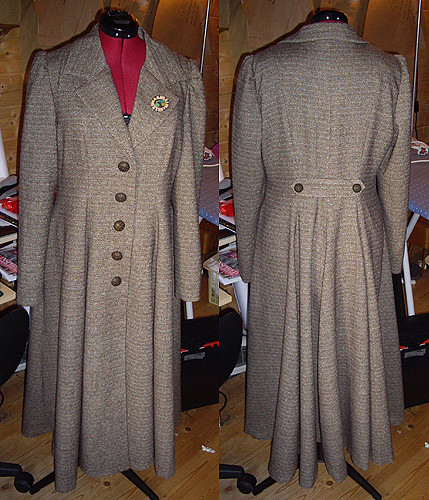
I made absolutely no attempt to match the stripes at any of the seams. I didn’t have anything like enough fabric to try, and I don’t think it really matters. The only thing I want to change next time though is to eliminate the top seam on the lower sleeve. It doesn’t really need to be there, it looks a bit distracting, and it creates a dodgy junction of four pieces of fabric coming together in the same place. In a thick fabric that can be difficult to keep tidy, so it seems best to just get rid of the extra seam altogether.

I’m not sure it’s quite chilly enough to start wearing this to work just yet, but I’m definitely looking forward to wearing it!

Velvet coat – almost finished…

Butterick 5266

Not the greatest photo ever – the combination of black velvet and a dark Shed is not the best – but I think you can see the progress on this coat! It has a body now, which is a big improvement on last week’s cape and sleeves. It’s still not quite finished – the hem needs, well, hemming, and it needs front fastenings of some kind. It also needs overlocking around the sleeves, and a jolly good pressing around the collar.

(Before anybody says anything, yes, I know the purple lining doesn’t go with the red outfit underneath. I wasn’t about to go out and buy another five metres of lining when I already had this purple in the stash.)

The saving grace of this project has been its simplicity. If it had been more complicated, there would probably be a lot more swear words in this post. As it is, I simply left out most of the tricky parts to make my life easier. The sleeves will be overlocked to the body instead of slip stitched. The fronts and neck and sleeve hems are topstitched rather than understitched. Where the lining came out a quarter of an inch bigger than the coat (at the sleeve heads and the hem, don’t ask me why!), I simply chopped off the difference and stopped worrying about it. I haven’t bothered with the fourteen metres of braided trim, or the openings in the front panels. Oh, and I left out the side seam vents too. Simple!

Having moaned on about the frustrating parts, I will concede that the sleeve heads eased into place beautifully, as did the collar. I’m now deciding how I want the front to fasten, and whether I’m going to add any kind of trimmings at all. I think I might need at least a little bit of detail on the ends of the collar, to make them stand out against the front a bit more. Paul’s suggested black frog fasteners and sequin trims, and I think he might be right.

Oh, and the poster in the frame, behind the dressform? That’s a little idea we had, that we’re hoping to turn into a reality!

Pinstriped velvet coat and cape

The tidy side

Remember when I bought this fantastic Ikea unit for the Shed, and tidied everything into neat little cubby holes?

Today I had every intention of making a hat. I had everything I needed laid out on the sewing table. Instructions, fabric, buckram, wire, lining, curved sewing needles… but no pattern. I knew it was in the Shed somewhere – most likely in the ever increasing pile of stuff I haven’t put away yet.

THE PILE

This is my (technically Paul’s) big comfy chair – where I can sit to do hand sewing. Except I can’t, because on the chair lives THE PILE. Anything that doesn’t have a tidy home yet, or anything that I’m going to “put away in a minute” tends to be dumped in the pile. I knew the hat pattern was in there somewhere, and I found it almost at the bottom – alongside the missing pattern for my niece’s dress. The last time I’d looked at either of those patterns was May. Eight months ago. Oops.

What you can also see overflowing from THE PILE is a mountain of pinstriped fabric. That’s about ten metres of cotton velvet, which I bought way back in the mists of time when I worked in a fabric shop. Scrunched up underneath it was the pattern for Butterick 5266, a pattern for a Victorian-ish coat with a cape. (Now out of print.) In my infinite wisdom, I decided that the best way to tidy this fabric and get it out of the Shed was to finally sew the dratted coat.

Cape and sleeves

So, I now have the cape part, and a pair of sleeves. Unfortunately I have also remembered how much I absolutely loathe sewing with cotton velvet. And the pinstripes aren’t helping either. They look great, but they’re printed onto the fabric rather than woven in, and they’re not printed on the straight grain. Which means that I have to choose either to follow the pinstripes or follow the grain. Not an ideal situation, particularly with velvet.

Pinstriped velvet

Isn’t this lovely though? That glorious moment when the pinstripes actually match at the seams as though I meant it, makes up for a lot. Unfortunately, it doesn’t make up for the frustrating way that velvet moves around when you sew it, even with the usually fantastic differential feed on my machine. So the pinstripes only match beautifully on one of the sleeves, and of course that’s the one where the fabric kept slipping as I was sewing in the lining, because the velvet was off the grain. And the sleeve that isn’t puckered around the cuff? The pinstripes don’t match up at all. Of course.

And that’s the easy bit.

The front and back panels are so big that they each have to be cut twice from a single layer of fabric. And then lined. I think from now on I’m going to ignore the instructions, and just leave out all the fiddly bits that could go wrong. No braid trimming, no side vents, no slits to put your hands through (what are they for anyway? the thing has sleeves!), no loops for the buttons – nothing. I’ll bag out the lining so it can’t slip around, and I’ll sew on enormous poppers with buttons over the top. Or buy frog fasteners.

It’ll be a few days before I can get back in the Shed to finish this off (my Real Job calls), but hopefully I can get this finished very soon. Then I can gleefully THROW AWAY* whatever’s left of the velvet, and rejoice in my decision to NEVER SEW WITH IT AGAIN.


*No, of course I won’t actually throw it away. I’ll give it to a charity shop, or donate it to anyone daft enough to take it off my hands after they’ve read this.

[edit] Well, Lisa of Off With Her Head has admitted to being daft enough – so when I’ve finished the cape, I’ll be sending her a big parcel. Look out for pinstriped velvet millinery, coming soon!

Steampunk Coat

Almost finished...

Here’s the final part of the outfit – a somewhat modified version of Simplicity 2172. Actually, it’s not as heavily altered as you might think – I just left off a few pieces that were surplus to requirements. Like the sleeves.

The buttons are the original ones from my friend’s military jacket. There are four on the front (complete with more hand-sewn buttonholes), two on each pocket, and an extra one at the centre back.

Almost finished...

As you can see, I decided to bustle the back of the coat, so I made thread loops in the seams which simply pop over the buttons on the pockets and at the back. The coat was exactly the same length as the skirt, and the red lacing looked a bit out of place without being able to see the red of the skirt to tie it in, so to speak.

The feather collar is actually a cape that I bought from Next, last winter. Sewing it into place around the neckline of the coat forces the feathers upwards into a more wing-like shape, rather than the cape simply sitting flat around the neck.

In case you’re wondering where on earth I’m going in this outfit, it’s for the Wild Boy’s Ball at Kensington Palace. All I need to do now is add some more feathers to my mask, and carefully choose the rest of my accessories. I’ll make sure to show you photos of the entire outfit when it’s finished!

Butterick 5425

Butterick 5425

I bought this lovely wool fabric back in August, at a re-enactment event. Originally I was planning to turn it into a jacket and trousers, but when I saw Butterick 5425 I knew they were a perfect match. I particularly like the slightly puffed sleeves and the very full skirt.

Butterick 5425

The only thing I would have done differently is to use a woven interfacing. The pattern called for fusible interfacing on the collar and front facings, but I think the wool fabric would have draped better with horsehair in the collar and a lighter woven at the front. Still, too late now, and I’ll know better next time.

The lining is a lovely turquoise blue, to bring out the spots in the fabric. My next mission is to buy a pile of this yarn, to knit myself a matching hat, scarf and gloves.

Butterick 5425

The buttons are only plastic, but they were so pretty that I couldn’t resist them. They’re non-functional, because my sewing machine still refuses to make decent buttonholes, so there are five big poppers sewn down the front of the coat, with buttons on top. I make all of my coats this way.

Butterick 5425

This lovely brooch was given to me as a Christmas present, hand made by my friend Heather. As soon as I unwrapped it, I knew that it would be perfect for this coat!

Twenty-eight buttons

Military jacket

This is a lovely jacket that belongs to a friend of mine. It came with black buttons, and we’d been chatting about how nice they were, and how difficult it would be to find a replacement if one was lost. A couple of hours later… you’ve guessed it! One missing button.

There were no spare buttons with the jacket, so the only option was to replace the whole lot. All twenty-eight of them. (There are two more on the sleeves that you can’t see in the picture.)  They’re ever so slightly larger than the original buttons, but thankfully they still fit through the buttonholes.

I bought practically every button in this style, and I’ve tucked a couple of spares into one of the pockets. That way, if another button goes missing, I don’t have to replace them all again. My fingers are really sore, from sewing them all on in one evening!