Wild Boy’s Ball

So, at long last, here is the completed stripy/steampunk outfit!

Paul and I went to the Wild Boy’s Ball at Kensington Palace, and had an absolutely magical evening. You can see all the photos that Paul took, over on Flickr.

We started off by going inside the palace itself, which was actually quite different from the last time I went. They’d repainted the entrance staircase, and changed quite a few of the rooms and installations. The giant dolls were gone, which was a shame, but they were allowing photographs (without flash) inside this time, which was brilliant. Perhaps the most enchanting but also the most creepy things were the new light installations by artist Chris Levine. At first glance they just look like a tower of flickering lights, but when you turn away from them you see people in your peripheral vision! (Sadly they gave Paul a terrible headache and made his eyes twitch.) I sat in the knitted throne, and was bowed-to by two of the Wildworks cast – who went on to give me a knitted orb and sceptre to hold until I made a wish!

When we came out we saw a show by The Gaiety Engine, which was hilarious. We also walked around the sunken gardens, which had been transformed with hundreds of red baubles hanging from the arches. Each bauble contained a piece of artwork or a secret written down by a member of the public. There may have been a certain amount of posing for photos… and as we were walking back, the official event photographer asked me if I’d mind posing for him, which was exciting – that’s never happened to me before! I suspect it’s just because I was conveniently wearing the right colour of dress, but he took some lovely pictures. Shame I didn’t think to give him my email address so I could get copies. You can see the whole set on Kensington Palace’s Facebook page.

I wanted to do the craft activities, so I made a pretty paper rose. (Like this, only bigger.) I didn’t make a lantern because there was a massive queue, but I rather cheekily brought all the lantern-making materials home with me, so I can make one anyway. Photos to follow when I’ve glued it all together and found a tea-light to pop inside. It’s very pretty.

There were supposed to be some people giving period dancing lessons and seduction tips, but we didn’t see them – although there was a small group of people in period costume, so it might have been them. At the end of the night there was dancing in front of the Orangery, run by The Last Tuesday Society. Every single piece of music was a waltz, and I tried very hard to teach Paul how to dance, but sadly he couldn’t get the hang of it. Which was a shame, because I could quite happily have waltzed for an hour, if I’d had somebody to waltz with. Paul and I did dance a bit, but it wasn’t waltzing by any stretch of the imagination!

Feathers and sequins

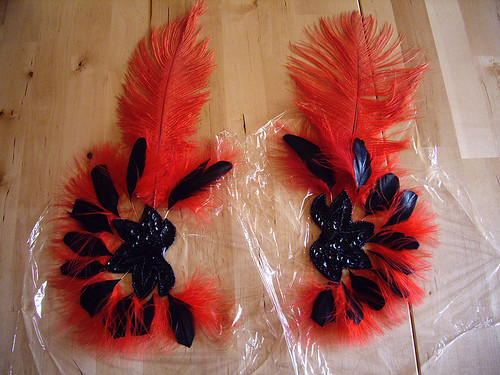
Feathers for mask

Oh my goodness, the feathers. Fluff everywhere. My Shed will never be the same again.

Once the glue’s dry, I’ll be getting out the hot glue gun to attach these feathery extravagances to the sides of a mask. The black feathers and the sparkly bits were originally attached to the mask in the first place, but the feathers were on very long stems and a lot of them were broken.

I bought the mask late last year, with no particular occasion in mind, and it’s been in somewhat careless storage ever since. So, I ripped off the sparkly bits, ripped off the feathers, and then spent absolutely ages trimming the stems off and pulling apart the little red feathers until they were the right size. And then I glued it all back together again. Except that I got a bit carried away and used far too much PVA, so now it’s all sandwiched between clingfilm and weighted down under a pile of books until it’s properly stuck together.

I also sewed a rather unsightly piece of wide black elastic to the back of the mask, which seems to keep it in place over the top of my glasses without squashing the frames into my face. Not the most elegant solution, but after a great deal of trial and error it turned out to be the most effective. Wearing a mask over glasses is always awkward, so I’m pleased to have found something that stays put and doesn’t hurt!

Simplicity 2207 – Striped Steampunk Skirt

Simplicity 2207

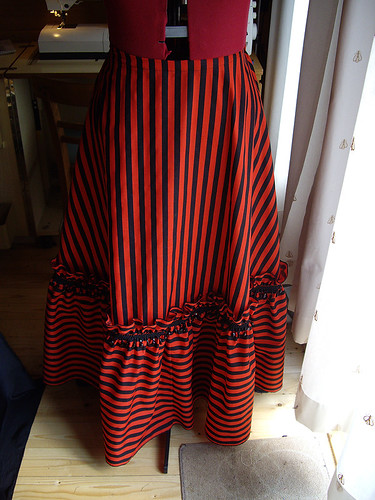
The title says is all really – this is Simplicity 2207, my striped steampunk skirt!

Somewhat eye-bending, but I knew the stripes on the skirt would end up going in all directions, so I deliberately placed them vertically on the front and horizontally on the ruffle.

Both edges of the ruffle are finished on the overlocker, with the “raw” edges left visible. Over the gathered join is four metres of beaded trim, with four metres of braid stitched over the top. I think I spent more on the trimmings than I did on the fabric!

(This was sadly evident as I was sewing – the black stripes are printed rather than woven, and I ended up with very grubby hands. Yuk.)

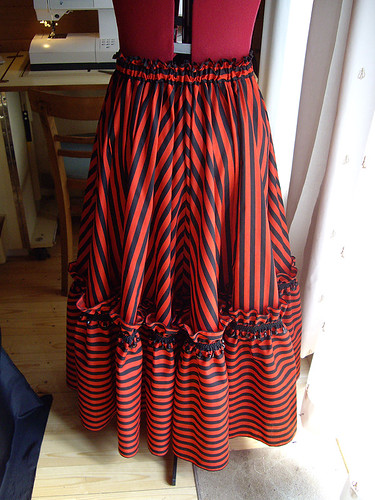
Simplicity 2207

I attempted to put pockets in the side seams, but that turned out to be a lesson in reading the entirety of the instructions before you start. The waistband has a somewhat unusual construction, so the two sides of my pockets didn’t match. Not wishing to rip out all the overlocking and start again, I simply chopped off the pocket pieces and pretended I didn’t want pockets after all.

The back of the skirt is twice as full as the front, and has an elasticated waist. I have a horrible suspicion that, despite measuring, I’ve cut the elastic a little bit too short. Thanks to the waistband construction I can’t easily get in and change it, so for now I’ve adjusted my dress form to be a little bit bigger than me, in the hope that it’ll stretch out a bit before I wear it. Fingers crossed.

Edwardian-ish Blouse

Edwardian-ish Blouse

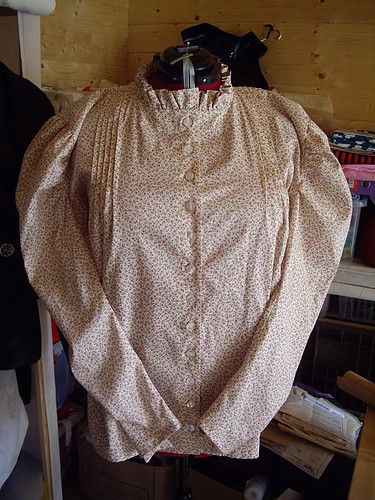
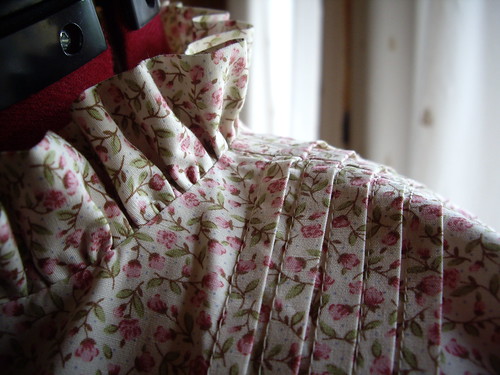
I don’t think I showed you the finished blouse that I was making for Aldbrickham Clog & Step Dancers. It took much longer than I was expecting, because I ended up having to make all of the buttonholes by hand.

The body and collar of the blouse are from Simplicity 3623, with pintucks instead of gathering at the shoulders. The sleeves are from Simplicity 2207, and the buttons down the front were added by request.

I’m just waiting to find out whether the blouse is going to be okay for dancing – because of the shape of the sleeve heads, I might need to add a little gusset at the underarm to allow a better range of movement. Otherwise, I’m really pleased with how it’s turned out.

Satin Bustle Skirt

Bustly skirt - front

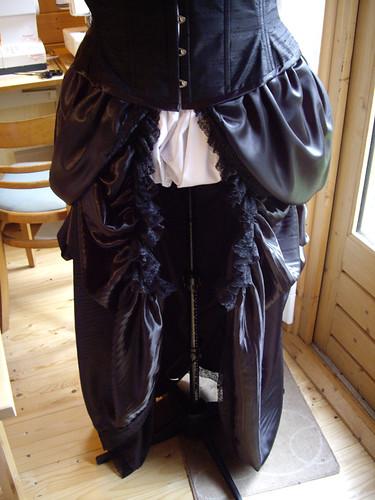
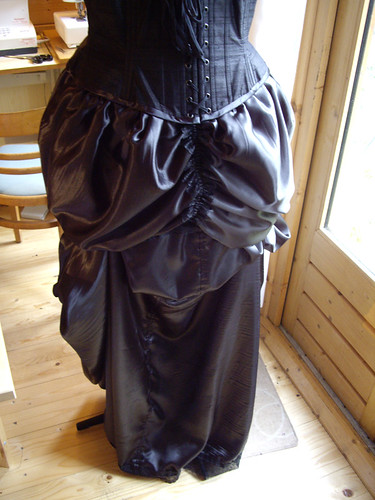
To go with the silk corset, I made a satin bustled overskirt. The idea was to have something that could be worn over several different skirts, and could be varied in style.

The top layer is from Simplicity 2207, with a bit of modification. Instead of using a single layer, I doubled the fabric to give a bit more volume. Rather than making ruffles, I gathered a pretty wide lace along the centre back and the lower edge.

Bustly skirt - back

The under layer is made from two widths of fabric joined together in a french seam and gathered in to the waistband. Left rectangular, all the edges were trimmed with the same wide lace, and then the sides were gathered tightly to create the draping at the front. The whole thing simply ties around the waist.

In between the two layers, below the waistband, are several plastic rings. These correspond with ribbons sewn onto the skirt. The ribbons can be pulled through the rings and tied in place to create different bustle effects, or left loose to create a train. I used six metres of satin in total, but because it’s such light fabric you get a lot of volume without too much extra weight.

The skirt, corset, pirate shirt and waistcoat all took a trip to the Summer Darkness festival, and I’m hoping to be able to show you some action photos soon!

Pirate Shirt

Scot's Pirate Shirt

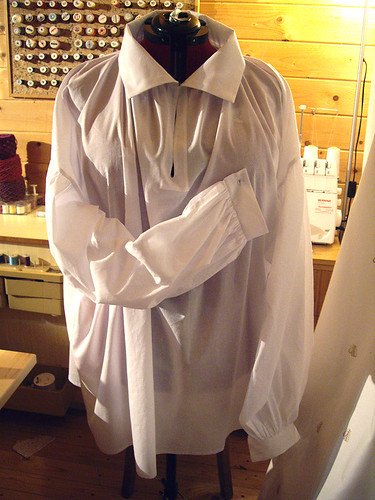
This is Simplicity 4923, in white cotton lawn. I only made two pattern alterations to this one – I shortened the front facing, and made buttonholes in the cuffs so that they can be fastened with cufflinks.

Regency Bodice

Regency Bodice

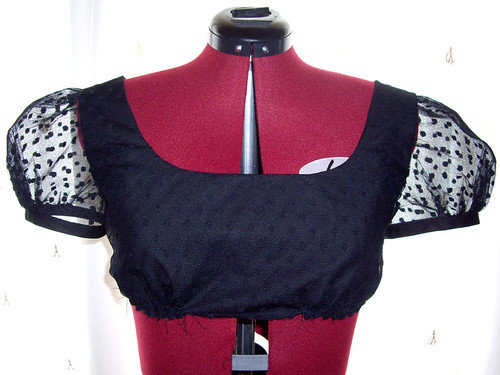
Remember me saying that I fancied making a Regency dress for the summer? Well, I went and grabbed myself a copy of Simplicity 4055, read a number of reviews online, and started sewing.

Normally in a Simplicity pattern I’d cut a size 18, but I’d read that this pattern came up large, and I knew I wasn’t going to be wearing umpteen layers of Regency underwear underneath it. So I checked the measurements, took a deep breath, and cut out a size 14. I made a muslin, and it fitted absolutely perfectly!

I have to say that this is the first pattern I’ve ever made that I haven’t had to alter in the bust, or at least think “oh well, I’ll just have to wear a padded bra”. I suspect this means that almost everybody else who makes this dress is going to need to make a full bust adjustment, or actually wear Regency stays underneath.

The bodice is made from three layers. The spotty mesh is basted to plain black poly-cotton, which are treated as a single layer. It’s then lined with another layer of the same poly-cotton. The sleeves are also underlined, with black dress net (crinoline). The spotty mesh is very light and floppy, and I knew that I wanted the sleeves to stand up by themselves. I also wanted to keep the translucent quality of the mesh, so the net seemed like the perfect solution. Structurally it’s worked really well, but the armscye seams are incredibly scratchy, despite being run through the overlocker. I think I might have to bind them with tape, to enclose the edges of the net completely.

Unfortunately I didn’t make a muslin of the sleeves, which have come out just a tiny bit too tight. I’ll be alright as long as I don’t want to go around waving my arms above my head, but next time I’ll make them slightly larger around the bicep.

I plan to make the skirt in plain black poly-cotton, overlaid with the spotty mesh again. The slight spanner in the works with that plan is that the spotty mesh is only a metre wide (40″), and the pattern uses the full width of 115cm (44″) fabric. I haven’t had a good look at the pattern pieces yet – I might be able to lose a little bit of width at the hem of the skirt. Alternatively I think I have enough of the mesh to put a seam at the centre back, and leave the the centre front hanging in two pieces. I’ll have to see.

I’m trying to make this dress completely from materials already stashed in my Shed, so now I’m hoping that I’ve got enough narrow lace to trim the mesh layer of the skirt. It also needs three buttons for the back of the bodice, but I don’t think I’m going to have any trouble finding three black buttons in here!

Pintucks and ruffles

Pinktucks and ruffles

This is just a little sneaky peek at something I’m working on at the moment. It’s a costume for Aldbrickham Clog & Step Dancers. I play recorder and concertina for them, and I’m helping out a friend who needs a new blouse.

We wear roughly Edwardian costumes, based on the working clothes worn in the countryside until about 1914. I’m putting this one together based on a Renaissance pattern, a steampunk-Victorian pattern, measurements taken from two existing blouses, and a bit of imagination!

Regency Summer

Today I would like to both praise and curse my friend Rhona, for being an extremely bad influence.

At the beginning of July I’m going to London for a three-day weekend with friends. Being London, and being July, I expect it to be excruciatingly hot and stuffy. (It’ll probably rain now.) In order to try and stay as comfortable as possible in the heat, I’d bought two patterns for sundresses – a 50s-ish halter neck, and a gathered maxi dress. I have absolutely miles of cotton shirting (mostly vertical stripes in various shades of pink and purple), plus all the organic cottons, so I figured these would be ideal. Long and floaty, nice and cool, and I could make little bolero jackets to go over the top to avoid sunburn.

And then Rhona started talking about making a very lightweight Regency-style dress to wear on her summer holiday. And then there were links to patterns, and fabric. And now there’s a fabric-shopping trip planned, and I want a Regency-style dress too!

So I’m looking at Simplicity 4055, mostly because I have a card from my local fabric shop for a free Simplicity pattern. (Hoorah for free!) And then I started wondering about Regency underwear (as you do), and discovered that there used to be a matching underwear pattern, but it’s out of print. And then I discovered that both patterns are actually by Sense and Sensibility, and I can buy the matching underwear pattern after all.

And then I started thinking about layers, and asymmetric hems, and combining lovely organic fabrics with stuff that’s been languishing in my stash, and about the visual ridiculousness of wearing a Regency-style dress with a half-shaved head and Doc Martens… and that’s something I really want to do! So, when I start wandering about looking like a somewhat punk Jane Austen, you only have Rhona to blame.

Brotherhood of the Wolf

Last night I watched Brotherhood of the Wolf, and now I find myself wishing that I had a masquerade to go to, so that I had an excuse to make a couple of really exciting 18th century costumes.

Simplicity 3637 would be an ideal starting point – although it might be rather an expensive one. The dress takes almost nineteen metres of fabric! In a pretty brocade or embroidered silk… actually, I don’t even want to work out how much that would cost.

And then of course there’s Simplicity 3635, to go underneath. Ten metres of steel boning for the panniers… and twenty-eight metres for the stays! Wow.

I don’t know though, whether I’d want to wear such an enormous dress, or whether I’d choose to go for a fancy gentleman’s coat instead.

Simplicity 4923 looks rather drab in these pictures because it’s intended as a pirate costume, but again in an embroidered silk it could look absolutely stunning.

I think I’d probably make the shirt, trousers and waistcoat from the men’s pattern, but use Simplicity 3677 for the coat.

I’ve made both the men’s and the women’s versions of the coat before, and the women’s version has a princess seam at the front which makes for a better fit.

Obviously none of these patterns are terribly accurate, historically speaking, but for a masquerade or a costume party, they’d be an excellent starting point.

Then I’d just need to find somebody who was willing to go with me, of course. Paul really doesn’t do dressing up.