Flowery sort of day.

Harris Garden

We spent this morning at a garden centre buying three Trachelospermum jasminoides to grow up the back of the Shed. Hopefully our neighbour will prefer looking at Trachelospermum jasminoides than my Shed wall, although it might take a year or two before they’re tall enough to peek over the garden fence!

We spent the afternoon mooching gently around the Harris Garden at the University of Reading, taking photos of pretty flowers. Most of mine were out of focus (I still haven’t entirely got the hang of the short depth of field on the 200mm lens), but I’ve got a few that I’m pleased with. Most of them were taken in the greenhouses.

You can see them here.

I think I need to buy some sun cream. My face feels a bit unhappy with me for spending the entire day out of doors.

Dyeing wool with Kool Aid

Ta-Daa!

I was looking through some of my photos on Flickr, and realised that I’d never posted my tutorial for dyeing wool using Kool Aid

It’s now in the FAQ section, with my other tutorials.

I dyed this one lonely ball of wool more than a year ago, and I still haven’t thought of anything in particular to knit with it. What do you do with just one ball of double knitting? Time to head over to Ravelry and look for some ideas, I think!

Enormous Trousers!

Vogue 8367, view C

Here’s what I’ve been up to for the past couple of days – making a pair of ENORMOUS trousers!
The pattern is Vogue 8367, view C.

The fabric is a slightly mad pinstripe… it’s a polyester/wool blend, but the stripes are metallic in red, blue and gold.

I wanted a pair of high waisted trousers for a reason – I have a lot of abdominal pain, so most trousers are really uncomfortable to wear. Because they’re so low, the waistband digs in when I sit down, and that’s pretty painful. I have some pull-on trousers which are great, but I wanted something that was a bit smarter. I think these fit the bill, and I’ll probably make a couple more pairs in different fabrics.

I am madly in love with these trousers, and I can’t wait to take them off the dress form and put them on!

Skulls & Roses waistcoat.

Skulls & Roses waistcoat

This is what I’ve been up to today – making a skulls & roses waistcoat.

The fabric is by Alexander Henry, the print is “The Rose Tattoo”. 
The waistcoat itself is from an old “Style” (now Simplicity/New Look) pattern, from 1995. I think it’s one of the first patterns I bought when I started sewing.

I particularly like the sweetheart neckline, and I think this would look equally good worn on its own as it would over a smart shirt. 

Skulls & Roses waistcoat

I used the fabric that was left over from a skirt that I made last year. That’s why there’s a seam down the centre back – I didn’t have a large enough piece of fabric to cut the panel on a fold.

The lacing at the back gives the waistcoat a nice fit and makes it very comfortable to wear.

The only thing that’s missing now is the buttons. Despite my enormous button collection, I couldn’t find a set of ten that matched. Typical!

Three hats for three babies.

Three umbilical cord hats

It’s just as well I was able to squeeze three little hats out of my remaining wool – a third baby was born amongst my friends on Easter Sunday. That’s three babies in one week!

Ava Mae’s embroidered birth announcement

Ava Mae

Ava Mae

Ava Mae was born on Thursday, and I enjoyed making Gwen’s embroidered birth announcement so much that I thought Ava should have one too.

This one’s almost all done in back stitch, with the exception of a few chains and french knots on the decoration. At the rate all these babies are arriving, I’m going to be kept very busy making small things!

Gwen’s embroidered birth announcement

Gwen Helen

Gwen Helen

Gwen was born on Monday, and I thought it would be nice to embroider a little something that her parents might like to keep. I didn’t want it to be a traditional-looking baby sampler, so I opted to go for a fancy font and some freehand embroidery.

The lettering is worked in back stitch, using two strands of ordinary cotton sewing thread. The decoration is mostly back stitch, with a few chains and french knots thrown in for good measure. It was done with a single strand of thread. I did start to fill in the letters with satin stitch, but decided that I liked them better open.

I’m really pleased with how this has come out, and I’ve just been and bought three more frames, to make name plaques for Paul’s little cousins. And I’ve had a request to embroider a couple more robins, so that a friend can quilt them into cushions!

I can’t tell you how much I’m enjoying this embroidery. I feel very inspired, and I can’t wait to do more.

Embroidered robin. In a hat.

Embroidered robin

This is a robin. Wearing a hat. Of course.

Last week I drew some silly pictures of birds wearing hats, and then spent ages deciding what I could do with them. Ages ago I bought a whole bunch of organic cotton tote bags, with the idea of embroidering designs on them. So, I embroidered the robin onto the tote bag. It looked like this.

I wasn’t very happy with the poor naked robin, so I decided to colour in his breast with a bright red fabric pen. Disaster! The pen came out pink, and no amount of layering would make it any brighter. Not good. Even adding his little embroidered top hat didn’t help.

So, in a fit of madness, I decided to cover up the fabric paint with embroidery. Lots and lots of satin stitch, done in a slightly irregular way, to look a bit like feathers. It took two evenings to finish, and I was completely cross-eyed by the end of it – but I really like it!

My First Clapotis.

Clapotis

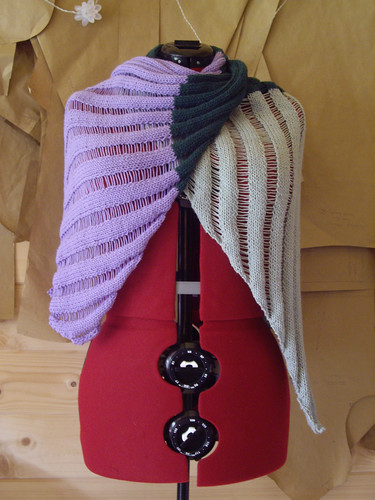
Now that the birthday gift has been received (only a week late, oops…) I can now reveal my first Clapotis!

I have to confess that I’ve been avoiding making a Clapotis for several years. There are more than ten thousand finished Clapotii listed on Ravelry, and another five thousand people with this project in their to-do queue. I didn’t see what all the fuss was about, and I didn’t want to jump on a giant knitting bandwagon just for the sake of it. So I didn’t knit one. Until now.

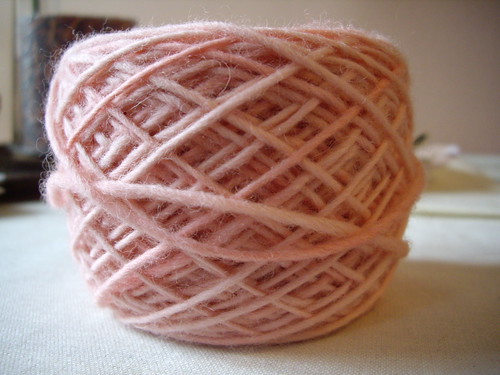
The reason this gift was a week late is that I spent many, many evenings knitting swatches for scarves and then unravelling them again. I wanted to make a companion gift to go with these Slither gloves, so I was originally thinking of something stripy, or perhaps an intarsia or fairisle design that would make the most of the three colours. In the end I couldn’t come up with anything that looked nice on both sides (I’m fussy about that in a scarf), so I started looking for any kind of scarf or wrap that could be made with the amount of wool that I had.

Clapotis turned out to fit the bill perfectly, and I’m glad it did!

I couldn’t have done it though, without the help of Stricklady‘s handy Clapotis Chart. She breaks down each section of the scarf and charts exactly where to place your markers, and how many repeats you need to make. Using this, I could keep track of which row I was working on, and figure out exactly where to change the colours so that I could be sure I’d have enough yarn to reach the other end. Thank you, Stricklady!

While I was out walking at the weekend, chasing geese with the camera, I could have done with a Clapotis of my very own. It’s perfect for this in-between weather – not quite warm enough to go without a coat, but not quite cold enough to want to be completely bundled up. I might have to have a little hunt through my wool stash, and see what I can find…

Dennis the Menace dress…

Dennis the Menace dress

I made this for Dott, the proud owner of a matching corset!

It’s made from a vintage duvet cover, except for the stripy bits which are new.

I have a moderately-sized stash of vintage children’s duvet covers and curtains, so I’ll be making a few more of these.