Not quite a pillowcase top

3567474842_c24e9f131d_z

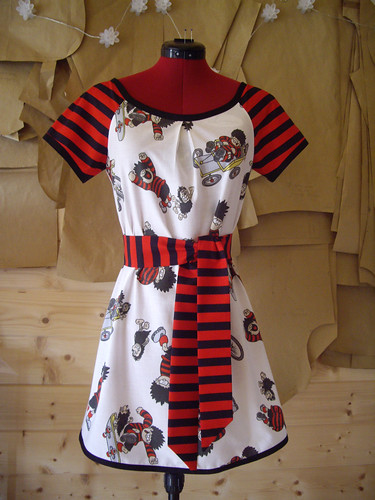
Still feeling inspired by the Great British Sewing Bee, this time the alteration challenge to create something from a pair of curtains. I’ve done a fair amount of fabric recycling in the past, from curtains, duvet covers, and end-of-roll fabrics. The tunic dress above was made from a gorgeous brand new vintage bed sheet, and I was able to use the border print along the hem.

IMG_4929

I was suddenly inspired to make a little cropped layering top, that I could fit onto just a pillowcase-sized piece of fabric, so I opened up my pattern drafting software and came up with this. Sadly it doesn’t fit onto a pillowcase, because I hadn’t taken into account the actual size of a pillowcase when I was working on the design. Oops. It does however fit onto a single metre of fabric, so it’s a very economical little top.

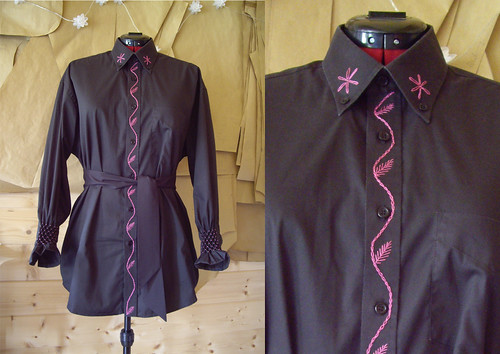
This prototype version is cut on the bias and has a seam down the centre front and back. The only reason for that is because the pieces were cut from the skirt of a dress that I made years ago, and never wore, so it’s still fabric recycling in that sense. It would definitely look better without the seam, and in this type of fabric I don’t think having it on the bias really makes all that much difference.

IMG_4931I’d originally envisaged wearing this with trousers and a long-sleeved t-shirt, or maybe over a camisole top in the summer. When I had a rummage in my wardrobe though, I spotted this empire-line dress and thought they’d go really well together!

The top is designed to be reversible, with the v-neck at the front if you have a pretty necklace to show off, or at the back if you have, say, a lovely tattoo, or perhaps you just prefer the higher neckline. This one is finished with some vintage nylon lingerie trim, but I can also imagine it with very fine organic cotton lace. In fact it would look lovely with some deeper lace around the hem as well.

10406953_10152469716633829_8661130960669008137_nIn fact, way back in May, I bought a little pile of organic cotton fabrics, most of which are about a metre in size. The bicycle print and the matching spots have been turned into a tunic for a friend, but all the others are still sitting in my stash. I think I might have just discovered what to do with them!


Hop Pillows ready for the EMPORIUM

Hop Pillows

Remember the hops that I started making into pillows, way back in November? I finished one, for Sarah’s birthday, as she’d kindly harvested the hops for me from the skycarrots allotment. The rest have been sitting around almost finished, just waiting for the top of each pillow to be ladder-stitched together by hand.

Today, in a flurry of productivity, I’ve sewn them all together and wrapped them all up with labels styled for the INEXPLICABLE EMPORIUM. These prints aren’t particularly “steampunk”, but as I’m trying to recycle the remnants of my stash before I buy anything new, I decided to use them anyway.

You might recognise a few of these fabrics – some of them turned out to have been hanging around for rather a long time!

  • Koi fabric from a circle skirt and corset that I made to wear to a friend’s wedding
  • Sewing print left over from an ill-fated dress that I’ve never worn
  • Psychedelic design was the lining for my Beatles jacket
  • Sugar skulls from my favourite skirt!
  • Flames from Lettice’s skirt
  • Strawberries left over from a pair of BIG PANTS that went straight from my sewing machine to the charity shop
  • Rainforest creatures from a dress I bought that turned out to be so badly made that the only thing I could do with it was chop it up.

The clover & ladybirds print is the only fabric that’s never had any other incarnation. I bought it back in the days when I was making lots of tote bags, but it turned out to be a little bit too thin. I have a little bit left over (along with most of the other fabrics) that I’ll be using to make some matching lavender bags. I have enough dried lavender to fill a hundred bags, so that should keep me busy for a little while!

Steel Wool Pincushions

Steel Wool Pincushion

I should probably state first of all that I copied this idea shamelessly from Mister Finch, who shared his gorgeous pincushions (in vintage silver trays) on Facebook. I was so smitten that I made my own.

It was incredibly easy to do, and there’s a tutorial for you here.

I bought the steel wool in Wilkinson‘s, and I was very tempted to buy a cheap heart-shaped dish that I’d spotted just down the aisle. Then I remembered that I already had these two heart shaped tins sitting empty at home. They’re a souvenir from the days when Paul worked for a company that had an office very close to a chocolate factory in Belgium. The bigger tin contained praline hearts, and the little one had dark chocolate with marzipan. My favourite!

The lovely flower-head pins in the little heart were a Christmas gift from my friend Chris, who makes amazing quilts. I might have to invest in some more of these – they’re much longer than ordinary dressmaking pins, and so pretty!

At the moment I’m finding that my work time is eating increasingly into my non-work time, with lots of meetings and planning and stress. I find that quick and easy projects like this will cheer me up immediately when I can at least end the day having made something both beautiful and useful.

(Also, I very much enjoyed the part where I got to stab all of those pins into the steel wool. Extremely therapeutic!)

Smocked and embroidered shirt.

Embroidered & smocked shirt

This is what I’m wearing today – a smocked and embroidered shirt.

It started life one of Paul’s old work shirts. It’s in perfectly good condition, it just doesn’t fit him any more. So I’ve smocked the sleeves and a bit on the back, and embroidered the button stand and collar.

I did this to see whether it would work as a project that could be taught in a workshop – how to revamp an old shirt with some simple decorative needlework. Unfortunately this was such a nuisance to make that I think the answer is no! There’s a reason why the smocking and embroidery is always done before you assemble your garment – it’s much too fiddly to try and do it afterwards.

On the plus side, I’ve gained a pretty addition to my wardrobe, and have every intention of wearing this with my huge floppy trousers. Also, it tells me that smocked and embroidered shirts made from scratch are definitely in my sewing future!

Dennis the Menace dress…

Dennis the Menace dress

I made this for Dott, the proud owner of a matching corset!

It’s made from a vintage duvet cover, except for the stripy bits which are new.

I have a moderately-sized stash of vintage children’s duvet covers and curtains, so I’ll be making a few more of these.

Three Blue Tote Bags

Three blue tote bags

I’ve been making a lot of tote bags recently, mostly from recycled pillowcases and duvet covers.

Now that supermarkets are starting to charge for their plastic bags, more and more people are getting back into the idea of using fabric shopping bags. They’re strong, they can fold up neatly into your handbag, and they can hold a heck of a lot of shopping!

I was planning to write up a tutorial for making a tote bag from a standard pillowcase, but I see that the first issue of the new Sew Hip Magazine has beaten me to it.

I’ve seen similar tutorials online, for bags made from pillowcases and pretty tea towels. My bags use only half of a pillowcase, and they’re not lined, but there’s no reason why you couldn’t go to town and make yours enormous, or as fancy as you like!