Nuno Felting

Nuno Felting

Hello! I feel as though I’ve been away for ages. I’m so busy at the moment I’ve barely had time to breathe, never mind blog, but I made this yesterday and I thought it would be a nice little something to show. It’s a somewhat experimental piece of nuno felt, about the size of a sheet of A4. As you can see, I’ve felted a little bit of merino onto a backing of muslin.

Nuno Felting

When the wool starts to felt, the fibres contract and matt together. The cotton muslin doesn’t shrink, so you get these lovely textures coming through.

Nuno Felting

This is the back, with its lovely rivers of ruching, and the wool fibres just poking through.

Not bad for a first attempt, I think!

Feathers and sequins

Feathers for mask

Oh my goodness, the feathers. Fluff everywhere. My Shed will never be the same again.

Once the glue’s dry, I’ll be getting out the hot glue gun to attach these feathery extravagances to the sides of a mask. The black feathers and the sparkly bits were originally attached to the mask in the first place, but the feathers were on very long stems and a lot of them were broken.

I bought the mask late last year, with no particular occasion in mind, and it’s been in somewhat careless storage ever since. So, I ripped off the sparkly bits, ripped off the feathers, and then spent absolutely ages trimming the stems off and pulling apart the little red feathers until they were the right size. And then I glued it all back together again. Except that I got a bit carried away and used far too much PVA, so now it’s all sandwiched between clingfilm and weighted down under a pile of books until it’s properly stuck together.

I also sewed a rather unsightly piece of wide black elastic to the back of the mask, which seems to keep it in place over the top of my glasses without squashing the frames into my face. Not the most elegant solution, but after a great deal of trial and error it turned out to be the most effective. Wearing a mask over glasses is always awkward, so I’m pleased to have found something that stays put and doesn’t hurt!

Fifteen silk buttons

Fifteen Silk Buttons

These are fifteen silk-covered buttons, waiting to take their place on a waistcoat to match the pirate shirt. They have to wait until I’ve made all the buttonholes by hand. This could take some time…

Silk Rose

Silk rose

I made this little silk rose a while ago, but forgot to take a photo to show you. It’s backed onto a magnet, so you can wear it as a buttonhole on a smart jacket without making pin holes. Now I’ve seen this larger-than-life picture I think I might add a silk-covered button in the centre, just as an extra little finishing touch.

Cufflinks

Cufflinks

The main reason I bought that TM Lewin shirt was because it fastened with cufflinks. It’s quite rare to find women’s shirts with double cuffs (unless you want to splash out more than I can currently afford), so I was really pleased to have spotted it.

In the shop the cuffs are fastened with little plastic studs, so of course I then needed to make myself a pair of cufflinks. I was going to follow the Martha Stewart tutorial, but a quick rummage around in the Shed turned up some slightly more sturdy components.

These are two pairs of buttons, as per Martha Stewart’s directions, but instead of being joined with thread loops I used metal jump rings from my jewellery-making supplies. All four buttons have shanks rather than holes, so this seemed like a more appropriate solution than joining them with thread.

The top buttons are about an inch across, and covered in offcuts of silk from the waistcoat and bow tie. The bottom buttons are about a centimetre across, and are the same as the buttons on the waistcoat. I also managed to find larger versions of the same buttons for the trousers and the jacket. So there you go – custom cufflinks to match your outfit for the price of four buttons and a couple of little metal rings!

Precious Metal Clay

Silver jewellery

These two little pendants are made from Precious Metal Clay. I’ve had the clay for almost a year, but was a bit afraid to make anything with it in case I ruined it. Janet (the silversmithing tutor) said that if I wanted to make something at home and bring it in, she’d show me how to fire it. I very gratefully took her up on the offer, and here are the results.

The pendants were made very simply by pushing a rubber stamp into the rolled-out clay. They’ve been through the barrel polisher, but I need to get into the indentations with a brash brush to bring up the shine. Another technique I’ve read about is to push polymer clay into the pendant, to add a bit of colour.

The silver blob is what happens when you melt silver clay completely to a liquid. I wanted to do that with the leftovers, so that I could see what the various stages of melting look like. Theoretically this should help me to avoid disaster in the future.

Silver jewellery

Sadly it didn’t help me to avoid this little disaster!

This is what happens when you’re firing your metal clay piece from the back (so you don’t squash the bail), but you let it get a little bit too hot. The honeycomb texture on this leaf is because I accidentally melted it ever so slightly into the firing block. Oops.

Unfortunately there’s not a great deal I can do about that, but I can at least clean it up with the brass brush and see how noticeable it is when the whole thing’s nice and shiny. Such a shame, because the delicate texture of the leaf was beautiful!

My next step is to book myself onto one of Janet’s Precious Metal Clay courses. I think I need a little bit more help…

Silver Jewellery

Silver jewellery

The final two days of my Art Week were spent at a silversmithing course. I’ve been meaning to get around to going on a silversmithing course for more than ten years, and now I’m really cross with myself that I didn’t do it sooner. Silversmithing is brilliant!

On the first day we made silver rings using different profiles of wire. On the second day we were given a quick demonstration of stone setting, so I set one of my rings with this lovely rose quartz. I’m absolutely thrilled to bits with this, and you can expect to see me wearing it pretty much all the time from now on.

Silver jewellery

My main project was this pendant. The leaf is silver sheet, textured with wire to make the veins, and then hammered gently over dome punches to give it a bit of shape. The acorn is made from copper and brass, and also gently domed. I’ve since brushed the brass part of the acorn, to give it a satin texture. I’m now pretty handy with a piercing saw and a needle file, although my hammering skills definitely have room for improvement!

Silver jewellery

I already have quite a few of the necessary tools for making jewellery, so I’m currently contemplating buying a few more. A bench clamp, a ring mandrel, a piercing saw and a few bits and pieces to allow me to do soldering… I can feel a few more pretty rings coming on!

There are quite a few silversmithing evening classes local to me, although apparently it’s quite a challenge to find one that actually has any available places. I’ll definitely be looking around to see whether I can squeeze myself onto a course. There’s so much to learn, and I can’t wait!

Create With Clay

Create With Clay

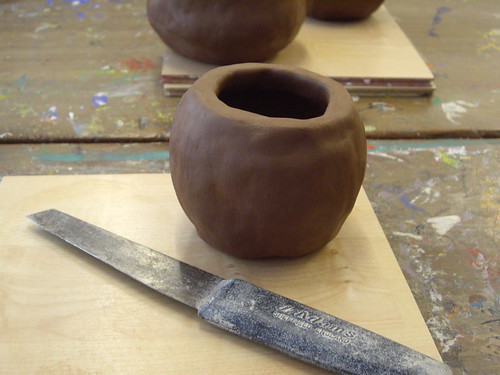
This week I’ve been at my local school, taking part in various art courses. The first one was “Create With Clay”, and above you can see the first thing that I’ve created in clay for approximately seventeen years. It’s a slightly wonky thumb or pinch pot, with coils added to the top.

Create With Clay

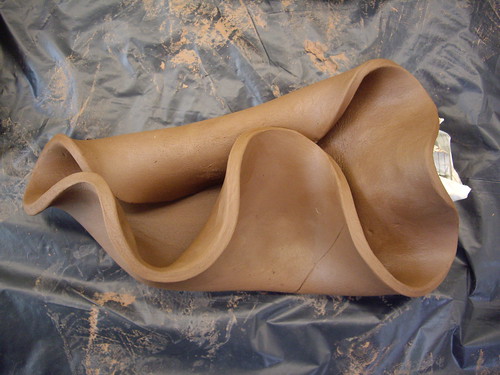
This is a slab of unfired terracotta, rolled out to a uniform thickness, and then curled into a pleasing shape.

I didn’t really enjoy the time I spent working with ceramics on my Art Foundation course. I hated getting my hands dirty, I didn’t like working in three dimensions, and I wasn’t really interested in waiting for weeks on end for the finished piece to come out of the kiln. Especially as it was quite likely that something in there would have exploded and ruined everybody else’s work. As a result I didn’t really pay much attention in ceramics classes, and so I made rubbish pieces which only confirmed that I didn’t like it.

Create With Clay

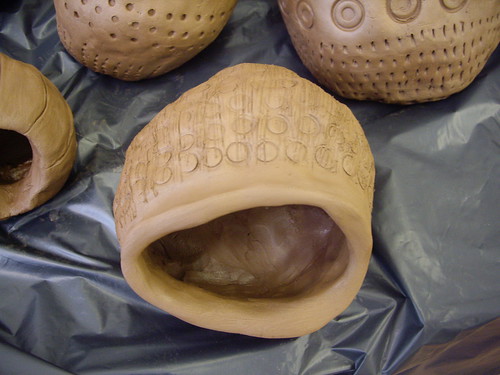
This one’s a “pod”. I made two pinch pots, stuck them together, and then made a hole – as per Kay’s instructions. The texture on the outside is done with the end of a pen and a dried up old paintbrush. The texture on the inside? That’s just my fingerprints.

I tried really hard not to mind about having dirty hands, although it turns out that I’m still pretty squeamish about the way that the clay draws all the moisture out of your skin. I also tried not to have a pre-conceived idea about what I wanted to achieve, and simply followed the instructions and enjoyed the process.

As it turned out, I actually did enjoy the process!

Create With Clay

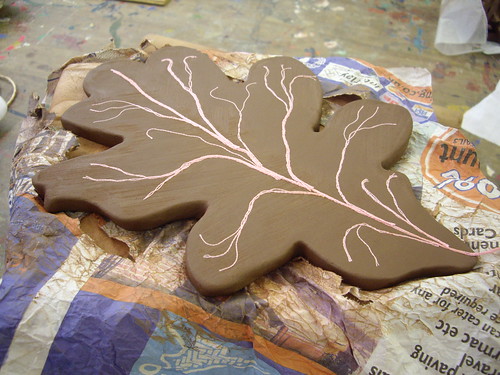
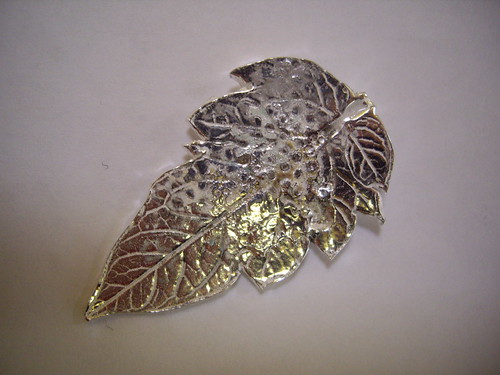
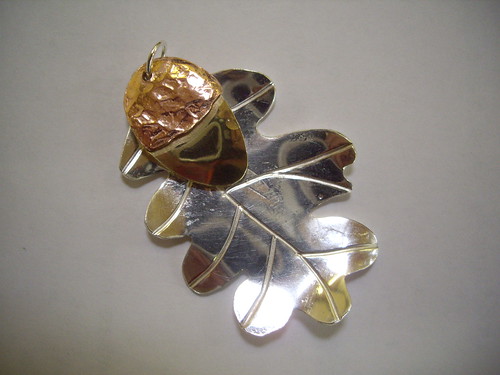
On the second day we made a piece of our own devising. I enjoyed the simplicity of working with a slab of clay (particularly the fact that I didn’t have to stick my thumbs into it!), so I decided that an oak leaf would be my “inspiration from nature”.

I drew out the shape onto a pice of A4 paper, and used that as my template for the size of the terracotta slab. After some experimentation with mark-making (something else that I loathed in college) I decided to use embroidery thread to mark out the veins. The underside of the leaf was textured by rolling it out onto a sheet of newspaper that I’d scrumpled up and then flattened out again.

Create With Clay

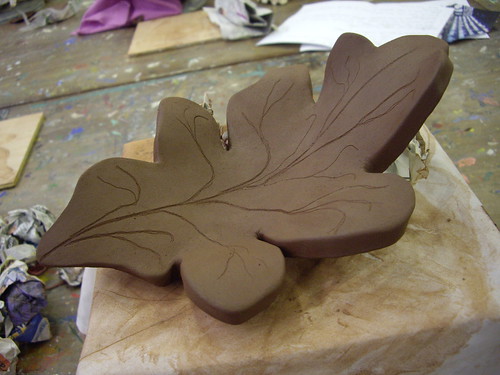
Once that was all done I spent a long time smoothing down the edges of the piece, and coaxing it gently into a more interesting shape. After I’d carefully pulled out the embroidery thread, the top surface was very gently textured with a damp sponge.

All of the pieces will be fired during the summer holidays, so we have to wait until the end of September to get them back. I’m really excited to see how the leaf looks once it’s been fired and finished with a clear glaze.

I’m not entirely certain what I’m going to do with a 12″ long terracotta leaf once I get it back… but this course definitely helped me to get over my fear and loathing of working with ceramics. In fact, I wouldn’t mind signing up for a longer course so that I could play with colours and glazes. That seems like fun!

Joana Vasconcelos

Joana Vasconcelos

While I was at the Haunch of Venison, I also saw an exhibition of work by Joana Vasconcelos.

I particularly liked the large ceramic pieces that had been covered with crochet. There was a lovely contrast of texture between the matt cotton thread and the shiny glazes underneath. The animal heads, mounted on the walls like hunting trophies, were particularly beautiful.

There was also a fabulously bonkers installation which consisted of a moving track with large ceramic dogs suspended from it. As the dogs swung around like a surreal canine carousel, they would bump together and occasionally smash into pieces. Weird, but mesmerising. I heartily recommend it.

Polly Morgan


Photo © Polly Morgan

The other day I went to see an exhibition of artwork by Polly Morgan at the Haunch of Venison. The exhibition is called “Psychopomps”, after the mythical creatures that conduct souls into the after-life.

This piece is “Atrial Flutter”, and it’s a human ribcage and spine, suspended from balloons.


Photo © Polly Morgan

Inside the ribcage is a beautiful taxidermied cardinal.

The pieces were displayed in a darkened space, accessed by a mezzanine walkway. You could also go into the room underneath, so you could see the sculptures from above and below and really get into the amazing detail and skill of the pieces.

Polly Morgan shadow

My favourite aspect was that the room had been lit so that each sculpture left a delicate shadow on the wall or the floor. In this one you can see the colour of the balloons, but this angle makes the little bird disappear.

Polly Morgan‘s work is a little bit heartbreaking, but absolutely beautiful.