Simplicity 3042

Simplicity 3042

Yes, I’m still here, just about. The last few weeks at work have been somewhat stressful, and I’ve spent a lot more time out of the Shed than I normally prefer, so things have been a bit quiet on the sewing front.

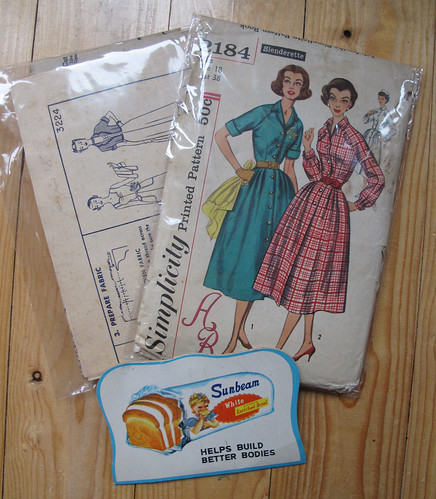
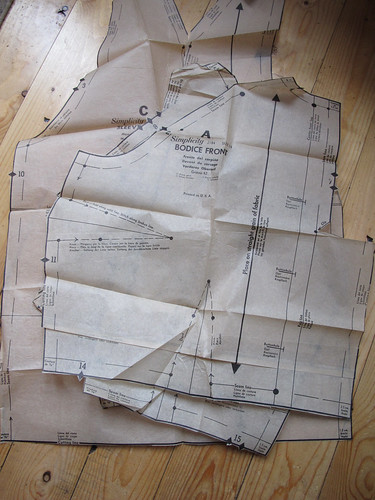
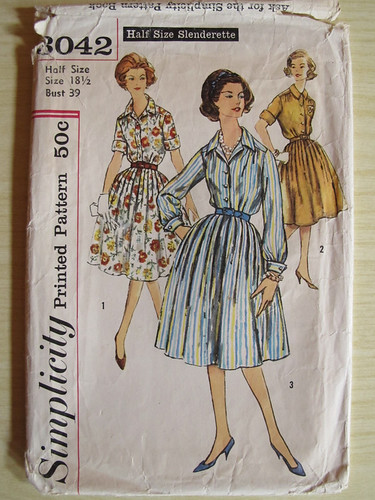
So, this is Simplicity 3042, a pattern from the late 1950s or early 1960s, in a Slenderette size 18½. Not my Holy Grail sewing pattern, because I wanted to make a test version in a size that should theoretically be absolutely perfect for me, so I could make the relevant alterations without too much guesswork.

Simplicity 3042

So, on the plus side, the fit of a Simplicity Slenderette size 18½ is indeed absolutely perfect! I didn’t make a single alteration to the pattern, the waist is in the right place (and the right size), and the length is spot on too.

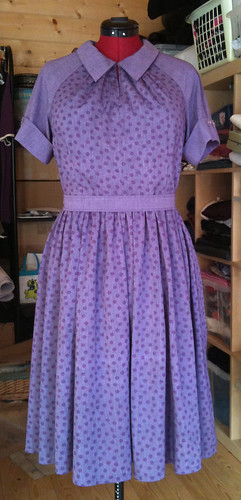
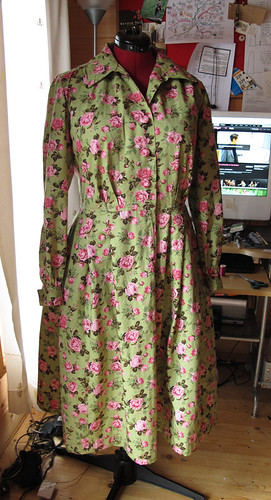
On the minus side, I don’t really like this fabric now it’s a dress (maybe Paul was right about it looking like a sofa?), and there are quite a lot of mistakes that happened when I thought I already knew how to make a dress and so didn’t read the instructions properly.

Simplicity 3042

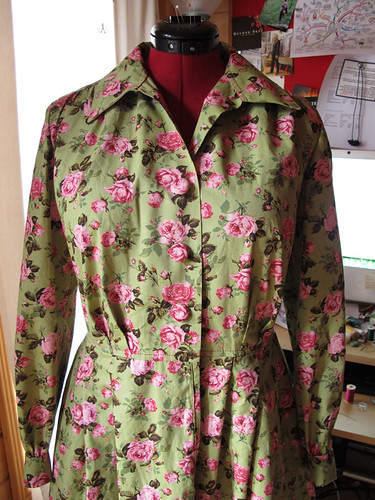
To begin with, I simply didn’t read the instructions for the front facing. That had implications for the collar, which now looks nothing like the illustration. I didn’t bother to unpick that, because I don’t plan to walk around with the pattern envelope pinned to my chest, so I don’t think it matters too much. Annoying, though.

The skirt, on the other hand… I knew I was going to need to make alterations to the pleats, because the side front/back panel piece was slightly larger than the fabric I had left… because I didn’t follow the layout given with the pattern. On top of that I somehow managed to sew the skirt to the top in such a way that it didn’t fasten properly, so I unpicked the waist seam and started again. I thought I’d done really well to get it to all fit back together again… and then I noticed that the left front (as you wear it, so on the right in the picture) has three pleats in the skirt, while the right front only has two. I also didn’t turn the binding of the skirt placket to the inside, so a) you can see it, and b) the skirt front doesn’t sit quite right.

Simplicity 3042

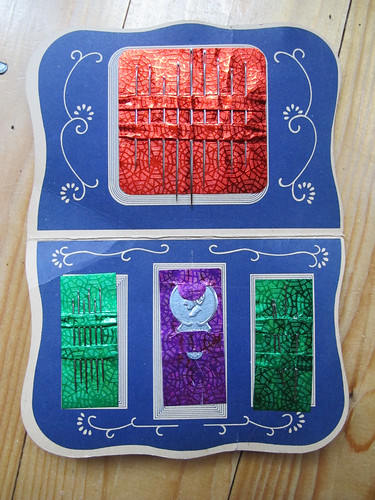
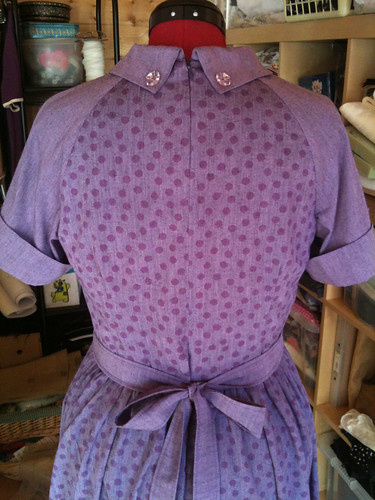
I am quite pleased with these cufflinks though. Two pairs of covered buttons, linked together by several strands of thread that’s covered with a simple buttonhole stitch. Now I just need to make the eight buttonholes in the french cuffs to fasten them through. Sadly I think that’s going to have to wait until tomorrow. The amount of hand sewing I can do in one day is gradually getting less and less. Making seven covered buttons and the three buttonholes in the front of the dress is all that I can manage for now.

This dress will be worn, mainly because I don’t want to waste four metres of fabric and two days’ work. I have a pink v-necked pullover that will go nicely over the top, and enough wool to knit a pink cardigan too. I’m also waiting for the arrival of another pattern, Simplicity 4838, which is a pinafore (jumper) dress.

Simplicity 4838

I’d planned to make a couple of these in wool or suiting fabrics, to wear over my smart shirts for work. Conveniently, it will also cover up the botched centre front of the dress I’ve just made, and lessen the impact of the sofa-like fabric. I think I even have some dusky green suiting which will go perfectly.

Next time, I might even read the instructions, too.

Vintage Underwear

Vintage Underwear

On Saturday morning I went to a local antique shop, looking for a wooden hand that I could use to display gloves. (As you do.) I didn’t find one, but I did find four lovely pieces of vintage underwear that I snapped up with great glee!

Vintage Underwear

First out of the basket was this petticoat. It’s in perfect condition, just a few rust spots here and there, and it actually fits me! I’ll just need to shorten the straps, and unpick the tape that’s been used to create gathers under the arms. Then I can wear it underneath the dresses I’m planning to make from my new pattern.

Vintage Underwear

Next up was not one, but two pairs of great big drawers! They’re decorated with drawn threadwork on the legs, each in a different style. Both pairs are a bit damaged. One has a lot of yellowing and a hole in the crotch. The plan for these, I think, is to cut away the worst of the damaged fabric and put in a whole new panel. I’ll also need to replace the elastic and drawstring at the back.

Vintage Underwear

The threadwork is gorgeous though, so fine! I genuinely can’t tell whether the spots in the middle of the squares are made by hand or machine. They’re so even!

Vintage Underwear

The other pair has a simpler design, but no less lovely. These have been repaired quite a lot, and will need a fair bit of work doing if they’re going to be rescued and returned to a wearable state. There’s a small tear at the front waist, and the drawstring channels have come apart on both sides. The crotch is intact in this pair, and in fact looks to have been replaced. The stitching is so tiny that the seams are virtually indistinguishable from the surrounding fabric. There’s also quite a large tear in the back of one leg, that’s been mended in a similarly delicate way.

Vintage Underwear

Both pairs are monogrammed with the initials “MR” just to the left of the centre front.

Vintage Underwear

And last but not least, there’s this pretty little camisole. More modern than the other pieces, it’s overlocked on the inside, and made from lawn rather than densely woven cotton. I can’t tell yet whether the straps will need replacing, or whether they’ll be fine after a good hot iron.

Vintage Underwear

The ribbon that’s threaded through the channel at the front definitely needs replacing though, and there’s a tear that will need to be mended. There’s also a double row of stitching around the waist, that must presumably have once contained elastic. This one’s not as carefully made as the others, which makes me feel less bad about altering it rather than trying to preserve it. In fact, I’m thinking that I might turn it upside down, and make it into a pretty little petticoat or summer nightdress for my niece.

Not bad, for a completely unexpected find!

Simplicity 2184 – it’s here!

Patterns from HoneymoonBus

Wow, that was quick. It took less than ten days for my PERFECT PATTERN to reach me, all the way from Canada! Bless her, Zoe from HoneymoonBus had already sent me a lovely convo via Etsy, to say thank you for mentioning her on my blog, and to let me know that she’d included a little gift. I didn’t know it was going to be a second pattern! That one’s Simplicity 3224, a sundress from 1950 with the options of fantastically enormous pockets and a matching bolero jacket. Fantastic! That one doesn’t have its original envelope, but thanks to The Magic of the Internet I’ve been able to track one down, so I can see how much fabric I’ll need to make it.

And just look at this simply gorgeous promotional needle case from Sunbeam Bread:

Vintage needle case

Isn’t it a beauty? Almost completely intact, you can just see where a couple of needles are missing from the right-hand green panel. On the back is a little paragraph explaining that adding vitamins to bread doesn’t affect its taste or texture, and reassuring us that it’s the best way of staying healthy.

The Pattern!

And here’s the pattern itself! I’m really pleased that Simplicity patterns were printed ones by the 1950s, as unprinted dress patterns tend to confuse me a bit. This one seems to have been made up as a short-sleeved blouse – the long sleeve and skirt pieces remain uncut. The previous owner had also done exactly what I was going to do, which is to take about an inch out of the bodice length to make it smaller – her original folds are still in place!

Once I’ve given all the pieces a gentle smoothing with the iron, I’ll trace them to keep the original safe for future use. I also need to make a few alterations, and it’ll be much better for me to scribble all over a new brown paper pattern than on this original one.

I popped into town yesterday to buy some frog fastenings and sequin trim to finish off my velvet cape, but both were out of stock and I had to order them in. Now I don’t feel so bad about putting the coat to one side while I start work on these lovely dresses!

Oh, and the reason I ended up buying from HoneymoonBus, rather than one of the many other vintage pattern sellers out there? Her Etsy store is arranged by size. I appreciate that if you’re looking for a pattern from a particular decade, that might be a bit annoying. But I’ve spent so many hours looking at vintage pattern sites, finding something I like, and discovering it’s too small, that to be able to go a place where I could just look in one section and find something in my own size was such a relief! So thanks again to Zoe, I can’t wait to get sewing!

Simplicity 2184: Vintage dress pattern holy grail!

Well, it’s taken me almost five years to find it, but here it is – my vintage dress pattern holy grail, in the form of Simplicity 2184.

Raglan sleeves. Short and long sleeve options. FRENCH CUFFS. Convertible collar. In a size that I don’t have to re-draft too much. HALLELUIA! All I need to do is add pockets in the side seams (and 3″ to the waist) and it will be PERFECT! It even still includes the embroidery transfers for the monogram. *swoons*

It’s probably just as well that I need to wait for it to arrive all the way from Canada (I bought it on Etsy, from HoneymoonBus), hopefully that will ensure that I’ve calmed down a little bit by the time it arrives. I’ve already mentally sewn it in about 153 different fabric combinations, and thrown out every other item of clothing in my wardrobe. I need to slow down.

I posted the link on Facebook, and several people were somewhat boggled by the term “Slenderette”. Thankfully a friend discovered that Gertie (whose blog I am now reading obsessively) had contacted Simplicity to find out what on earth. Apparently the term was used for patterns that were specifically designed to make you look more slender. Not that this is going to work for me, as I’m going to have to let out the waist by at least three inches to make the dress fit – or invest in some fairly serious underwear.

Yes, underwear is still an ongoing issue. This stupid annoying fibromyalgia thing that I’ve got going on means that wearing a bra is absolutely excruciating, so I haven’t done it for the best part of a year. (And the Fashion Police didn’t arrest me or anything! It’s been a revelation!) Those “secret support” vests – sorry – camisoles with a soft bra hidden inside are a bit better, but they still have a constricting band of elastic around the body, so they’re not ideal. I did make a lovely soft teddy from bamboo fabric, but there were some issues with the fit (which is why I haven’t blogged about it yet), and Paul said it looked “like Victorian underwear – in a bad way”. Clearly some improvement needed there!

I keep looking at Kiss Me Deadly, whose vintage-inspired underwear would be perfect underneath this type of dress. But sadly their pretty things are outside the realms of my budget at the moment (anybody want to buy me a Vargas dress? Go on, you know you want to!), and I’m not 100% certain that my body will tolerate being squished by powernet all day.

So perhaps while I’m waiting for this pattern to arrive and fill me with wonder and glee, I should concentrate on doing some experiments with underwear. I’ve only made a couple of bras since I went on LCF’s Structured Lingerie course, and that was two years ago. Now I really want to do their Lingerie Workshop, but again, budget, and the courses take place in the school holidays, which is when I tend to be doing extra hours at work. Hey ho.

In the meantime, I’ve been reading blogs such as Ohhh Lulu, and reading my 1970s and 1980s lingerie-sewing books, in the hope that these might encourage me to get over my terrible fear of wasting fabric, and actually cut something out. I think now’s the time!

Simplicity 1755

Simplicity 1755

This is Simplicity 1755, my new favourite dress. Fifties-inspired style? Check. Pockets? Check. Raglan sleeves? Check. Pretty collar? Check. Perfect!

Well, sort of.

Although the dress itself has come out lovely, the pattern leaves a fair bit to be desired. To begin with, the instructions for the button loops and sleeves are wrong. Somebody’s had a little centimetres versus inches confusion, because the instructions say to cut the button loops 2cm long, when they actually need to measure 5cm – about 2 inches. And the instructions for the placement of the button loop are wrong as well. In the end I decided to abandon the loops completely, and used a couple of sparkly buttons on each sleeve to hold the cuffs in place.

Simplicity 1755

I also added a couple of sparkly buttons on the back of the collar, because the pattern didn’t seem quite right there either. The instructions call for hooks and eyes to close the two halves of the collar together at the back, but the pattern pieces simply aren’t the right shape for that to happen. So, the sparkly buttons are holding the back of the collar down to the dress, to stop the corners from flying away.

Simplicity 1755

I’m pretty pleased with the invisible zip, considering it’s only the second one I’ve ever put in. It gaps a little bit at the waist, but the belt covers it, and all the seams match which is good. The waist isn’t terribly defined for a 1950s-inspired dress, but that’s because I had to grade it from a size 16 at the top to a size 20 at the waist to make it fit. I only hope that doesn’t make it look too frumpy, but the most important thing for me is that it’s comfortable.

The fabric is an organic cotton and bamboo mix, in heather and heather splash spot. I’ve used this bamboo fabric before, and it’s fantastically soft and luxurious. Bit crinkly though, so I foresee a fair bit of ironing in my future.

I’ll definitely be making this dress again, probably with a couple of modifications. The pockets are a little on the small side, so I’ll replace those with my own pocket pattern. I also have a shirt pattern with the most fantastically enormous raglan sleeves, and I can definitely imagine a long sleeved version of this dress. In fact, I may have just ordered three metres of this lovely stripy bamboo/cotton, to go with the leftover plain purple… perfect!

Inexplicable Emporium

Inexplicable Emporium Poster

So, Paul and I came back from Waltz on the Wye with an idea…

Beautiful Buttons

…that seems to be turning into a reality!

Vintage embroidery transfers

Vintage Embroidery Transfers

My parents have been clearing out the loft before they move house, and my Mum had vaguely mentioned a box of embroidery transfers. Turns out that the box is about the size of a ream of paper, and crammed absolutely full!

Most of the transfers are from the 1930s and 1940s, with a few from the early 50s including a lovely set of Coronation designs for brooches. The earliest dated one I found was from 1915! Most of the transfers aren’t dated, but the majority of them have a company name and a number. Others have the name of a magazine and an issue number, so it should be relatively easy to track them down and date them properly.

Vintage Embroidery Transfers

There are lots of different crinoline ladies, as you might expect, ranging from the delightfully simple to the impressively large and complicated!

There are also patterns for cross stitch, broderie anglaise and cutwork. Plenty of floral designs, mostly for dressing table sets or chair backs. Lots of designs for brooches too, which surprised me. I hadn’t seen those in any of my 1930s & 40s sewing books, so I wasn’t expecting them. I quite fancy making some now though.

At first I thought the kiwi (the bird, not the fruit) was the most unexpected design, but on reflection I think that award might have to go to the chicken with the soda syphon…

Vintage Embroidery Transfers

Vintage Embroidery Transfers

Vintage Embroidery Transfers

Vintage Embroidery Transfers

Who knew that chickens could have so much fun at a cocktail party?!

I have some vague plans for using the transfers to actually embroider things, and I also have plans to scan them so that I can use the designs without destroying the originals. A couple of people have suggested that I sell the copies, but I’d need to double check the copyright situation. I do want to research them first though, to date them properly, and to put all the matching transfers together. Once I have a bit of Spare Time, I can feel a lovely project coming on.

Lobster Skirt!

Basildon Park

I managed to miss the Horrockses exhibition at the Fashion & Textile Museum, so I was delighted to pick up a leaflet for Basildon Park and find out that I could see them a little closer to home. The dresses were beautifully displayed throughout the house, but the highlight for me was this lobster-print skirt – ideally placed in a room full of shells!

It was really nice to be able to get so close to so many of the dresses. I learned a lot about the intricacies of their construction just by being able to look at them in such detail. Most of the dresses featured an underarm gusset with tiny topstitching, which was something I hadn’t seen on any of my 1950s sewing patterns.

We also got to chat to the housekeeper, who was doing some conservation work on a pair of beautiful silk curtains. She’d had some very fine net dyed to the same colour as the fabric, and was carefully removing some older, more coarse netting and replacing it with the new. It was really interesting to be able to see the work in progress, and to compare it with some of the work around the house that had already been done.

The gardens and house were very beautiful, but mostly I just want to know where I can get hold of some lobster fabric!

Down in Devon

Crow flying across the beach

Last weekend we drove down to Devon, to visit Paul’s family.

We stopped at Paignton seafront, where we played a dancing game on the pier, took lots of photos underneath the pier, and chased a big crow who was trying to break open an enormous shellfish by dropping it on our car! I am full of admiration for the crow for having learnt how to do this, but less impressed that he decided to throw things at our windscreen. Thankfully he didn’t break it, but I do wonder how many tourists return from the beach to find their cars vandalised!

After Paignton we went to Totnes, where we found a proper vintage clothing shop called Revival that almost caused me to go into shock the moment I walked through the door. Paul managed to dissuade me from buying a beautiful red tailcoat, just because the silk lining in the sleeves was completely shattered and the lapels also needed replacing or re-covering. I wasn’t certain how old it was (there was no label), but it was beautifully made. The pad stitching under the lapels was fantastically neat, and there were pockets in the tails, and the buttonholes in the cuffs were all functional. And it still had all of its original buttons!

Damn, I wish I’d bought it.
Mind you, whilst I could have replaced the damaged parts of the jacket, and made the sleeves an inch shorter, I didn’t fancy taking it apart sufficiently to make it short enough in the waist. So I probably would have ended up never wearing it, and eventually selling it on Ebay for less than it would have cost me to buy and restore it. So it’s probably just as well I left it behind.

Probably.

Action Man

Action Man Jacket

One of the joys of Facebook is that occasionally you receive a message from an old friend. In this case it was a plea from someone I went to school with – could I help him with his vintage Action Man collection? Of course!

Shortly afterwards I received two tiny little jackets in the post.

My mission was to remove the broken zip from the older jacket, and replace it with the functional zip from a newer one. No problem! I even used vintage cotton thread, for authenticity.

I hung on to the two little jackets for a while, in case I could turn up a second tiny little zip and repair them both. Unfortunately 3½” long zips with green tape and metal teeth are quite difficult to come by, as it turns out. Possibly their only use is in mending broken Action Man jackets.