The Great Kool Aid experiment.

Recently I bought a sewing pattern from an American Ebay seller. As a little free gift, she included a mini packet of Kool Aid! Having looked at the ingredients and decided that I didn’t want to risk actually drinking it, I thought it might be fun to do a little experiment.

I must admit, I didn’t have very high hopes for this experiment’s success. The instructions on Knitty and in Simply Knitting Magazine (Issue 26, April 2007) both state that you should use only unsweeetened Kool Aid, and that you should allow 1-2 3.9g packets per 50g of wool. I had only one individual serving (smaller – sorry, I didn’t note down the weight) packet of sweetened Kool Aid, so I wasn’t at all sure whether it would have any effect on the wool at all.

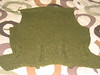
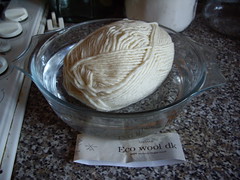
I bought a single 50g ball of Sirdar Eco Wool. It’s completely undyed, so I figured that would be perfect. I followed the instructions in Simply Knitting magazine.

Pre-soaking the wool.
First I pre-soaked the ball of wool in warm water. Apparently wool floats! Not to worry – it soon sinks when it gets nice and wet. It helps to press the air out a bit.

Pre-soaking the wool.
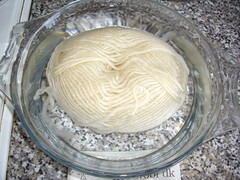
I left the ball of wool soaking for about an hour, to let it get nice and wet all the way through. I didn’t bother unwinding the ball into a skein, as I figured that the dye bath would penetrate all the way through, and I didn’t mind if the outside was brighter then the inside. I just wanted to see whether it would work at all! The water is warm, but not too warm.

Adding the Kool Aid.
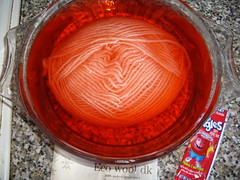
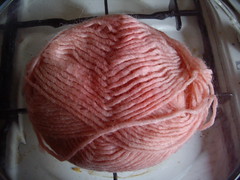
Here’s the wool, now soaking in the Kool Aid.
I took the ball of wool out of the water, and drained it in a colander. I pressed out most of the water, taking care not to scrunch the wool about too much, in case of felting. In the casserole dish, I poured in the Kool Aid, and then diluted it with warm water, roughly the same temperature as the wet ball of wool. When all of the Kool Aid crystals were dissolved, I popped the ball of wool into the solution, and added more water – enough to cover the whole ball. I then scrunched the wool around carefully, to make sure the dye was going all the way through.

Cooking away nicely...
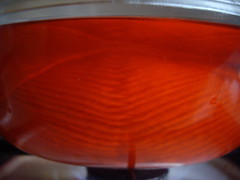
Then it was on with the lid, and onto the hob for a good cooking! Simply Knitting magazine said, “When cooking on the hob, cover and simmer gently for 20-30 minutes”. I left mine cooking for about an hour, because I was watching Funny Girl on tv, and lost track of the time. I don’t think it ever quite reached a simmer either, as I left it on the very lowest setting. During the ad breaks, I carefully turned the ball of wool, to make sure the dye really was going all the way through. I’d recommend using gloves for this part – firstly because it’s hot, and secondly because I ended up with pink fingers for most of the day.

It's pink!
Tipping out the Kool Aid solution, I left the ball of wool until it was cool enough to pick up.

The shower scene...
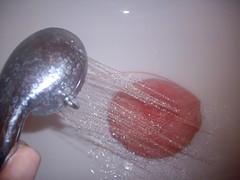
I then transferred it to the shower. I made sure that the water was roughly the same temperature as the ball of wool, and rinsed out the excess dye. I then squeezed out as much water as possible, taking care not to risk accidental felting.

Hanging out to dry.
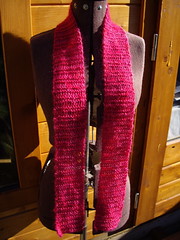
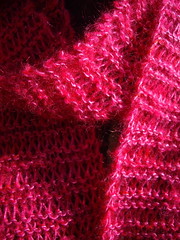
Winding the wool around my clothes airer to dry, I’m really pleased to find that the dye is much more even than I’d hoped for. I think I’d call this experiment a success!

Ta-Daa! Candy-floss pink!
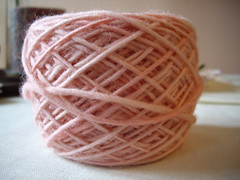
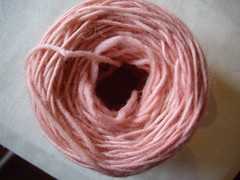
And here’s the final result! Left overnight to dry, and wound into a neat little cake, I have a lovely ball of pale pink wool!

The dyeing made no mess whatsoever (except for my pink fingers, but that was my own silly fault!), took very little supervision, and was extremely easy to do.

You can buy Kool Aid in the UK from D T Crafts or Kool Aid UK for as little as 40-50p per packet. Kool Aid UK also sometimes sell expired packets specifically for dyeing, as they can’t be used for drinking once they’re out of date.

The ball of Sirdar Eco Wool cost £3.99, so the addition of 50p for the dye definitely wouldn’t break the bank. I’m not sure I’d want to try and dye the yarn for a whole jumper, as you’d have to get a bit scientific about the dilution of the Kool Aid to make sure that all of the wool came out pretty much the same colour. But for single-ball projects, I’m definitely going to be doing this again!

Cardigan with Cabled Points – the left front.

My newest issue of Simply Knitting magazine has arrived!

The free gift this month is a pattern counting device, which is perfectly timed, as I keep losing track of my cables.

I spent much of yesterday afternoon knitting, and swearing. I don’t know what it is about this particular cardigan, but swearing seems to have accompanied its entire construction so far.

(The back and sleeves are complete, and I’m working on the left front.)

First I was annoyed that the edge cable and the point cables don’t twist on the same rows.

Then I was annoyed that my tension changed when the cabled points stopped, and now my edge cables are getting smaller and smaller! Either that or I’ve lost count, and am cabling on the wrong rows.

Either way, this cardigan is very annoying.

(Why would all the cables not twist on the same row? Why?!)

Cardigan with Cabled Points

Looking at the photograph, you can see very clearly that it’s definitely my tension that’s mucking up the edge cabling. You can see that the knitting between the two short cables is much looser than the knitting immediately above them.

Do I unravel an afternoon’s work and start again, or can I live with wonky cables that might even themselves out in the wash? I’m feeling quite inclined to live with it at the moment.

Speaking of cables, for weeks I walked past this jumper in my local Marks & Spencer.

M&S Per Una cabled jumper

Every time I saw it I thought, “I could knit one of those”.

If I’m not heartily sick of cables when I’m finished with this cardigan, I might give it a go. The one change I would make is to mirror the cables on either side of the central section. It annoys me (another thing!) about the Nicky Epstein cardigan that all the cables face the same way, so I don’t really want to knit a second annoying cabled garment!

I did learn something extremely useful while I was knitting this cardigan. I learned that if you expect all the cables to be twisting on the same row, and don’t read the pattern properly, and then discover that you should have cabled the front band two rows ago… it is perfectly possible to carefully drop the six stitches you’re working on for those two rows, twist them round to make the cable, and then pick those two rows back up again.

This is not something I’d like to make a habit of doing, but I’m pleased to find out that it works!

Two Sleeves in Two Days

Now that my Dad has opened his Christmas present (my parents are going away this year), I can safely reveal that it has taken three weeks to knit a single glove for him. It was ribbed, it was fiddly, and it was in DK, which is the thinnest yarn I have ever used.

Now that I don’t need to have the second glove finished until he comes back from his travels (oops…), I decided to give my fingers a bit of a break, and go back to the Nicky Epstein Cardigan with Cabled Points. I knew that knitting with chunky wool on 7½mm needles would be much faster than ribbing in DK, but I wasn’t expecting to complete both of the sleeves in just two days!

I’d completely lost track of where I was up to on the first sleeve, so I decided to bite the bullet, unravel what I’d done, and start again. I’m really not having very much luck with this pattern.

This time the mistake genuinely wasn’t mine, but a printing error. The row numbers for the sleeve had been printed wrongly, and before I knew it I had three fewer stitches than I needed. I made an executive decision not to undo the sleeve again, but instead to make some cunningly disguised increases on the next row. Thankfully, this worked really well.

I also made an executive decision to change the increases on the sleeves. As you may have noticed on my previous encounter with this cardigan, my maths really isn’t up to much, and I couldn’t cope with cabling on every sixth row and increasing on every eighth. My decision was to make the increases on the same rows as the cables, which made for less counting, which is fine by me!

As it happened, by the time I’d finished the correct number of increases the sleeve was already at the exact length I was supposed to keep knitting to, so if I’d been increasing every eight rows instead of every six, it would actually have been several inches too long!

Cardigan with cabled points - sleeves

Cardigan with cabled points - sleeves

If you click through to the larger picture of the single sleeve, you can get a much better indication of how this will look once it’s finished. You can really see the bright flecks of blue, and the occasional spot of red, scattered across the sleeve.

A scarf and a squirrel handbag.

Remember that frighteningly tangled skein of silk?

This is what became of it:

Silk & Mohair Scarf Silk & Mohair Scarf

It’s a narrow scarf, which is long enough to reach below the waist on both sides. It’s knitted with one strand of Debbie Bliss Pure Silk and two strands of Colinette Parisienne held together. I cast on 13 stitches, on 5mm needles. Every fourth row, I changed to a 10mm needle. Otherwise it’s just plain garter stitch – keep knitting until the yarn runs out!

Here’s the last of the pre-ordered tote bags, which I finished today.

Squirrel handbag Squirrel handbag

You may have noticed that it’s a different shape from the others!

The photographs don’t show the shape particularly well – it’s more curvy than it looks. It’s big, too – in the second picture the bag has an A4 pad inside it, to keep it nice and flat. It has one long handle, and you can just see a tiny sneaky peek of the Design By Claire label in there too.

Tomorrow night is Hallowe’en and I’ve just rustled up a very quick costume thanks to Martha Stewart. I’ll tell you all about it as soon as I have some photos. Happy Hallowe’en!

Some days you just shouldn’t knit.

I was off work yesterday, with tonsilitis, so I thought I’d have a nice relaxing afternoon on the sofa, gently coughing into a bit of nice simple knitting.

I had a skein of Colinette Parisienne mohair and a skein of Debbie Bliss Pure Silk, which I thought would pair up nicely together to make a fabulously soft scarf.

I wound them into balls with my trusty ball winder, and made a start.

I had wondered whether the mohair might be a bit of a pain, as I’m using two strands held together with one strand of the silk, and I was a bit worried that I might get into a tangle using the yarn from both the inside and the outside of the ball at once.

Three rows later, and I discover that the problem is not going to be with the mohair, but with the silk.

My carefully wound ball has started to fall apart at both ends!

An hour of careful untangling later, and I am faced with this:

That could have gone better. 🙁

The LJ Brit Knits community have been extremely helpful, and in the end I was able to untangle the whole thing, without taking the scissors to it! It only took five and three-quarter hours… I could have knitted the whole scarf in that time!

Speaking of which… I’m about twenty rows in, and I’ve now decided that the scarf is too wide. I’m really not sure yet whether I can face unravelling the knitting as well as the yarn, so I might just have to learn to live with a short, wide scarf!

Lesson Of The Day: Don’t wind silk into centre-pull balls!

Knitting Synchronicity

Every now and then I go through my giant stack of magazines, cut out the bits which interest me, and chuck the remains in the recycling.

Over the weekend, I found a picture of a jumper that I really liked, and idly wondered whether I could be bothered to work out a pattern to knit one for myself.

Today, I arrived home from work to find the Fall issue of Knit1 magazine sitting on my doorstep. (Thanks to Magazine Café, where you can subscribe to American magazines in the UK.) What should I see amongst the patterns? A jumper which looks remarkably similar to the one I’d snipped out of Elle!

Knitting Synchronicity

On the left: Elle UK, August 2007. Jumper by Louis Vuitton.
On the right: Knit1 Magazine, Fall 2007.

Perfect.

I’ll probably never get around to actually knitting this pattern. On the list of things I really want to knit for myself, this one’s pretty low. But just knowing that I can knit it, if I want to, is making me very happy this evening.

It seems I owe Nicky Epstein an apology.

In the greatest tradition of these things, it’s not her, it’s me.

I did say that I was mathematically challenged, when I was complaining about this cardigan pattern being all wrong. As it turns out, I am also challenged in the department of being able to read a knitting pattern. Oops.

What I was trying to do was:
k12 sl1 k1 psso k1 k2tog, k12 sl1 k1 psso k1 k2tog, k12 sl1 k1 psso k1 k2tog…

and what I should I have been doing was this:

k12 sl1 k1 psso k1 k2tog k12, k12 sl1 k1 psso k1 k2tog k12, k12 sl1 k1 psso k1 k2tog k12…

Spot the extra “k12” in the second line, which makes all the difference.

Anyway, I have now finished the back, and aside from my own stupidity, it was extremely easy to knit.

Nicky Epstein - Cardigan with Cabled Points Nicky Epstein - Cardigan with Cabled Points Nicky Epstein - Cardigan with Cabled Points

The waist shaping at the back is achieved entirely by the cables pulling the knitting in – there’s no shaping in the back at all, apart from the armholes.

The last photo is probably the most accurate in terms of the colour. The wool is Rowanspun Chunky, which I bought in the sale at Cucumberpatch

The only change I’ve made so far is that I’m knitting it on 7.5mm needles instead of 8mm. The smallest size given in the pattern was 38″ and I wanted mine to be a little tighter than that, so hopefully the slightly smaller gauge will make just enough difference.

(You watch the damn thing turn out too small now!)

Nicky Epstein’s Cardigan with Cabled Points

Has anybody ever successfully knit Nicky Epstein’s Cardigan with Cabled Points?

The pattern is in a supplement with this month’s Knitting magazine (UK). I find it suspicious that I’ve just trawled through fifty-four pages of Google images and the whole of Flickr, and I can’t find a single photograph of the finished garment. (I’d try Ravelry, but I’m still 31,783rd in the queue to join!)

I’m asking because I spent the whole of yesterday afternoon unravelling the damn thing. I am amazed at how utterly wrong a pattern can be, and still make it through to publication!

I was making the smallest size, for which the instructions are:

Cast on 116.
Row 1: K12, skp, k1, k2tog, k12 – rep to end.

Except that first row only adds up to 114 stitches.

I decided to persevere, pulling the two extra stitches off the needle, carefully unpicking the slip knot and unravelling them, in order not to have to unravel the entire thing straight away.

Row 2: p. Not much that can go wrong there.

Row 3: k11, skp, k1, k2tog, k11 – rep to end.

Uh-oh. These decreases don’t line up neatly with the ones below. (Which is what we want if we’re making points.) I persevere, and reach the end of my last k11 with a mere seven stitches left over.

This is not going well.

I break out the calculator.

Anyone who knows me will be aware that my maths skills are pretty much non-existent, so there may have been a certain amount of swearing involved at this point. I carefully work out the new repeats, unravel the whole thing, and start again with 114 stitches. Unfortunately my carefully worked out maths is completely wrong, and I have to unravel the first three rows and start again for the third time.

Third time lucky – I put in lots and lots of stitch markers where I want the decreases for the points to be. It’s like knitting a porcupine, but at least I now have clues as to what I’m supposed to be doing. I decrease away happily.

Unfortunately, by row 9 I already have fewer stitches than I’m supposed to have at the end of row 13, and my points aren’t coming out the right shape (according to the picture) at all. I’ve checked the internet for corrections, and all I can find is something relating to the numbering of rows on the sleeves. Nothing at all which mentions the maths for the points is all wrong.

It’s at this point that I give up, unravel the entire thing again, and start knitting a nice simple cardigan from Simply Knitting March 2007. I’m adding some shaping to the back to make it a bit less like a giant rectangle with two cables down the front, but so far it’s knitting up beautifully and I can’t fault the pattern at all.

I’d be quite interested to know whether anybody at Knitting actually had to knit the cardigan that’s shown in the picture, or whether it was a stock photo from one of Nicky Epstein’s books. Either way, I’d be interested to know how a pattern which is so completely wrong can make it through to publication without anybody apparently having knitted it! The mistakes are obvious by the second row, so you’d be aware of the problem straight away.

If anybody does actually have a list of errata for this pattern, I’d really like to see it. I really want to knit it, as it’s a beautiful cardigan, but I’m damned if I can figure out how to fix the pattern by myself!

New Toys, or I Love My Yarn Winder.

I have a new yarn winder! It arrived a couple of days ago from Texere. It was quite expensive for a little plastic gadget, but it’s definitely going to be worth the money.

Yarn Winder

The first thing I did when it arrived was to immediately set to work winding balls from the odd skeins of Colinette from my stash. In fact I loved my yarn winder so much that I actually re-wound a couple of balls that I’d previously done by hand, as the little flat “cakes” of yarn that the winder produces are so much nicer! You pull the yarn out from the centre to knit with, so they keep their shape as you work and, they don’t roll away across the floor! They also stack really nicely.

I’m working out a pattern for a jumper which I plan to knit using Colinette Cadenza. I really didn’t fancy winding five hundred grams of wool into balls by hand, so I’m really pleased that the yarn winder works so well.

Finished – one ENORMOUS jumper!

This jumper was for a commission which came in through the website, and I’ve been working on it pretty steadily for about six weeks.

These pictures in no way illustrate the enormity of this jumper. The dressform is set to my size. When I tried it on, it came down to my knees.

I now completely understand why my Mum makes mostly baby clothes.

I think all knitted commissions from now on are going to have to be for small things, like hats and scarves and maybe socks, if I ever get around to learning how to knit them.

No more jumpers. It takes far too long, and it makes my wrists hurt.

(I’d consider a Point 5 jumper, as they knit up so quickly, but nothing with smaller than 10mm needles.)