Slow progress

Whiteley hat - after

I was hoping to show you three finished hats today – but apparently that was a vast under-estimation of how long it would take me to do all the hand sewing! Admittely there were interruptions (doing the laundry, finding a mouse in the kitchen, rearranging all the furniture in the sewing room, stroking the rabbit…), but hand sewing is still very slow – especially around the inside of a hat.

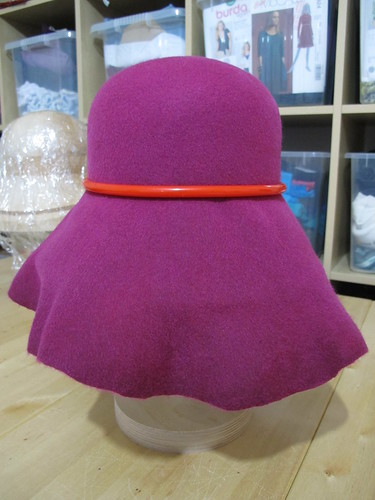
The one above is finished, and it’s actually one I’ve had for ages. It’s a Whiteley hat that I fell in love with, but didn’t wear very often.

Whiteley hat - before

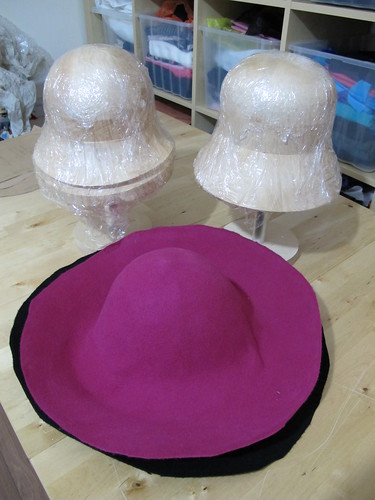
It used to look like this. I took off all the trimmings, soaked the felt, and re-blocked it into the cloche shape above. Fundamentally the same hat, but now in a shape that I’m much more likely to wear!

Red & black cloche - in progress

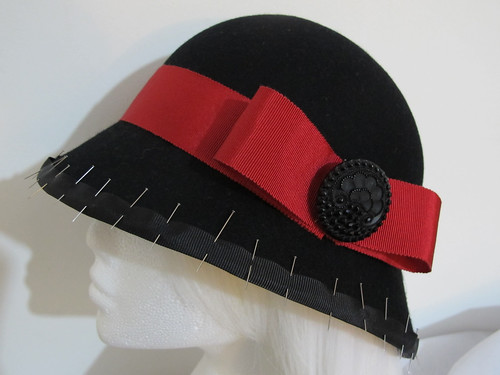
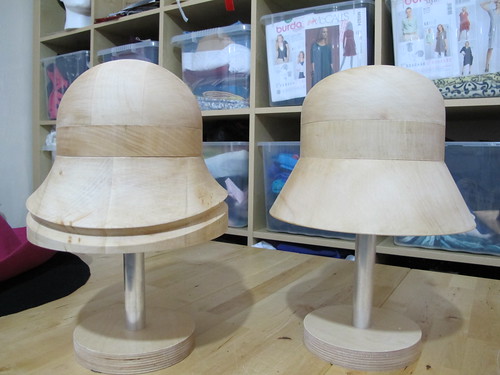
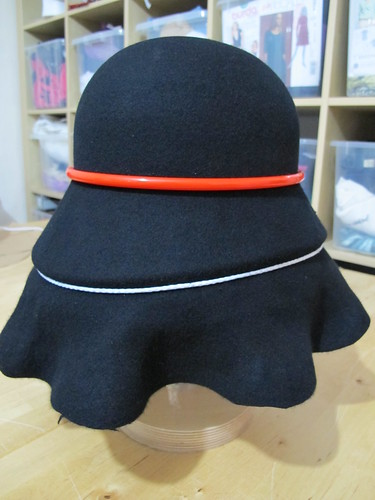
This is as far as I’ve got with the black cloche which was one of the first onto the new blocks. I’ve sewn the band inside, which took ages, as I was trying to discover which would be the best needle to use. (I’m still not sure.) I’ve sewn brim wire all the way around the edge of the brim with a stitch that’s like a blanket stitch, but with a french knot thrown in for extra security. I’ve also sewn the black grosgrain edging to the inside of the brim, and you can see that it’s just pinned into place on the outside. I’m not entirely sure that this was the best type of grosgrain to use, as it’s 100% polyester, and I’m not convinced I’m going to be able to steam the fullness out of it so that it sits smoothly in place.

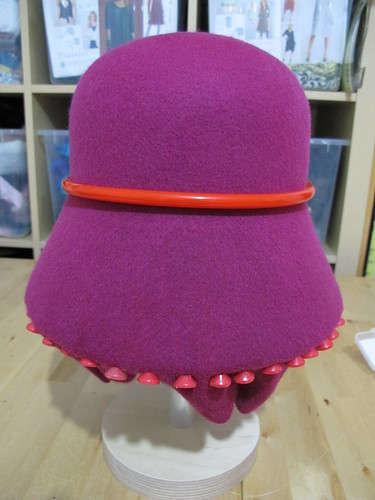
The red grosgrain, which is just pinned in place to give you an idea, is a vintage one that came to me in a donated pile of ribbons, and it looks to be a much better quality. The button I just happened to have in my stash, along with a matching purple one that’s going to look lovely on the purple hat that’s blocking on my table now.

I think my next hat day is going to be Monday (unless I manage to sneak in a few stitches at the weekend), so this is definitely going to be a very slow process!

The hat blocks are here!

Felt hats

Aren’t they beautiful? My very own multi block cloche set from Guy Morse-Brown. You may have already seen pictures of them on Facebook – I’ve been saving up for these all year, and was very excited about their arrival! All the sections are interchangeable, which means that eventually I can buy more crowns and brims to make different styles of hat. But I think cloches make an excellent everyday sort of hat, and I want to make hats that people actually wear, not stick in a cupboard and only bring out for weddings. So, cloche hats it is!

Felt hats

The blocks are covered in cling film, to prevent dye transfer from the felt, and to prevent the stiffener that’s impregnated into the fabric from sticking to the wood. The floppy shapes on the table are called capelines – which my spell checker keeps insisting is two words, grrr! They’re made from wool, and I bought them at Broadlands about four years ago. About time I put them to good use!

Felt hats

Some people use steam, but I just used hot water to soften the felt enough to pull it down over the block. The red band is a blocking spring, which holds the felt in place at the crown so that you can keep pulling and stretching it over the brim. It’s hard work – this kind of felt is very stiff.

Felt hats

This is the brim, held in place by fifty special blocking pins. Once the felt is completely dry, I can cut away the excess, trim the brim, add an inside band, and then decorate it. I think this one’s going to be mine!

Felt hats

And here’s the second block, which has more of a sweeping shape to the brim. The back of the hat is on the right. You wear this hat slightly pushed towards the back of your head, so you can see out from under the brim. Speaking of the brim…  I might need to work on this one a bit more. I think this is where steam will come in handy, as I had real trouble blocking the brim to fit the concave shape of the block. I don’t think the string was tight enough in the groove to make a really neat edge to the brim, but I won’t find out until I’ve taken the hat off the block. The great thing about working with felt like this is that it doesn’t matter if I’ve mucked it up at the stage – I can simply soak the capeline in hot water, or steam the brim, and start again. Brilliant!

Wool felt colours

And because I am nothing if not enthusiastic, I’ve made a colour chart of the range of felts I can order from to make more hats! (Oh, number 20, Regal, is out of stock at the moment, so you can’t have that one.)

What I’d like to do is offer a discount to the first six people who pre-order a hat from me. This gives six people a hat at a fantastic bargain price (yet to be worked out, but likely around £40 + shipping), and gives me the funds up front to buy things like a big roll of brim wire and a bottle of felt stiffener that I can’t buy in single-hat quantities. I realise that nobody’s going to buy a hat based on two pictures of work very much in progress, but I figure that if you know this is happening, you can start to think about colours and trims for when the time comes!

Felted layers

Felted brooch bases

Progress on the fleecy hats is slow. Hand-sewing the bands and brims is taking about half an hour per hat, and there’s a limit to how much I can do in one go before my hands start to complain.

I’d been thinking about making some felt brooches, so not being one to do things by halves, here are twenty-two little circles. I had planned to work blanket stitch around the cut edges, but I actually really like the way you can see all the layers of colour showing through.

They’re made from half a dozen rectangles of wonky, uneven felt that I made as practice pieces. They’d been sitting in a cupboard for about a year, gathering dust and moths, so I decided to chuck them in the washing machine and see what happened. After a quick whiz through a hot wash and a tumble dryer, they’d shrunk down from about A4 size to about A5, become nice and thick, and developed a lovely crinkly texture.

I have some little pieces of Harris Tweed that I’m hoping will needle felt nicely onto the top of the circles, perhaps with a little button each to finish them off. (And a pin on the back, of course.)

Much as I love the bright colours in these, I can also imagine them in nice muted, natural, sheepy shades. Maybe with some Wensleydale curls and semi-precious stones stitched on top. Something to think about after Christmas, definitely.

Pink Felted Slippers

Felted Slipper Tutorial

Today I spent about three and a half hours transforming this…

Felted Slipper Tutorial

…into these!

I have to say that, although they’re not quite finished yet, and there are definitely things I’d do differently next time, I’m really pleased with my first attempt at resist felting!

I’m currently impatiently waiting for them to dry. I was hoping it would take less than 24 hours in this heat, but the humidity’s so high at the moment I think they might actually be getting wetter the longer I leave them out in the garden.

Whilst they look toasty warm, I think these will turn out to be summer slippers. I only used four layers of merino to make the felt, and really they need to be a lot more sturdy than this if they’re going to last any length of time. I’d also like to be able to glue a rubber sole onto future slippers, and this pair are much too thin for that. Perhaps I’ve really made myself some nice warm socks? (In the middle of a heatwave! Brilliant!)

I spent about an hour this morning searching for a good tutorial, with lots of pictures, explaining how to use the polystyrene lasts without taking the (altogether too risky for me) option of just chucking them in the washing machine. I couldn’t find one, so I’ve written my own. Because this was my first attempt, it will no doubt be edited as I go along and find ways to improve things. In the meantime, you can read it here!

Felted gemstone pendant

Felted pendant

A little experiment for a Tuesday afternoon – a felted pendant.

This nugget of purest green has been hanging around on my desk since January 2010. It sort of did what I wanted it to (the polymer clay encased the stone, took texture and paint well, and provided an anchor for a bail), but I was never quite happy with the finish of it.

Interestingly though, I’ve just found the piece of fimo that I added fragrance to at the same time, and it just about still smells. So now I know that the fragrance lasts roughly three years before it wears off. Not bad!

Given that this pendant had effectively become a waste product, in that I didn’t like it enough to either wear or sell, I decided that I had nothing to lose by seeing what would happen if I took my little rotary drill to it. The stone (aventurine) engraves quite nicely, though it’ll take a little more practice and experimentation with different shapes of diamond point to discover what works best.

Once that was done I thought I might as well carry on experimenting, so I rummaged about in my little bag of coloured wool. Less than an hour later I had this – an engraved gemstone encased in felt.

Now this I do like, very much.

The wool has shrunk nice and tightly around the stone so that it can’t fall out, and you can see the inner layer of dark green felt just poking out around the edges of the opening. The polymer clay that I didn’t like has been hidden away completely, and I love the soft edges of the new shape. I might do a little experiment with fragrance on this one as well, by adding a couple of drops of essential oil to the back of the pendant. I doubt that will last for three years, but I’ll let you know!

Nuno Felting

Nuno Felting

Hello! I feel as though I’ve been away for ages. I’m so busy at the moment I’ve barely had time to breathe, never mind blog, but I made this yesterday and I thought it would be a nice little something to show. It’s a somewhat experimental piece of nuno felt, about the size of a sheet of A4. As you can see, I’ve felted a little bit of merino onto a backing of muslin.

Nuno Felting

When the wool starts to felt, the fibres contract and matt together. The cotton muslin doesn’t shrink, so you get these lovely textures coming through.

Nuno Felting

This is the back, with its lovely rivers of ruching, and the wool fibres just poking through.

Not bad for a first attempt, I think!

Lithuanian Felted Slippers

Aren’t these felted slippers absolutely magical? If I accidentally found my way through the back of a wardrobe and ended up in a mythical land where it was always winter and never Christmas, these are exactly what I’d want to keep my feet warm while I was there.

They’re hand made in Lithunania by ing00te, who sells them on Etsy.

She also has a blog (which is partially translated into English for those of us who can’t read Lithuanian!), and you can see her beautiful pictures on Flickr.

Some of ing00te’s slippers have cork soles, so that you can wear them outside. I love the detail of the little heel on this pair, the way it echoes the felted swirls on top. Just gorgeous!

Now I have to fight the urge to learn how to make felt slippers, because I need another hobby like a hole in the head. But if you don’t want to fight that urge, you can buy polystyrene lasts and all the wool you’ll need from Wingham Wool Work. There are lots of tutorials online to get you started, but this video from Ray Reynolds seems pretty comprehensive.

I’m just going to look through ing00te’s photostream again. So pretty…

Exactly what I need!

I’m sorry that the posts have been few and far between lately – I’m having far too much fun at the museum, and haven’t found time to blog about it all while I’m at home.

I’m partly helping out on the reception desk of the museum, and partly giving a hand to the visiting artists who are providing the family workshop activities. Today we’re making and decorating plaster of paris bugs, which should be fun!

The museum has a studio full of amazing resources. I’ve been learning all about wool with information packs from the British Wool Marketing Board, and feeling inspired to learn how to make felt.

I was just having a little look around the internet for felting resources (as someone’s helpfully checked out all the books from my local library – and they’re overdue!), and I came across the most useful thing ever – polystyrene lasts for making felted slippers!

The main stumbling block (if you’ll pardon the pun) in my quest to make shoes has been that the lasts are so expensive, and difficult to buy in single pairs. I never wanted to use the lasts for hammering, only for shaping the fabric as I sew. For that, these polystyrene ones will be absolutely ideal!

Who’d have thought that a felting website was exactly the place I needed to look for shoemaking supplies?

I love those moments when you find exactly the perfect thing, just as you thought you were searching for something else.