Antique Shop Bargain!

Ridged rolling pin "for oats", perfect for felting!

Today we popped into Fanny’s Antiques (in a side road near TGI Friday’s, Reading), and picked up a couple of lovely things.

The first lovely thing I can’t show you, and I have to forget about immediately, because it’s going to be my Christmas present. Suffice it to say that it’s a small piece of furniture, and sewing is involved. I’ll show you in December, once I’ve remembered to be surprised by it!

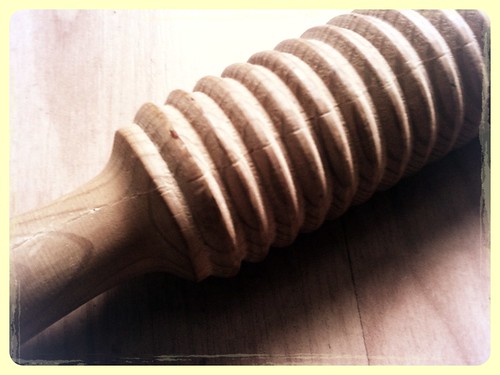
The second lovely thing is the rolling pin pictured above. Labelled as being “for oats”, it’s going to be absolutely perfect for working with felt! Half the price of buying one from Wingham Wool Work, too.

It turns out I’ve also saved myself the grand sum of £9.50 by not buying a fulling block – I discovered that a grooved wooden soap dish does the same job! One felting gadget that I do want to buy though is a bulb spray. That will allow me to use water that’s hotter than my hands are able to tolerate through the plastic bottle I’m using at the moment. It should also hopefully be a bit more controlled.

Once we’ve moved house, there’s a convenient-looking work surface next to the sink in the new kitchen, so I’m hoping I can get the felting stuff out while the sewing machines and fabric are still packed away. I’m looking forward to seeing what I can do with my new rolling pin!

My first handspun yarn!

Plied handspun yarn

Well, it took me long enough, but today I took my singles off the drop spindle, and turned it into yarn! I wound it off onto a plastic bottle which took the place of a nostepinne. I was then able to use both ends of the same yarn, and ply them together with the spindle.

My first handspun!

And here it is – my very first ball of handspun yarn. A whole ten grams of thick-and-thin, funny-coloured, badly spun, badly plied hand made yarn!

Little Mikey's Monstrous Scarf

I wasn’t sure what I’d be able to knit with such a little amount of yarn. (I wasn’t able to spin any more because the spindle needed to be emptied before the spinning workshop that’s running next week.) It turned out that Little Mikey was in need of a scarf, so I thought my monstrous handspun would be the perfect yarn! I used my Simplest Scarf in the World tutorial, with two 5mm needles and one 12mm. It came out just long enough, and I’ve saved the last couple of inches of yarn as a memento.

I have to say that ticking the “my handspun” box on Ravelry was very satisfying. I hope I’m able to make a lot more!

Felted slippers – part two

Too big!

Awww. They’re too big! I knew the lasts would be quite roomy around the top, and I do plan to cut these away to more of a ballet pump shape. But still. Too big.

Too big!

Look how much room there is in front of my toes! The lasts were a size 38/39, but I’d say these have come out around a 40/41. I did toy with the idea of chucking them in the washing machine, to take the hard work out of shrinking them a little bit more, but was so worried about them coming out the right size to fit my two year old niece that I decided against. (Not that I begrudge her a pair of pink felted slippers, but I want these to be mine!)

Soles and insoles

So, I went back to my long-neglected shoemaking supplies, and have given them rubber soles along with cork-and-fleece insoles. These are now sitting on the deck waiting to dry, while I’m recovering from the fumes from the glue. Wow, that stuff is disgusting. Even wearing a respirator and eye protection, you can still smell it a bit, and it still makes my eyes water. That, along with the terrifying health and safety warnings, makes me think that there must be a better solution than glue. I mean, what’s the point of painstakingly hand crafting a pair of slippers from natural materials… and then whacking four layers of highly toxic rubber cement all over them?

They do need some kind of sole though. On laminate flooring and tiles they’re slippery enough to be absolutely lethal, and of course without soles they can’t be worn outside. Time to go back to my shoemaking books (and maybe a few museums with non-leather shoes?) to come up with some more ideas.

Lots and lots of tea bags...

Meanwhile… this is the scene in my kitchen at the moment. Remember I said I was going to take all my frozen tea bags out of the freezer, to make room for ice cubes? Well, I did that, and I left them all out on a table in the garden to dry overnight. Except that, for the first time in weeks and weeks, it rained. It rained A LOT. So now they’re on the kitchen table, drying off again.

I have no idea whether they’ll have any dyeing properties left whatsoever, after the amount of water that landed on them last night! Hopefully they’ll still leave at least a little trace. I’m still not entirely sure what I’m going to dye with them yet, but after a few experiments with the leftovers in the tea urn filled with assam, I’m thinking it needs to be silk for the best results. Which is the one thing, of course, that I don’t have a great deal of in my fabric stash! I might need to make a bit of extra room by sewing up some of the cottons first…

Learning to spin

Spinning wheel

A spinning wheel was donated to work recently, but it wasn’t needed as part of the collections, so it made its way along to me. As Learning Assistant, it’s now my job to learn how to use the wheel, so that I can eventually demonstrate and teach it to other people. Gosh, it’s a hard life sometimes, isn’t it?!

The wheel was dropped off to the museum while I wasn’t there – I came in to find the wheel itself, and a bucket of bits. The bucket contained the flyer, a couple of bobbins, the drive cord (broken), a niddy-noddy, and a knob that I haven’t discovered the function of yet. If anyone can tell from the photo above where there isn’t a knob and there ought to be a knob, please let me know!

First yarn

The piece of leather attaching the pedal to the drive shaft had split, so Fred (the Conservator) very kindly replaced it with a whole new piece for me. Once that was done, and I’d tied a knot in the drive cord, I could start to spin! I practiced just treadling for a bit, until I could do it without the wheel swinging backwards all the time. I came to add my own fibre to the yarn that was already wound around the bobbin, and discovered that I didn’t have an orifice hook – hence the straightened paper clip above!

I’d thought my first attempt at spinning was going rather badly, until I took my first metre and a half of yarn off the bobbin and plied it back on itself. Obviously it’s extremely uneven and wonky, but it’s got twist in it, and I’ve made yarn! Admittedly it took several attempts to get this far, lots of wondering why the yarn wasn’t winding around the bobbin, and adjusting the tension, and wondering whether it was too tightly spun, and losing control of the wheel with my feet while I was trying to draft with my hands.

I’ve emailed the local Spinners, Weaver & Dyers to ask for a bit of help, so hopefully I should be on my way to learning to spin really soon!

Felted gemstone pendant

Felted pendant

A little experiment for a Tuesday afternoon – a felted pendant.

This nugget of purest green has been hanging around on my desk since January 2010. It sort of did what I wanted it to (the polymer clay encased the stone, took texture and paint well, and provided an anchor for a bail), but I was never quite happy with the finish of it.

Interestingly though, I’ve just found the piece of fimo that I added fragrance to at the same time, and it just about still smells. So now I know that the fragrance lasts roughly three years before it wears off. Not bad!

Given that this pendant had effectively become a waste product, in that I didn’t like it enough to either wear or sell, I decided that I had nothing to lose by seeing what would happen if I took my little rotary drill to it. The stone (aventurine) engraves quite nicely, though it’ll take a little more practice and experimentation with different shapes of diamond point to discover what works best.

Once that was done I thought I might as well carry on experimenting, so I rummaged about in my little bag of coloured wool. Less than an hour later I had this – an engraved gemstone encased in felt.

Now this I do like, very much.

The wool has shrunk nice and tightly around the stone so that it can’t fall out, and you can see the inner layer of dark green felt just poking out around the edges of the opening. The polymer clay that I didn’t like has been hidden away completely, and I love the soft edges of the new shape. I might do a little experiment with fragrance on this one as well, by adding a couple of drops of essential oil to the back of the pendant. I doubt that will last for three years, but I’ll let you know!

Buttons and Bows

First bow tie, finished and boxed.

This was the first of Mr Magpie’s Adjustable Bow Ties to come off my mini production line. It’s a cotton hand-tied bow, on a grosgrain ribbon adjustable band. I love the look of a hand-tied bow but I find it impossible to tie one on front of a mirror, so this seemed like the ideal solution!

Organic cotton covered buttons, 15mm

While I was making the bow ties, I used all the offcuts of organic cotton to cover a little pile of 15mm buttons. They’ll be for sale alongside the ties and the vintage button stash that I’ve been sorting out.

Organic cotton bow ties

Here they are in glorious technicolour – all the striped fabrics are all from fat quarters of organic cotton designed by Kaffe Fassett for Rowan. I don’t think that particular fabric’s available any more, but I’ll definitely be making more bow ties with new organic cottons as I buy them.

I’ve got one more batch of fragranced tealights to make before the Frome Steampunk Extravaganza, and once they’re done, it’ll be a matter of what else I can make in the time I’ve got available in between my shifts at work. Hopefully I’ll end up with a stall that shows a good variety of the things I enjoy making, and that people will actually want to buy!

Lavender Bags

Lavender bags - the insides

Much of my time over the Easter break was spent sewing a dress, and getting out of the house with Paul, which made a nice change! (Photos to follow.) Yesterday and today however, have been mostly spent working on lavender bags for the EMPORIUM.

In the box above are 65 little pouches made from recycled sheeting, each containing about 10g of dried Yorkshire lavender. The little pile on the floor was intended to be the filling for the 66th. Oops…

Lavender bags

Having made up the outer pouches yesterday, all from my ridiculously large box of scraps, I spent today stuffing the insides into the outsides, and ladder-stitching them closed. I’ve still got just less than half to do, but I have now printed out all the labels and packaged up all of the completed bags.

These are most of the fabric choices, there are a couple more that I only had enough of to make one or two. As you can see, there are quite a lot of skulls left over from the old GothStuff days!

I reckon I need one more long afternoon (on a day when my hands are inclined to cooperate) to finish the rest. For now they’ll be sealed in a couple of layers of plastic bags so that they don’t make everything else smell of lavender, until they come out again at the Steampunk Extravaganza next month. I’m currently trying not to worry about how soon that is and how few days off work I have in the meantime. The list of things I need to make is definitely getting smaller, and I WILL get it all done!

Hop Pillows ready for the EMPORIUM

Hop Pillows

Remember the hops that I started making into pillows, way back in November? I finished one, for Sarah’s birthday, as she’d kindly harvested the hops for me from the skycarrots allotment. The rest have been sitting around almost finished, just waiting for the top of each pillow to be ladder-stitched together by hand.

Today, in a flurry of productivity, I’ve sewn them all together and wrapped them all up with labels styled for the INEXPLICABLE EMPORIUM. These prints aren’t particularly “steampunk”, but as I’m trying to recycle the remnants of my stash before I buy anything new, I decided to use them anyway.

You might recognise a few of these fabrics – some of them turned out to have been hanging around for rather a long time!

  • Koi fabric from a circle skirt and corset that I made to wear to a friend’s wedding
  • Sewing print left over from an ill-fated dress that I’ve never worn
  • Psychedelic design was the lining for my Beatles jacket
  • Sugar skulls from my favourite skirt!
  • Flames from Lettice’s skirt
  • Strawberries left over from a pair of BIG PANTS that went straight from my sewing machine to the charity shop
  • Rainforest creatures from a dress I bought that turned out to be so badly made that the only thing I could do with it was chop it up.

The clover & ladybirds print is the only fabric that’s never had any other incarnation. I bought it back in the days when I was making lots of tote bags, but it turned out to be a little bit too thin. I have a little bit left over (along with most of the other fabrics) that I’ll be using to make some matching lavender bags. I have enough dried lavender to fill a hundred bags, so that should keep me busy for a little while!

Candles & hand cream

Hand cream

Today has been mostly filled with making twenty-one candles in glass jars, and sixteen and a half tealights. Once that was done, I kept the bain-marie warm so that I could make some hand cream. I hadn’t done this for years, and I’d forgotten how easy it is.

Now that it’s just about cooled down I’ve tried it out, and I think it’s going to be a tiny bit too oily for my liking. It reminds me more of Neal’s Yard’s Wild Rose Beauty Balm than the kind of hand cream I’m used to. This might be because the soya wax is softer than the beeswax recommended in the recipe, so the cream doesn’t set quite as hard. Having said that, it sinks in really quickly, and the geranium essential oil (my favourite) makes it smell divine.

It took less than 10 minutes to make, with all natural ingredients, and was just enough to fill a little aluminium Lush tin. I’ll see how I feel about the recipe, and once I’ve perfected it I’ll share it with you! Now I’m looking on Ebay for either a pink frosted glass jar (that matches my dressing table set) or a white ceramic jar (that matches my bathroom), with a lid, that I can use for future creams and lotions.

Also, have I mentioned how lovely my husband is? This morning I grumbled that the most time-consuming part of making the candles was cleaning the kitchen before I could start. When I finally dragged myself out of bed, just after he’d left for work, I discovered that the previously messy kitchen was now absolutely spotless. Thank you, Paul!

Candle Day…

Candles in glass jars

Today I did get as far as making some candles – these are in 120ml amber glass jars, just waiting for their wicks to be trimmed before I pop the lids on. The tealight should give you some idea of the size, although I’ll admit that the picture’s at a bit of a funny angle.

Those of you who wonder why I don’t bake may begin to understand why when I reveal that I managed to get the weight-to-volume conversion for these completely wrong. I thought I was making five 120ml candles. In fact I turned out to be making seven 120ml candles plus another six tealights! Which means I now need to order more glass jars before I can finish making the rest of the fragrances. But on the plus side – more candles!

While I was placing the order for the second batch of jars, I thought I might as well make it worth the shipping fee by ordering a few more bits and pieces as well. I’m almost out of hand cream and moisturiser, which I usually buy from Lush, but I thought I’d have a try at making my own. I’ve done it before, and it’s no more difficult than making the candles… as long as you get the weights and measures right!

I’m currently a bit galled about having paid £30 for ingredients when it would have cost me £20 to go and buy my usual stuff from Lush. But then I’m buying a much greater quantity of oils and butters than would fit in my two little black pots, and their shelf life’s long enough that I’ll be able to make a good few batches with them, so it should work out more economical in the long run.

I plan to drag my aromatherapy training out of the depths of my memory (or perhaps read my old text books!) to make it even better for my skin. Hopefully I’ll be able to come up with something that smells nice, feels nice, and takes down a bit of the redness that the fibromyalgia causes. That might be a bit of a tall order for my first attempt, but I’ll give it a go!