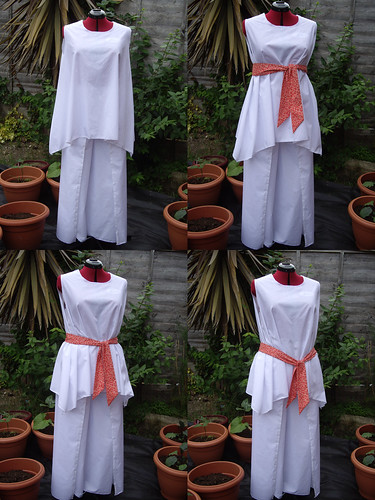
Incapable of following instructions

This is Burda 7808.
(Information now only available in German, since the English site has merged with Burda Style and all the patterns are gone. *sigh*)

I bought the pattern yesterday because the weather’s gone mad, and I’m going to need some kind of loose summer dress so that I don’t inadvertently boil inside my own skin. Now I’m thinking through all the changes I’m going to need to make to the pattern before I actually start cutting fabric to make the dress.

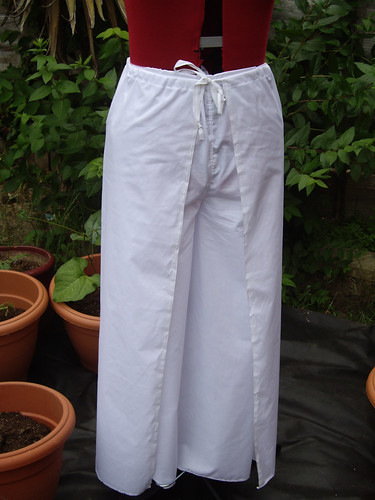
For a start, I didn’t realise that there was a zip in the side seam. That’ll have to go. And then I’ll have to make the dress a little bit wider under the arms, so that I’ll have enough room to get it on and off over my head.

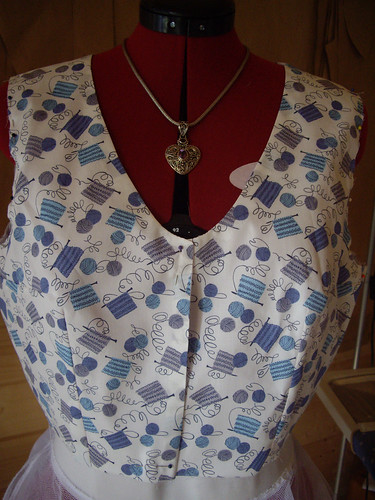
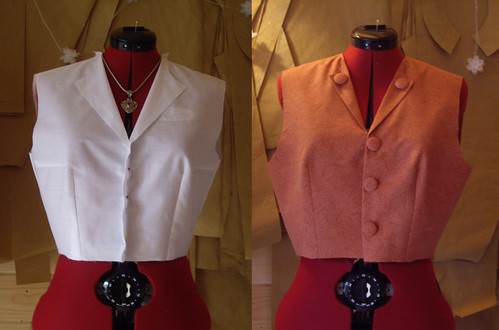
I don’t much like the larger collar, so I’ll probably make the little stand-up collar on the version with sleeves. I also want to increase the width of the sleeve head, so that I can make gathers at the shoulder to match the gathers at the cuff.

If I do make the sleeveless version, I’m definitely changing the way that they’ve applied the bias binding to the sleeve edges. I think the instructions given will make them much too bulky.

Oh, and I also want to add gathers to the back, so that it matches the front. Then I’ll make the ties much longer, and have them coming from the front panel rather than the back. A little ruffle of broderie anglais trim at the hem probably wouldn’t hurt either.

All of which makes me wonder why on earth I bothered to buy a pattern in the first place!

Actually, my answer to that is because I find that having a ready-made pattern to start off with is much easier than trying to draft something from scratch. I can look at the picture, the shape of the pattern pieces and the instructions, decide what I do and don’t like, and then make my changes confident that all the bits will still fit together in the end.

I’m going to try and make a start on this over the weekend, so hopefully photos will follow soon.

That’s more like it.

Wrap trousers and swing top

I spent yesterday afternoon developing the prototypes I made on Saturday – in fabrics that I’ll actually wear.

The top is a pink tartan cotton and viscose blend shirting. I added sleeves, although they didn’t turn out quite how I meant them to. I was intending to make floaty butterfly sleeves, but these have come out distinctly tight. They’re not too tight to wear though, so I can change them next time. If they get too annoying, I’ll just chop them off. The fabric is 60″ wide, rather than the 45″ I used for the prototype, so the hem is much wider and the sides are much longer.

The trousers are made from my stash of Bishopston organic cotton. I made a more angled crotch seam than on the previous pair, which makes them more fitted around the waist. Because of this I didn’t make a drawstring. I used bias binding to enclose the top edge, extending it 20″ on each side to make the ties. I’m trying not to worry that the wrapped edges are a bit wobbly. One of the things about handwoven fabric is that the grain isn’t anything like as straight as something that’s been machine made. I can’t do anything about that, so I’m just going to have to live with slightly wiggly trousers.

Now i just need to hope that the weather stays nice enough for me to wear them.

Summer Outfit

New summer outfit (prototype)

This week’s been a pretty hot one, as far as weather goes in the UK. I’m sure most people are thrilled to bits (in fact I can hear them all outside, laughing and enjoying their barbecues in their gardens), but unfortunately for me, I’m really not very good at hot. I get sunstroke very easily, and just generally don’t cope very well with the heat.

All my usual work clothes are making me much too hot, and all my summer clothes aren’t really smart enough to wear for work. Everything in the shops appears to be made of polyester, which is not a nice fabric to wear in the heat, so I decided it was about time I stopped moaning and tried to figure out something I could make quickly and wear all summer.

I started with an idea for a loose kimono-sleeved jacket, although the prototype didn’t come out very well. More work needed on that one. So I moved on to a very loose, draped top. This will definitely work better in a softer fabric, like a linen or a lawn, but I think it works nicely with a belt. A bit martial-arts-looking all in white, but I think that effect would be reduced in a different fabric or a different colour.

New summer outfit (prototype)

The trousers are a simple wraparound style with a drawstring waist. They’re so cool and comfortable, and they were extremely easy to make. These would definitely be lovely in a nice soft, crinkly linen or a handwoven organic cotton.

I think if I can get the fabrics right, this would make an ideal “smart-casual” outfit for work.

Knitting neckline.

New neckline

Work has been progressing at a snail’s page around here this week. I’ve finally put together a new bodice, but I think this neckline’s going to be too low. I like the shape of it, and I think it showcases the necklace beautifully, but I think it needs to come up just a little bit.

I’m not too worried about it for this dress, as I can just wear a white t-shirt underneath. But it’s back to the drawing board before I cut the silk for the next dress!

Drafting a new blouse.

Blouse - step two.

Yesterday I drafted a pattern for a blouse, and made the toile on the left. The dressform is wearing my necklace so I can check that I’m putting the top button in the right place to show it off.

Today I worked out the pattern pieces for the facings, and made the blouse on the right. Apparently I was having a little difficulty with spatial awareness when I cut the pieces out, because I’ve ended up with the buttons on the wrong side. Oops…

I’m not entirely sure about the buttons on the collar, but in this case they serve a practical purpose. The interfacing I had available was a bit on the heavy side, so the collar sticks up more than I’d like. The buttons will serve to fix it in place, whilst looking decorative at the same time.

My next step is to draft a skirt pattern, and then it’ll be a dress!

Two Top Toiles.

Simplicity 3503

This is the toile for what will eventually be Simplicity 5303, the long beige version. Only not in beige.

Jenny’s coming over tomorrow, to bring the not-beige fabric that she’s chosen, and to try on the top.

I’ve only made the top half of the dress because the only part that needs fitting is to make sure that the underbust seam actually does sit under the bust, and not half way up. If it fits, Jenny can keep it; if it doesn’t, I’ve got a new top!


Top toile

This one’s a copy of Miss Alice‘s favourite work top.

It’s cut on the bias, and has really pretty sleeves. Hopefully I’ve managed to adjust the bust darts and the length for a better fit.

All I need to do now is bind the neckline, and finish the pair of trousers that I need to send off in the same parcel.


I also need to do something about the lighting in the Shed. I’ve got three halogen spotlights, a standard lamp and a net of LED fairy lights blazing out in there, and it’s still too dark to see properly.

Complex Curves.

So far I have made a grand total of seven and a half corsets. Two for me, four for friends, and one which is still under construction. The first one I made from a commercial sewing pattern, and it was such a ridiculous shape (even for a ridiculously-shaped garment like a corset) that I decided that drafting my own patterns was the best way forward. This plan was also borne out of two abdominal operations and an ongoing stomach-ache, which means that I don’t like to be squished too much around the middle.

Now I appreciate that seven and a half corsets doesn’t make my anything even faintly resembling an expert! But eleven years as a dressmaker, plus a year of fitting bridalwear, does give me some sort of clue as to the range of shapes and sizes in which the female form can manifest itself.

Here is a work-in-progress picture of the corset that I’m making at the moment:

Rhona's corset - in progress

You will notice that it has peaks and troughs, where it doesn’t lie flat on the table.

This is because (shock, horror) people aren’t flat.

I frequent a number of online communities for corset wearers and corset makers, and time after time I see pictures of completed corsets, often beautifully made, lying completely flat on a table.

Of course, the primary function of a corset is to reduce the size of the wearer’s waist. The best way to make this reduction very apparent is to do this by taking all of the reduction out of the side seams of the corset. This results in an extremely dramatic silhouette, and a very flat corset.

The trouble is, once again, people aren’t flat. They don’t squish only at the sides. My back, for example, has an exaggerated curve. If I were to wear a corset where the sides had been reduced but the back was straight, there’s no way it would be comfortable for me to wear. I also have a rounded stomach, so I need to make allowances for that in the shape of my corset, even if the intention is to make it appear as flat as possible.

My eight-panel underbust corsets are about the simplest style it’s possible to make whilst still taking into account the curves of the wearer. If I wanted to go for a much more precise fit, taking into account the shape of the wearer’s ribcage, or the curvature of their spine, I’d probably be looking at doubling the number of panels, in order to accommodate the complex curves.

(Complex curves is also the reason I don’t take orders for overbust corsets, by the way!)


Of course, the principle that people aren’t flat doesn’t apply only to corsets.

Kathleen at Fashion Incubator, for example, has two extremely interesting articles which explain why your trousers don’t fit.

And because most “industry standard” (as if there were any such thing) clothing is made to fit a B-cup, a great many of my customers are either women with larger breasts, or smaller women with curves they’re not “supposed” to have. Oh, and plus size women who don’t have shoulders like a weightlifter, which is what a great deal of clothing apparently expects from them.


When I become a Proper Fashion Designer (stop laughing at the back!), I can assure you that my clothes will be designed for, and modelled by, a whole range of different shapes and sizes of woman.

Believe me, this is going to be much, much more difficult than buying a set of slopers or a grading scale or some pre-set CAD software. If I use those, my clothes will come out the same shapes and sizes as the ones you see in the shops. And that rather defeats the object of making clothing from scratch in the first place.

Apparently I’ve never been one for doing things the easy way…

Important Lesson of the Day.

Today’s important lesson is

ALWAYS LABEL YOUR PATTERNS.

Otherwise, when you come to repeat a pair of trousers for a friend after eighteen months, you may come to find a cryptic note pinned to the pattern, with no clues whatsoever as to what it means.

Always label your patterns!

I can hazard a guess that this is the amount I had to take out of the centre back seam of the trousers when I fitted them, but I can’t be absolutely certain.

Equally unhelpfully, the pattern is a completely different size from the block, so I obviously didn’t transfer my alterations there either!

As you may have gathered, I’m still riding the learning curve of pattern drafting. Having never taken any classes, I’m learning in the time-honoured fashion of frowning at books and making it up as I go along.

I’ve also been reading through the archives of a few helpful blogs – notably Not Enough Thursdays, Fashion Incubator and You Sew Girl.

I need to do a great deal of work on my pattern drafting skills, if I’m going to get any further with developing my own range of clothing. There’s only so much you can learn from books though, so I keep looking at the short courses at the London College of Fashion, in case I can somehow miraculously afford to attend.

The Intensive Pattern Cutting Workshop looks ideal, as it combines flat pattern drafting and draping on the stand. It only runs as a summer school though, which means I’ll have to wait until next year. Ah well… more time to save those pennies!

The ridiculous fiction of size charts.

Today my plan was to draft some paper patterns for three or four different styles of skirt that I’ve been thinking about for a little while. I know the average sizes of myself, my friends and family, and my repeat customers, but I thought I’d better do a little bit of research and find out what sizes other people were using for their clothes.

I’m making skirts, so I’ve focussed entirely on waist and hip measurements here.

The sizes shown below are all taken from the charts on the stores’ websites. All of the measurements given are for a UK size 14. They’re in centimetres.

Shop Waist Hips
M&S 79 104
Evans 80 101
Top Shop 79.2 101.5
Dorothy Perkins 78 101.5
John Lewis 77 102.5
Next 76 100.5
Miss Selfridge 79 101.5
Principles 78 101.5
Debenhams 76-80 99-103
British Home Stores 78 103
New Look 81 104
Monsoon 76.5 102
River Island 77 102
Wallis 78.5 104
H&M 76 100
Oasis 77 104
French Connection (FCUK) 79 104
Kew 79 104
Karen Millen 78 104
Hobbs 81 106
Jigsaw 79 104
Coast 80 105
Warehouse 79 102

These are the measurements from two of the industry standard pattern cutting books, from which students learn to draft their clothing patterns.

Fabric, Form and Flat Pattern Cutting, 2nd Edition (1996/2007)
Size   10 12 14 16 18 20 22    
Waist   62 67 72 77 82 87 92    
Hips   87 92 97 102 107 112 117    
Metric Pattern Cutting, 4th Edition (revised 1997)
Size 8 10 12 14 16 18 20 22 24 26
Waist 62 66 70 74 78 82 86 92 98 104
Hips 68 90 94 98 102 106 110 116 122 128

In the first set of measurements, there is a 25cm difference between the waist and hip measurements, and an average of 5 cm between each size.

In the second set, there is a 24cm difference between the waist and hip measurements, and 4 cm difference between each size, but the measurements given for each size are now larger. A person who would have worn a size 10 in the first set of measurements would now be wearing a size 8.

Despite this, the most recent measurements given in the pattern cutting books for a size 14 are still at least one size smaller than those given in the stores. Having said that, the charts in the pattern book are eleven years old. I know that the 5th edition of Metric Pattern Cutting is due out very soon, so it’s possible that the measurements given for each size may now be more in line with those shown by the stores.

But if the clothing that’s in the stores isn’t the same size as the measurements on the size charts, how can anybody possibly know what size to choose?

According to the pattern cutting books, I’m a size 18-20. Looking at the stores’ size charts shown above, a size 14 should be much too small for me. However, I know from experience that I can usually fit comfortably into a size 14 from any of those shops. In a commercial dress pattern, I sew anything between a size 12 and a size 20, depending on the style of the garment and the amount of design ease that has been allowed.

So, the answer would seem to be to provide exact measurements for each garment that I make – and in fact I will make my own size chart on that principle. But this does assume that people know what size they are, and most people simply don’t.

For example, if I was to buy a size 14 skirt from one of the shops listed above, I should theoretically be able to assume that my waist measurement falls into the range 76-81 cm. Even though this is a pretty large size range for a single garment, in fact my actual waist measurement is much larger. Then there’s the added complication that modern skirts and trousers are cut to fit far lower on the body than the natural waist, which means that the waist sizes given on the charts bears absolutely no relation to the measurements of the actual garment.

As a dressmaker I have a house full of tape measures, and I measure myself on a regular basis so that I can work out which size to choose for my next creation. It’s easy for me to forget that this is not normal for most people!

Perhaps I should offer a handy measuring pack, with a tape measure and a little chart showing where to take the measurements. Once people knew their actual dimensions, then they could more confidently choose the right size of garment according to my chart.

This is quite important, as all of my clothes are made by hand from limited stocks of fabric. If somebody buys a garment and finds that it doesn’t fit, I’ll willingly exchange it, but I can make no guarantees that I’ll have enough fabric left to make another one exactly the same.

Given that I’m planning to offer a new range of clothing in multiple sizes, I need to have a set of basic patterns that I can use over and over again. (The cost of drafting a new pattern for each individual customer is rather prohibitive.) Having a standard range of sizes definitely makes this much easier from a manufacturing point of view. The difficult part is going to be to come up with a range of sizes which genuinely reflect the actual dimensions of the garment, and will fit as many people as possible.

Wish me luck!