A very happy accident!

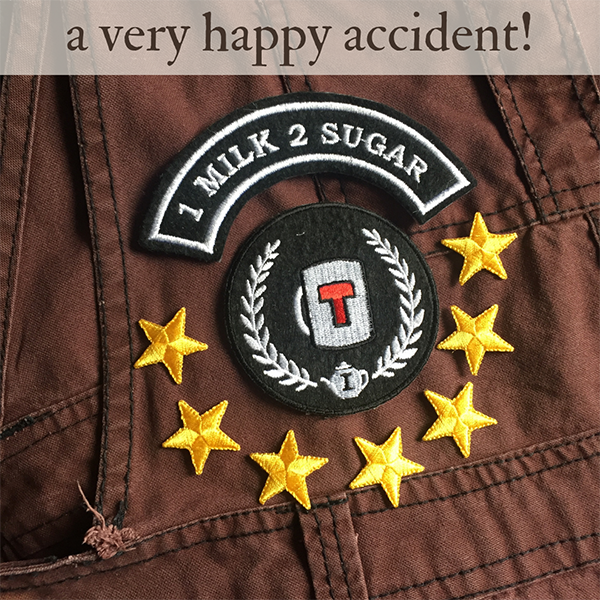
A close-up views of a pair of brown dungarees with black stitching. Placed on top of them are a round embroidered patch depicting a mug of tea inside a laurel wreath, a curved patch above it that says "1 milk 2 sugar", and there are seven small gold star patches underneath.

After my lengthy waffle about making myself a new steampunk costume, I decided to bite the bullet and just dye my existing dungarees. They were black, and I ran them through a 95º wash (I hope they haven’t shrunk!) with a box of Dylon pre-dye. I had been intending to dye them Espresso Brown, but I’m glad now that I didn’t buy the dye in advance, as it turns out I didn’t need it! They came out this lovely rich brown colour all on their own.

The patches, quite coincidentally, popped through the letterbox just as I was getting ready to take this photo, which couldn’t have been better timing. They were a gift from Lisa at Off With her Head Millinery, and they’re by Doctor Geoff. While I was browsing his patches, I spotted this enamel badge for the RSPCAM – the Royal Society for Prevention of Cruelty to Abominable Monsters. If my character’s going to be an in-the-field catcher of magical and/or mythical beasts, I’m definitely going to need one of those!

My first order of business is going to be mending and reinforcing that tear at the edge of the bib (you can see it in the bottom left of the photo) which I hadn’t noticed was there. Then I can start covering the dungarees with patches and enamel pins, before I start thinking about my accessories.

Excellent.

Making Do and Mending

IMG_3999

Well, isn’t this irritating? One freshly-dyed white t-shirt (Dylon Rosewood Red, not as lurid as it appears in these photos!) complete with stain that, annoyingly, wasn’t visible when the t-shirt was white. Now that the t-shirt’s dyed I can’t use a stain-removal product or scrub at the fabric, as that will most likely take off the dye as well as the stain. My only option now is to cover it up with something.

IMG_4002

That’s better! A bit out of focus, but these are floral motifs carefully snipped from a small piece of Lancaster & Cornish organic cotton lace. I’m hoping there might be just enough loose dye still in the fabric that a little bit of it leaches out into the lace the next time it’s washed, just to soften the cream colour a little bit. But if that doesn’t happen, no worries, because the cream lace makes the white stitching on the t-shirt look as bit more as though it’s supposed to be white on purpose.

Knowing that the stitching wouldn’t take the dye was the main reason I chose the colours I did for dyeing my trousers – beige to dark brown, and pale blue to dark grey. With the contrast stitching they just look like smart, lightweight jeans. I also have plans for mending all of my funny-coloured trousers in the future. I’m on the look-out for small pieces of Liberty print fabrics that I can use for patching, and maybe for adding a hint-of-a-print on the turn-ups. Hopefully that will be a long way off yet though!

IMG_4004-1

While I was mending things, I made the decision to take two of my most beloved t-shirts out of my wardrobe. This Suzanne Vega t-shirt is from the very first gig I ever went to – at the Wulfrun Civic Hall in Wolverhampton, on April 8th 1993. (We were sitting three rows from the back, and Suzanne Vega had a cough.) Having been worn pretty often over the past 22 years, although recently relegated to hospital wear or pyjamas only, it’s safe to say that this t-shirt is very much past its best! But there was no way on earth I was going to throw it out, and it’s really not fit to give to a charity shop, so it was the work of about five minutes to turn it into a cushion. The tour dates are on the back.

IMG_4005-1

The same fate befell my other favourite t-shirt, also purchased in 1993, this time from Forbidden Plant in Hanley. I didn’t own any other green clothes, and it was far too big for me (being a men’s size XL), but I just had to have it. It saw me through art college and University, but again, it’s not even really fit to wear as pyjamas any more. But, because it was still in my wardrobe, it kept mysteriously finding its way out and onto my body. Drastic measures clearly had to be taken. So, cushion it is.

(No, I don’t iron my bedding. Sorry, Mum!)

Making these two cushions from my favourite t-shirts has made me wonder though – are there any items in my current wardrobe that I can imagine myself still wanting to keep in 22 years’ time?!

Organic Cotton Skirt Ideas

Skirt ideas

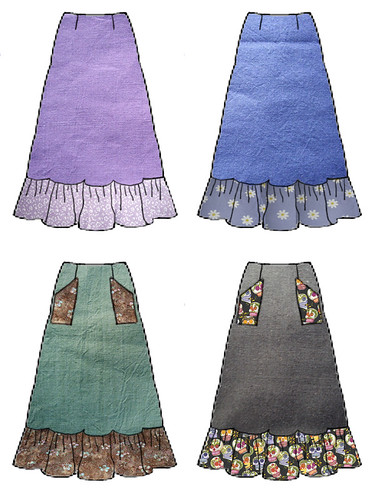
Starting to work with the organic cottons again reminded me that I’d already put together some designs for skirts that were very similar to the blue cotton tunic dress. Large pockets and a ruffle, although I think I’d go for an elastic waistband rather than darts and a zip.

I drafted these little sketches way back in 2008, when I was also going through a phase of buying lots of recycled fabrics, mostly in the form of duvet covers. I thought I could use the matching pillowcases to make the ruffles and pockets, and do you know what? I think that might just work! Why it’s taken me three years to get around to doing anything with this idea, I’m not so sure.

I have four colours of organic cotton left in the stash – blue, green, pink and cream. My favourite place to buy organic cottons has a special offer on pot-luck remnant pieces, so I might buy a bundle and see what turns up. That, along with the Kaffe Fassett fat quarters, should give me plenty of choices for contrasting waistbands and pockets.

That’s better.

Vogue 8145 - with amendments.

I find that most dresses can be improved by the addition of a polo neck. If it’s frilly, all the better.

Now I just wish I’d put pockets in it!

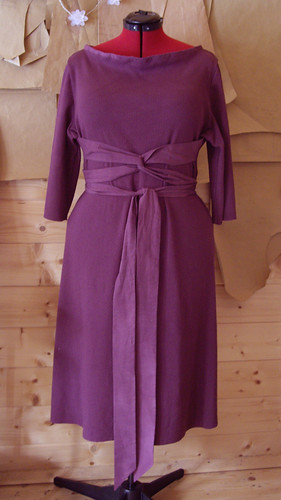
The pattern started out as Vogue 8145, with the addition of a modified polo neck based on the pattern piece from McCalls 5924. The dress is the shorter of the two, and the sleeves are elbow length because that’s how much fabric I had left.

The fabric is organic cotton natural pointelle from Near Sea Naturals, and I dyed it “Burlesque Red” using Dylon machine dye. The tie belt is organic cotton shirting from Bishopston Trading, dyed at the same time.

Despite the difficulties I had while making this, I’m really pleased with the end result. I think the frilly neckline is my favourite part.

A slight sewing difficulty.

I’ve been trying for the best part of a fortnight to make a dress. A dress which should be so easy that I thought it would only take me about four hours to make. And then my sewing machine stopped working, so I was going to use the overlocker, and then I didn’t have the right colour of thread, and then I remembered my old sewing machine was still in the loft, and it was all going quite well until I tried to bind the neckline yesterday. And now it’s all gone a bit wrong again.

The dress currently looks like this:
Vogue 8145

It’s supposed to look like this– that is, with a nice flat neckline.

It did look exactly like that, until I tried to add the binding.
The neckline is supposed to be hemmed, but I wanted to add the binding a) because I had a bit of matching fabric left over and it would be a shame to waste it, and b) because I wanted to add stability to the wide boat neck, so it didn’t stretch out and slide off my narrow shoulders all the time.

Except that this fabric is a very heavy ribbed pointelle, which means that it stretches. A LOT. And my old sewing machine doesn’t have a differential feed, or any variation in the pressure on the presser foot, and as a result the neckline has stretched and stretched and stretched.

I’m going to undo the binding and hope that I can stream shrink the ribbing back into place. Then I can do what I should have done in the first place, which is finish the neckline by hand.

The hem and sleeves though, I actively want to stretch! I plan to finish them with a lettuce hem, which basically means that I’ll deliberately stretch the ribbing out as far as I can when I run it through the overlocker. This will leave me with a decorative wiggly edge.

That just wasn’t quite what I had in mind for the neckline. :/

(And yet, as I sit here swearing at my sewing machines, I do still harbour some faint delusion that maybe I could one day be up there with Secret Lentil and Sarah Clemens. If only I wasn’t so… I don’t know. something.)

Simplicity 2777

This is Simplicity 2777.

I’m making the ankle length version of the top/dress (which I have rather unhelpfully cropped out of the picture), but I’m not entirely certain which size to make. Usually there are actual garments measurements given on the pattern, but there aren’t any on this one.

According to the pattern envelope I should be making a size 18, but it’s such a loose-fitting garment that I think I could easily get away with making a size 14 instead. As long as the top of the dress is a good fit the rest will be fine, but I don’t want to accidentally make it too small under the arms.

Speaking of arms, I’m probably going to make the sleeves a bit smaller as well. I do love ridiculously floaty sleeves, but they’re not terribly practical. I haven’t decided yet whether I want to slim down the entire sleeve, or whether to bring in the fullness by adding some elastic or a little cuff at the wrist.

The fabric’s just a lightweight plain white polycotton, and it’s going to be an underdress. The dress to go over the top is going to be Vogue 8145. I’m making it from a lovely organic cotton pointelle from Near Sea Naturals, which is currently being dyed Burlesque Red, in my washing machine.

I’m keeping my fingers crossed that this will turn into a really pretty outfit without being too “costumey”.

Simplicity 2927 – black and grey

Simplicity 2927

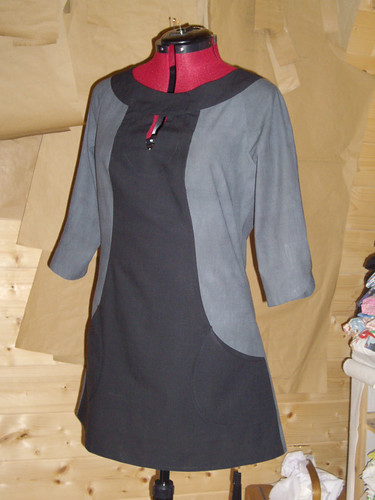
Here is incarnation number two of Simplicity 2927, this time in black and grey. This one’s for Claire, (no, not me!) who left me a comment when she saw the one I’d made for myself.

It’s made using 100% organic cotton, from Bishopston Trading. I couldn’t find any grey, so I dyed a piece myself. I used Dylon’s Antique Grey machine dye, over the unbleached cotton that I used for my own version. It came out really nicely!

We made a couple of small alterations from the original pattern – the length is slightly longer than the tunic version, and shorter than the dress. The sleeves are also an in-between length.

All that this one’s missing now is a big black button, to give it that finishing touch.