Starting on the smock

Smocking

Yesterday I spent a pleasant hour in the Reading Room at the Museum of English Rural Life, having a look at a couple of books about smocking that had been put to one side for me.

The books were Smocking: A Practical Beginner’s Guide, by Audrey Vincente Dean, and Smocking: Traditional and Modern Approaches by Oenone Cave and Jean Hodges. Both of them were really useful, and I’m currently on the lookout for second hand copies that I can keep open while I’m sewing.

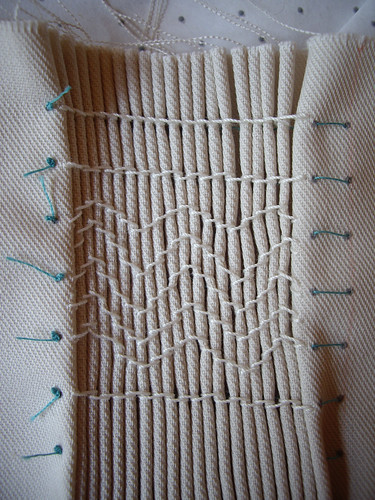
As you can see, I’ve made a start on the prototype child’s dressing-up smock. It’s taken me all day to reach this point – I spent most of the morning cutting out the back, front and sleeves, and completing all the gathering. In the background of the picture you can just see the smocking dot transfers that help you to space the gathers very neatly.

My next mission is to try and find out whether honeycomb smocking is a traditional stitch used in the eighteenth century, or whether it’s too modern for me to use on this particular smock.

I’m going to be volunteering at the Museum on Monday, looking through their smock collection, so I guess I’ll be able to find out!

Laura’s beaded wedding bag

Laura's beaded wedding bag

I don’t like showing other people’s wedding things in their entirety before the wedding, so this is just a little snapshot of Laura’s beaded wedding bag.

The ivory silk dupion was already beaded and embroidered. I removed some of the clear beads, and replaced them with red ones. You can also see the pretty flower shaped iridescent button, there in the bottom right hand corner.

Laura and Rob are getting married in September.

Congratulations!

More embroidered ampersands

Embroidery examples

This is what’s been keeping me out of trouble in the evenings – embroidering ampersands. And a little flower made from a vintage button, just for good measure.

The larger ones measure 6 inches across, and the smaller ones are four inches.

In order to prevent my house from becoming completely over run by embroidered typography, all of these pieces are now for sale on Etsy.

I’m now in that awkward position where I probably shouldn’t really go buying any more supplies until I’ve earned a bit of money by selling some of these. I can’t wait to make some more, so I’m keeping my fingers crossed that somebody out there likes them as much as I do!

Embroidered ampersand

Embroidered ampersand

When typography and crafts collide… I couldn’t be happier!

I’d intended this ampersand to be like a traditional embroidered monogram, and was originally planning on filling in the design with satin stitch. Instead I spent several days looking at the outline, and eventually decided that I like it just the way it is.

Being something of a typography geek, I have a particular fondness for ligatures. I was never a type designer myself, but I appreciate the beautiful attention to detail of joining up the design of (usually) two individual characters to make a more efficient form.

A while ago I bought the most glorious font, made up entirely of ampersands. My next mission? To embroider a whole lot more!

Oscar Edward’s embroidered birth announcement

Oscar Edward

Oscar Edward

Oscar Edward arrived on Easter Sunday! Which was the 12th. Not the 13th, as I originally embroidered. Oops!

Thankfully I realised my mistake before the piece was mounted and framed. Now to pop it in the post, along with a little hat.

Ava Mae’s embroidered birth announcement

Ava Mae

Ava Mae

Ava Mae was born on Thursday, and I enjoyed making Gwen’s embroidered birth announcement so much that I thought Ava should have one too.

This one’s almost all done in back stitch, with the exception of a few chains and french knots on the decoration. At the rate all these babies are arriving, I’m going to be kept very busy making small things!

Gwen’s embroidered birth announcement

Gwen Helen

Gwen Helen

Gwen was born on Monday, and I thought it would be nice to embroider a little something that her parents might like to keep. I didn’t want it to be a traditional-looking baby sampler, so I opted to go for a fancy font and some freehand embroidery.

The lettering is worked in back stitch, using two strands of ordinary cotton sewing thread. The decoration is mostly back stitch, with a few chains and french knots thrown in for good measure. It was done with a single strand of thread. I did start to fill in the letters with satin stitch, but decided that I liked them better open.

I’m really pleased with how this has come out, and I’ve just been and bought three more frames, to make name plaques for Paul’s little cousins. And I’ve had a request to embroider a couple more robins, so that a friend can quilt them into cushions!

I can’t tell you how much I’m enjoying this embroidery. I feel very inspired, and I can’t wait to do more.

Embroidered robin. In a hat.

Embroidered robin

This is a robin. Wearing a hat. Of course.

Last week I drew some silly pictures of birds wearing hats, and then spent ages deciding what I could do with them. Ages ago I bought a whole bunch of organic cotton tote bags, with the idea of embroidering designs on them. So, I embroidered the robin onto the tote bag. It looked like this.

I wasn’t very happy with the poor naked robin, so I decided to colour in his breast with a bright red fabric pen. Disaster! The pen came out pink, and no amount of layering would make it any brighter. Not good. Even adding his little embroidered top hat didn’t help.

So, in a fit of madness, I decided to cover up the fabric paint with embroidery. Lots and lots of satin stitch, done in a slightly irregular way, to look a bit like feathers. It took two evenings to finish, and I was completely cross-eyed by the end of it – but I really like it!