First brand new hat off the blocks!

Black & red cloche

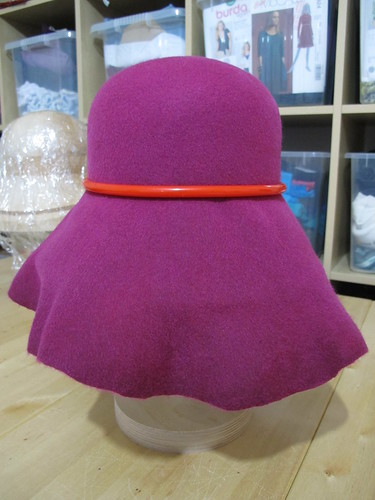
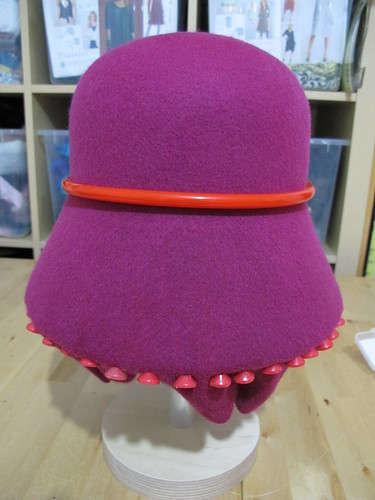
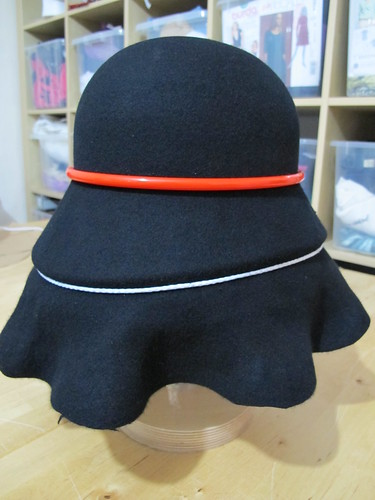
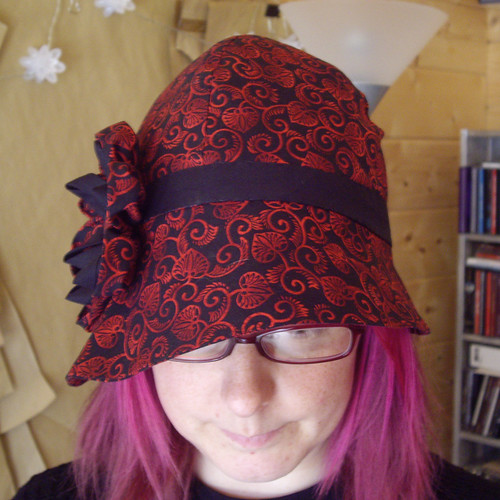
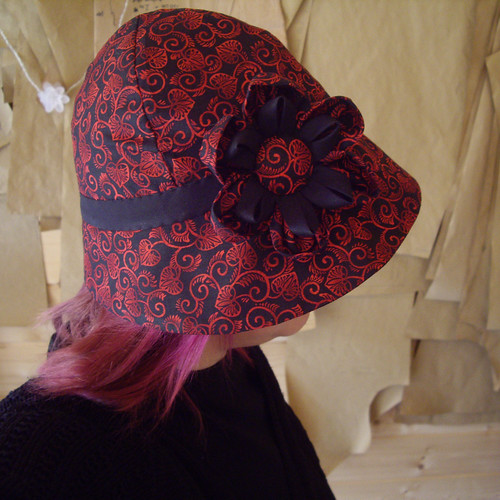
Yes, I know I showed you my pink cloche the other day, but as I didn’t make it completely from scratch it definitely doesn’t count as my first brand new hat. This one, on the other hand, does. It’s finished, it’s for sale on Etsy, and I’m really pleased with it! I hope somebody else will like it enough to want to offer it a new home.

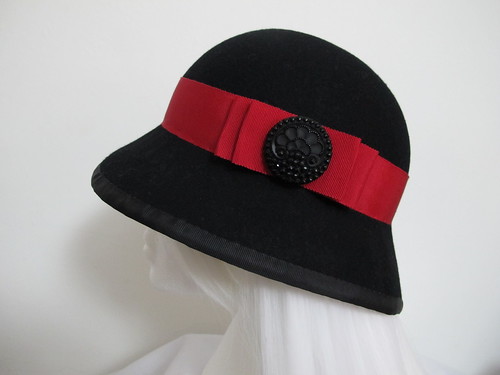
I’ve decided that all of the blocked felt hats I make between now and the end of March will be listed for half price. What that price turns out to be will depend mostly on the cost of the materials used in the trimmings, and the amount of time it takes to make them. I suspect this will vary quite a bit! Hopefully this will bring in enough money from hat sales (she says, optimistically!) to buy a few more wool hoods, than I can then make a few more hats with. I will also offer custom orders, for a limited time only, to see how they go.

Cupcake hood

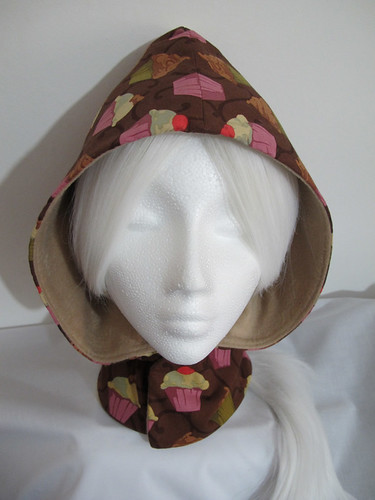
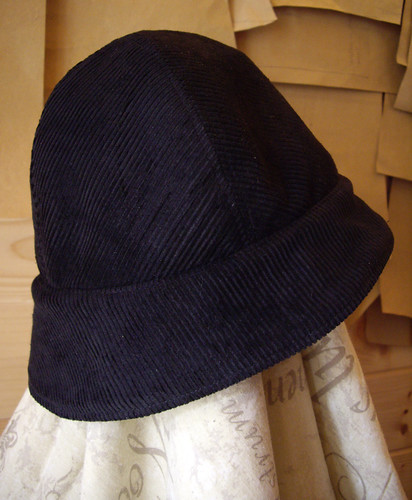
Something else that’s also now for sale on Etsy is this cute little hood! Again, I’m intending for this to be the first of many. I have different styles in mind (this is the smallest – they get bigger and sillier from here!), lots of different fabrics, and different fastenings too. I recently treated myself to a set of Clover Asian Knot templates so that I can start to make my own frogging. I think that will look lovely on these hoods, and it might make some pretty hat trimmings too.

Now I just need to stop being quite so nervous about having finished my first blocked hat! I need to step away from the Facebook likes and the Etsy stats, and concentrate on making the next one. And the one after that.

If you’re interested in keeping up with progress on the hats, the best place to do it is via the Eternal Magpie Facebook Page. I post quite a lot of working photos there, little snippets of what I’ve been up to, and I can update it on the go more easily than writing a whole blog post. Mind you, snapping photos on my phone and uploading them in all their graininess is making me rather covetous of a new phone – or a clever camera that connects to the internet. Probably just as well I’ve spent all my money on hats blocks!

The hat blocks are here!

Felt hats

Aren’t they beautiful? My very own multi block cloche set from Guy Morse-Brown. You may have already seen pictures of them on Facebook – I’ve been saving up for these all year, and was very excited about their arrival! All the sections are interchangeable, which means that eventually I can buy more crowns and brims to make different styles of hat. But I think cloches make an excellent everyday sort of hat, and I want to make hats that people actually wear, not stick in a cupboard and only bring out for weddings. So, cloche hats it is!

Felt hats

The blocks are covered in cling film, to prevent dye transfer from the felt, and to prevent the stiffener that’s impregnated into the fabric from sticking to the wood. The floppy shapes on the table are called capelines – which my spell checker keeps insisting is two words, grrr! They’re made from wool, and I bought them at Broadlands about four years ago. About time I put them to good use!

Felt hats

Some people use steam, but I just used hot water to soften the felt enough to pull it down over the block. The red band is a blocking spring, which holds the felt in place at the crown so that you can keep pulling and stretching it over the brim. It’s hard work – this kind of felt is very stiff.

Felt hats

This is the brim, held in place by fifty special blocking pins. Once the felt is completely dry, I can cut away the excess, trim the brim, add an inside band, and then decorate it. I think this one’s going to be mine!

Felt hats

And here’s the second block, which has more of a sweeping shape to the brim. The back of the hat is on the right. You wear this hat slightly pushed towards the back of your head, so you can see out from under the brim. Speaking of the brim…  I might need to work on this one a bit more. I think this is where steam will come in handy, as I had real trouble blocking the brim to fit the concave shape of the block. I don’t think the string was tight enough in the groove to make a really neat edge to the brim, but I won’t find out until I’ve taken the hat off the block. The great thing about working with felt like this is that it doesn’t matter if I’ve mucked it up at the stage – I can simply soak the capeline in hot water, or steam the brim, and start again. Brilliant!

Wool felt colours

And because I am nothing if not enthusiastic, I’ve made a colour chart of the range of felts I can order from to make more hats! (Oh, number 20, Regal, is out of stock at the moment, so you can’t have that one.)

What I’d like to do is offer a discount to the first six people who pre-order a hat from me. This gives six people a hat at a fantastic bargain price (yet to be worked out, but likely around £40 + shipping), and gives me the funds up front to buy things like a big roll of brim wire and a bottle of felt stiffener that I can’t buy in single-hat quantities. I realise that nobody’s going to buy a hat based on two pictures of work very much in progress, but I figure that if you know this is happening, you can start to think about colours and trims for when the time comes!

Prototype hat

Prototype fleece cloche hat

If you follow me on Facebook (hint, hint!), you’ll have already seen that I spent Sunday making a prototype hat. I used Simplicity 1736 as a starting point, because I thought the cloche-like style and piped details made it an interesting Steampunk-Casual (if such a thing exists) type of hat.

I learned a few things while I was making it, not least how to make my own piping and then insert it into the seams – two things that I’d somehow managed to avoid in all my years of sewing. Turns out it’s much easier if you coincidentally manage to make the flange on the piping 15mm wide, then you can use it as a guide for sewing the seams.

I also learned that you need to trim the piping cord out of the way of the seam allowances, that three piped seams coming together in one place is extremely awkward, and that my machine won’t sew through three layers of fleece without skipping stitches.

Next time round I’ll be altering the pattern so that the crown pieces don’t come together into one point at the sides. You can’t see that detail anyway, it’s hidden under the brim, so why not make the whole thing easier to sew? I also want to alter the brim itself, as I’m not very fond of the way it stops half way round. I’d also like it to be more curved, and much larger at the front. Taking the brim all the way around the hat will also mean that I can attach it in a different way, eliminating the need to sew through so many layers of fleece in one go. In fact I might face the brim with something lighter, and get rid of one layer of fleece altogether.

Having said all of that, I am actually very pleased with this hat! It’s going to be my daywear hat for the Steampunk Extravaganza, hence the red and black colour scheme, and the combination of spots and stripes. It’s extremely comfortable and warm, and fits beautifully over my very short hair. I might try out the next iteration in black and pink, so that it goes with my spotty coat. Or maybe a brown and blue version to go with my long winter coat… yes, I can see myself making quite a few of these!

Completed Cloches.

Two completed cloches

The black corduroy cloche that I showed you the other day has now been livened up by a lime green bias tape band.

The red cloche is made from two layers of polar fleece. There’s also a black bias band on the inside, making it fully reversible. My brief for this one was to make it bright red, and soft enough to fold up.

The brim of the red hat is made from two layers of fleece and a layer of craft weight non-woven interfacing. For some reason my sewing machine wasn’t too happy about sewing through the fleece and interfacing combination. I had to try several different needles before I stopped getting lots of skipped stitches.

I’m really pleased with how the finished hat’s turned out though, and I think it will be lovely and cozy to wear. I might make another one for myself.

Corduroy cloche

Cord & fleece cloche

This is my second cloche hat, with a symmetrical brim this time.
(You’re looking at the side of the hat – front at the left of the photo.)

It’s made from heavy black cord, and lined with black polar fleece. This hat’s going on a honeymoon to Iceland in a few weeks, so it should be the perfect thing for keeping Clare’s ears nice and warm!

New hat!

New hat - finished!

For Christmas, skycarrots gave me a 1960s book on millinery. I keep leafing through it, but it’s taken me all these months to get around to actually making anything. There are several chapters on “dressmaker” hats. Rather than using felt hoods and a block to mould your hat into shape, you make a pattern and sew it up in the same way that you’d make any other item of clothing.

This is a sort of a cloche style, with a four piece crown and an asymmetric brim. The fabric is “Kyoto Hollyhock” by Alexander Henry – yet another quilting cotton. The brim is made from the same fabric on both sides, and the crown is lined with plain black polycotton.

As recommended by various online tutorials, I stiffened the main fabric with fusible interfacing. It works well for speed and convenience, as you don’t have to worry about a third separate layer, but next time I think I’ll try horsehair canvas or coutil instead. The fusible interfacing prevented the fabric from steaming into a nice rounded shape at the crown, and I think horsehair or coutil will be better for that.

I finished the main body of the hat last night and left it plain. I knew it needed a bit of livening up though, so this morning I added the band around the crown, and the flower trim.

The flower is a variation on my flower brooch tutorial. I’d been reading about kanzashi (traditional japanese hair ornaments) and was inspired by some of the multi-layered flowers that I saw. Once I’d made my basic flower, I added the second layer by folding strips of bias tape into place. I used a fabric covered button to finish off the centre of the flower, and here it is – my finished hat!

New hat - finished!