These boots weren’t made for walking.

At the end of December I received an email that I just couldn’t resist – a message about the Jeffery~West sale. I went to their website, just to have a look, you understand, and discovered that the Rochester Rafael boots were now half price. Even better – there were several colours left in my size! After much deliberation I decided that I couldn’t live without this fabulous red mock-croc pair.

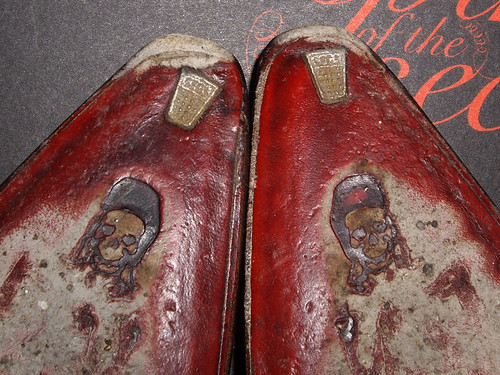
They arrived really quickly, were a perfect fit, and I was thrilled to bits. I wore them once, took them off when I got home, turned them over to show the design on the sole to my husband… and was horrified to discover that they looked as though they were falling apart!

A worried email and a couple of phone calls to Jeffery~West later, and a lovely lady called Kirsty was able to reassure me that this is not the case.

I knew that the soles of these shoes were blake stitched rather than Goodyear welted, but I hadn’t realised what difference this type of construction would actually make. Because the soles are stitched directly to the uppers without a welt, you get a shallow channel around the very edge of the sole. To stitch the upper in place, the leather is cut with a knife and peeled back. Once the stitching is complete, the leather is pressed back into place. If the sole of the shoe gets damp, this channel can open up. Thankfully it can also be pressed back down again – and once I’d done that and worn the shoes a second time, you’d never know that this had happened.

What I will need to keep in mind is that these shoes won’t be as robust as my Sylvians, and I should probably save them for summer. I’d never go out in the rain in leather soled shoes anyway, but this is England, and sometimes you just can’t avoid walking on a wet pavement!

For anybody interested in the technical details of the differences between blake stitched and Goodyear welted shoes, W. Sanford (bespoke tailors and shoemakers in Shanghai) have a really interesting article, with diagrams. I’ll be studying this for future reference…

Spring Cleaning.

Haberdashery tidy-up

I started clearing out my sewing Shed this time last year, by organising all of my unruly haberdashery into these handy cardboard boxes. (I bought them from Muji, years ago.)

Then the roof blew off the garden shed, so a few things moved in to my Shed for safe keeping. And then we had the kitchen replaced, so lots more things moved in here while we didn’t have any cupboards. The end result is that not everything has been moved back out again, and my sewing space is not only full of my own stuff, but also with all these things that don’t belong here at all.

Once again it’s time to have a bit of a clear-out and try and get everything back to its rightful home. After that I can rearrange the furniture, and try to get a bit more organised.

The upshot of this is that I won’t be able to do any sewing for a little while. So I’m going to forward-date a bunch of posts, showing you all the things I’ve made over the past few months but haven’t had time to write about. Hopefully that’ll tide me over until I’ve got everything sorted and made something new!

Off to Oxfam

Off to Oxfam Reworked

One of the dangers of working in a fabric shop is that you collect fabric. Lots of fabric.

Ideas, plus staff discount, equals a Shed full of fabric that I’m probably never going to use.

So, this is the ten carrier bags that Paul and I cleared out of the Shed last week, and took down to Oxfam Reworked.

Lyndsey Clark runs the new shop in the Harris Arcade. She and a team of volunteer designers take garments that are not suitable for sale in a regular Oxfam shop, and re-work them into unique pieces of clothing.

Hopefully Lyndsey can put all this fabric to better use than leaving it piled up in a Shed for years on end.

Looking for the perfect bag.

Now that the honeymoon’s booked (hooray!), I’ve started to think about what I’ll need to take with me on our trip. We’ll be walking around the city all day, and we’ll be carrying heavy cameras, so I need a comfortable bag to fit everything into.

This is a bag that I have already – a Crumpler Sheep Scarer.
It was perfect for college, and for lugging my old laptop about. It’s also perfect for days out when I’m close to home and only packing the camera and not much else. Because of the triangular shape of the bag, once you’ve got the camera and a lens or two stashed in the bottom, you can’t fit anything else in the top without having to unpack it all to get the camera in and out. Not ideal.

This is my proper grown-up handbag – a Mulberry Bayswater.
I love it to bits, but it has two problems. One, if I’m wearing a jumper or a big winter coat, the straps are about an inch too short to fit over my shoulder, which means I have to carry it in my hand. If I’m using the camera a lot, I really need a bag that’s hands-free. Two, inside it’s just one great big enormous space, which makes it very easy to fill with heavy things, and I can never manage to find the thing I want because it’s always right down in one of the corners.

So, after a fruitless trip to the local shops, I did what any sensible person would do and had a look on Etsy for a new bag.

Browing the “backpacks” category was a bit daunting – it brought up 117 pages of bags that mostly weren’t backpacks at all. (I do hate it when people deliberately tag things incorrectly to get more views.) Thankfully, on just the third page, I spotted a familiar image and went to the Bohemian Cats store to have a look.

I’ve bought bags from Baba Studio before, for Christmas gifts, and I was delighted with the quality as well as the beautiful imagery.

This is one of their three-way messenger bags. They come in black or taupe as a base colour, and you can choose from a stunning array of images for the front flap. I particularly like the way you can convert this style from shoulder bag to messenger bag to rucksack with just the one strap. So clever!

But, at only a couple of inches wide this is quite a slim bag, and I wasn’t absolutely convinced that my camera would fit inside. I contacted Karen at Baba Studio on Facebook, and she suggested that the laptop bag might be a better choice.

And wow, I think she’s right.

There’s an Etsy store specifically for the laptop bags, which are kept in stock, or you can place an order for the design of your choice from the Baba Store. Again you can decide between black or taupe as a base colour, and there are more than twenty gorgeous images to choose from. The inside of the bag has been made with brilliant attention to detail. There’s a padded section for your laptop, of course, but there’s also a drawstring waterproof cover over the main body of the bag. There are two zipped pockets, one of which has sections for pens. This is very important, as I can almost never find a pen when I need one! All of the pockets are completely covered by the flap, which I think is held in place by magnets, making it all extra secure.

But it’s not a rucksack, which is what I thought I was looking for.

Now I just need to decide whether that matters… and which design to choose!

Summer Shirt

Rosy Days Shirt

Remember when I told you that McCalls 5433 was going to be my perfect summer wardrobe? Well, here’s my first summer shirt!

The fabric is a lightweight quilting cotton – a vintage piece by Rose & Hubble. The print is called “Rosy Days”, and it looks a bit like an old-fashioned quilt. Inside the circles are flowers, hearts and posies in pretty little baskets.

Rosy Days Shirt

The buttons are little blue plastic ones with a flower in the centre. I have no idea how old they are or where they came from – I unearthed them from one of my many inherited button tins!

The buttons aren’t functional – the shirt actually fastens with poppers. (This is because the buttonhole functionality on my sewing machine completely refuses to make nice buttonholes.)

The instructions were great, and the shirt went together very nicely. However, unless you’re a fan of hand finishing, I wouldn’t necessarily recommend this pattern to a beginner. There are a lot of small details that make a big difference in the sewing of a shirt, and some of them can be a little bit fiddly.

I’ve really enjoyed making and wearing this shirt though, so it definitely counts as a success!

Bees! In the house!

No, it isn’t as alarming as it sounds.

As you might have gathered from the picture, I’m talking about wallpaper!

Farrow & Ball* have the most beautiful ranges of historical paints and wallpapers. With paint colours such as StringDead Salmon and Cat’s Paw, who could fail to be intrigued? I’ve often longed for a period property, just so I could say things like, “The drawing room? Oh, that’s decorated in Bone and Mouse’s Back, darling…”


Anyway. Bees. I really like bees.

A friend sent me a link yesterday, with the subject “I saw this and thought of you”. I couldn’t imagine why I would remind anyone of paint or wallpaper, so I clicked through to find out.

Farrow & Ball have bumblebee wallpaper!

From their website:

Bumble Bee is one of 4 designs from Papers 5; a collection of block printed papers, produced in the traditional manner using only our finest water based paints. The Napoleonic bee signifies the French worker and the design was originally found in Josephine Bonaparte‘s boudoir, as a silk fabric. The 7 Farrow & Ball coloured grounds are traditionally trough and brush applied before the design is block printed. The 4 designs are drawn from existing Farrow & Ball blocks used in restoration of great British houses.

It comes in 20 different colourways, and costs £57 per 10 metre roll. I’ve sent off for a couple of samples, in the colours shown above. Hopefully one of them will match with my beautiful bee fabric, which I’ve been meaning to turn into curtains for quite some time. Then I need to work out how much wall I can cover with just one roll of paper…

…or perhaps I’ll have to settle for framing the samples, making my curtains, and dreaming of the day that I can afford to have a complete bee room!


*Note – you might have to tell their website which country you’re in, before you can follow the links. Tell it you’re in the UK, and you’ll be able to click through with no trouble.

Baa Baa Black Sheep…

Ever wondered what an entire kilo of Colinette Point 5 looks like?

Colinette Point 5 - black

Well, now you know!

Colinette Point 5 jumper 

It used to be the most enormous jumper, one that I knitted for Paul a few years ago. It’s hardly been worn, so I decided it was time to reclaim the wool and turn it into something else. I’ve promised to sew a fleece for Paul instead, so at least he won’t get cold!

His main complaints about this jumper were that it was:

  1. Too heavy. Well, it did weigh an entire kilo! The style is supposed to be a funnel neck, but the sleeves are so heavy that they pull out the neckline sideways.
  2. Too hot. I suppose you would be hot, wearing half a sheep…
  3. Too cold. Yes, really. Colinette recommend that you knit this wool using 12mm needles. That’s fine for the thicker parts of the yarn, but wherever you get a thinner strand you also get a looser knit. This makes the resulting fabric a bit draughty in places, and Paul complained that the wind got through!

I must admit that I prefer to knit most Colinette yarns using smaller needles than suggested. I’m going to try a swatch of this on 10mm needles, and see how it comes out.

I’ve been looking for the perfect shrug/bolero/cropped cardigan pattern which would work in either Point 5 or Rowan Big Wool (which I also prefer to knit on smaller needles than recommended), and I haven’t found it yet.

I think it’s time to sit down with Ann Budd and a piece of graph paper, and work something out.