Hat the second…

Tweed hat

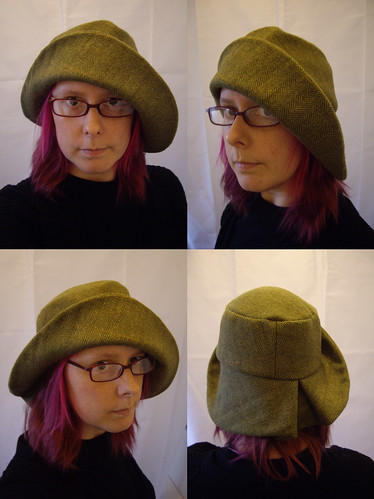
I spent Saturday afternoon making another hat.

It’s not finished yet – it needs a good steam pressing, a lining, and then a bit of trim.

I’ve cut out the pieces to make another one the same – except I’ll use a different interfacing and see what the difference is in the finished hat. This one’s interfaced with horsehair canvas, which shapes well, but is a bit floppy. And in combination with the tweed, makes the Shed smell like a damp farmyard when I steam it.

Speaking of which… I managed to explode yet another iron. There was a sort of a sproingy sound, and shortly afterwards the iron was cold. Oops. Paul kindly took me on an emergency trip to Asda, where I bought a new iron for the princely sum of £4. I never buy an expensive iron for sewing, on the grounds that domestic irons aren’t designed to be switched on and abused for eight hours at a time, so they’re going to break sooner rather than later. I never use the steam function (I prefer to generate steam by wetting the fabric and the ironing board), and I need something as small and light as possible because of my bad wrist. So, the cheapest iron in the shop wins the day.

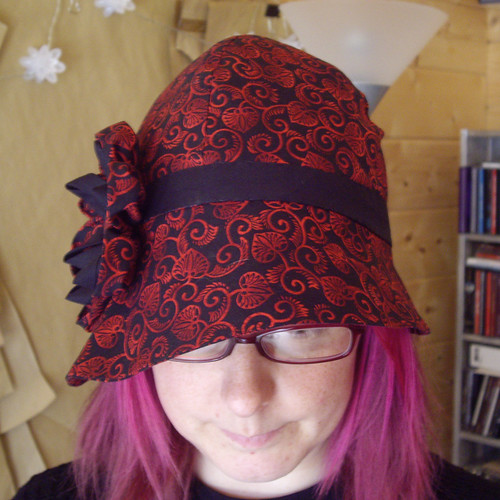
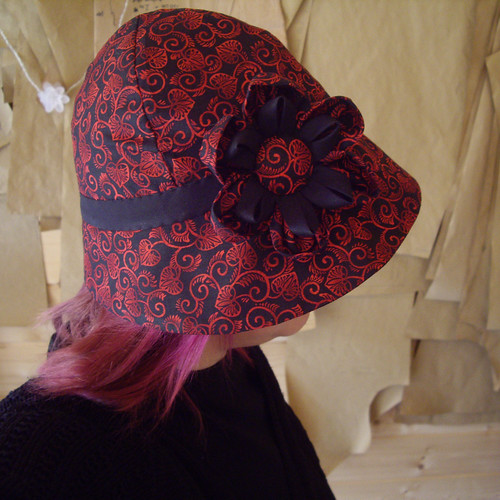
I like this hat very much.
The only thing I’m not sure about is the placement of the pleat at the back. I think I’ve put it too close to the centre back seam, so it looks a bit like a mistake. I might move it a bit further round to the side on the next one.

I do love my sewing machine though. (A Pfaff 2024.) It chomped its way right through five layers of folded tweed and canvas as though it was nothing. Brilliant.

New hat!

New hat - finished!

For Christmas, skycarrots gave me a 1960s book on millinery. I keep leafing through it, but it’s taken me all these months to get around to actually making anything. There are several chapters on “dressmaker” hats. Rather than using felt hoods and a block to mould your hat into shape, you make a pattern and sew it up in the same way that you’d make any other item of clothing.

This is a sort of a cloche style, with a four piece crown and an asymmetric brim. The fabric is “Kyoto Hollyhock” by Alexander Henry – yet another quilting cotton. The brim is made from the same fabric on both sides, and the crown is lined with plain black polycotton.

As recommended by various online tutorials, I stiffened the main fabric with fusible interfacing. It works well for speed and convenience, as you don’t have to worry about a third separate layer, but next time I think I’ll try horsehair canvas or coutil instead. The fusible interfacing prevented the fabric from steaming into a nice rounded shape at the crown, and I think horsehair or coutil will be better for that.

I finished the main body of the hat last night and left it plain. I knew it needed a bit of livening up though, so this morning I added the band around the crown, and the flower trim.

The flower is a variation on my flower brooch tutorial. I’d been reading about kanzashi (traditional japanese hair ornaments) and was inspired by some of the multi-layered flowers that I saw. Once I’d made my basic flower, I added the second layer by folding strips of bias tape into place. I used a fabric covered button to finish off the centre of the flower, and here it is – my finished hat!

New hat - finished!