Learning to spin

Spinning wheel

A spinning wheel was donated to work recently, but it wasn’t needed as part of the collections, so it made its way along to me. As Learning Assistant, it’s now my job to learn how to use the wheel, so that I can eventually demonstrate and teach it to other people. Gosh, it’s a hard life sometimes, isn’t it?!

The wheel was dropped off to the museum while I wasn’t there – I came in to find the wheel itself, and a bucket of bits. The bucket contained the flyer, a couple of bobbins, the drive cord (broken), a niddy-noddy, and a knob that I haven’t discovered the function of yet. If anyone can tell from the photo above where there isn’t a knob and there ought to be a knob, please let me know!

First yarn

The piece of leather attaching the pedal to the drive shaft had split, so Fred (the Conservator) very kindly replaced it with a whole new piece for me. Once that was done, and I’d tied a knot in the drive cord, I could start to spin! I practiced just treadling for a bit, until I could do it without the wheel swinging backwards all the time. I came to add my own fibre to the yarn that was already wound around the bobbin, and discovered that I didn’t have an orifice hook – hence the straightened paper clip above!

I’d thought my first attempt at spinning was going rather badly, until I took my first metre and a half of yarn off the bobbin and plied it back on itself. Obviously it’s extremely uneven and wonky, but it’s got twist in it, and I’ve made yarn! Admittedly it took several attempts to get this far, lots of wondering why the yarn wasn’t winding around the bobbin, and adjusting the tension, and wondering whether it was too tightly spun, and losing control of the wheel with my feet while I was trying to draft with my hands.

I’ve emailed the local Spinners, Weaver & Dyers to ask for a bit of help, so hopefully I should be on my way to learning to spin really soon!

Mere drawers cannot contain her bountiful abundance.

Storage Solutions

No, this isn’t going to be another post about my underwear, thank goodness.

Anybody who’s spent any time living in the same house as me (family, my long-suffering housemates at Blenheim Road, a couple of husbands…) will be all too aware that I’m a very messy person, and I have Too Much Stuff. I have always maintained that given the right amount and combination of storage, I could become a Tidy Person. This assertion is usually met with rolled eyes and gales of laughter. But, the further we get into the process of packing up the house to move, the more I think I might actually be right!

So far, I haven’t bought any new storage solutions specifically for the move. We don’t know precisely how everything’s going to fit into the space at the new house (assuming we actually get it), and we don’t want to move any more belongings than we have to. Everything here was in the house or the Shed already, I’m just cramming stuff inside and trying to label everything as I go. Rather than just throwing all my things into large boxes marked “jewellery stuff” or “craft supplies” or “haberdashery”, it seemed to make sense to be a lot more specific. That way I don’t have to spend years unpacking at the other end, wondering where on earth in the giant box marked “jewellery stuff” my favourite pair of pliers has got to.

(What do you mean, you haven’t got a favourite pair of pliers? You’ll be telling me you haven’t got a favourite pair of scissors next. Or a favourite child.)

Storage Solutions

These cardboard storage drawers had been pressed into use already, during my previous bout of frenzied Shed-tidying. It turns out that knowing exactly where all your stuff is, and not having to hunt for it every single time, can make you more efficient! Who knew?! The drawers are from Muji, shoebox sized, and they’re squished into one of those wardrobe-hanging shoe storage things. I have twenty altogether (although I can currently only find nineteen, typical), and they were bought years and years ago to house my ever-increasing shoe collection.

Storage Solutions

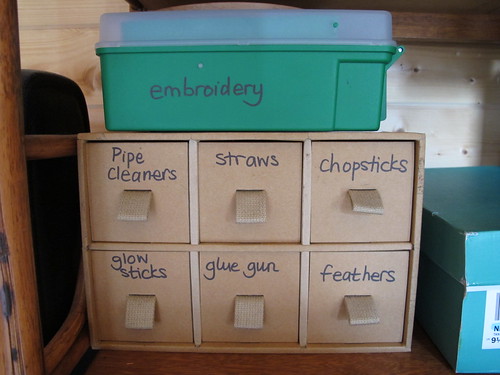
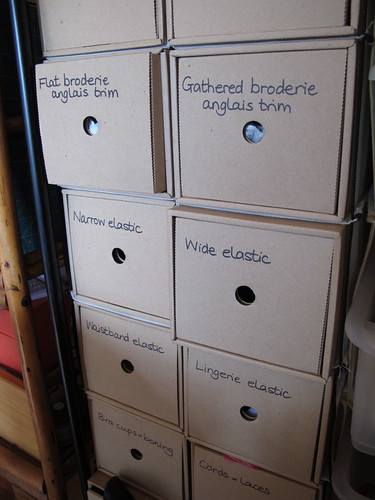
The small cardboard drawers with the little fabric pull tabs are also from Muji, and they’re long and thin. I have two sets of these, one of which I moved, still flat in its original packaging, from my previous house to this one. (And Paul tried to tell me I should throw it away, because I hadn’t used it yet and obviously didn’t need it. The man has no idea!) I can’t remember what I was planning to keep in them when I bought them, but now one holds some of my craft supplies, and the other holds jewellery-making tools such as hammers, ring mandrels and a hand drill. That should tell you something about how sturdy these cardboard pieces are too – I’ve had the bottoms fall out of cheap Argos drawers with fewer heavy things inside them.

I miss Muji. I had a look online, and they don’t seem to make this kind of cardboard furniture any more. Which is a shame, because I could do with a couple more sets of these, for things that are too long to fit into the shoe boxes.

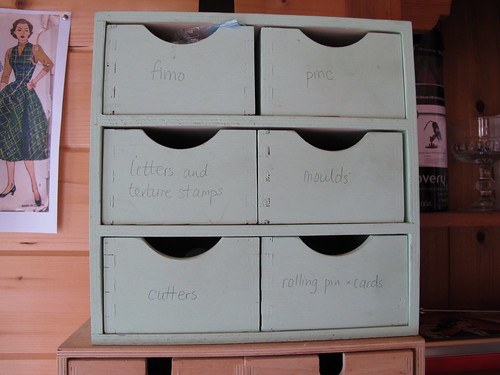
The green wooden drawers in the top photo are from Ikea. I have (brace yourselves) never actually been to an Ikea, but we do own a small amount of their bits and pieces. (Yes, including a massive bag of tealights that we never burn.) I also have a slightly larger set which currently houses shoe polish, and Paul has a few of these plywood magazine files. When we move, I want to buy enough of these to house my complete collection of The Knitter, and paint them to match the decor of the new place. When his CD collection outgrew the three sets of Ikea plywood CD storage drawers they were living in, Paul donated those to me, and now they’re housing more craft supplies and stationery.

I still need to wrestle a few things in the Shed out of their “miscellanous” boxes and into the appropriate drawer. And then do the same with the two boxes of craft supplies that have been living unopened under the bed for several years. But I remain absolutely firm in my conviction that I am only messy because I simply don’t have enough storage. I really, really hope that turns out to be true!

Kiss Me Deadly – Paradise Girdle


Photo © Kiss Me Deadly

A few weeks ago, one of these turned up in the post. No, not a lovely blonde lady with a pointy dagger, but a Kiss Me Deadly Paradise Longline Girdle.

Given that during my recent wardrobe purge I threw out every single piece of uncomfortable lingerie I owned (which to Paul’s dismay was nearly all of it), this might seem like a bit of a bonkers purchase. And it is, a little bit. But in its favour, it’s stretchy, it doesn’t dig in anywhere, and best of all – you can colour it in.


Photo © Kiss Me Deadly

Yes, you read that correctly. The design itself is black and white, but every Paradise girdle is supplied with a set of paints and a brush, so you can paint your own. I chose the pearlescent paints, because I like the subtle effect in this picture, but you can also choose from sparkly, glittery, or glow in the dark! Kiss Me Deadly are awarding prizes for pictures of the finished result, so I’d probably better get a move on and colour mine in!

I do need to make a small alteration to mine first though. Despite the advice on the KMD website to order this particular garment by your waist size rather than your hip measurement, I went the other way. This means it’s a little bit too big for me at the top, but I’m glad I went for the larger size otherwise I think it would have been too constricting for me at the bottom. Please note – my body is a very odd shape, thanks to 20 years of IBS and three lots of abdominal surgery, so if you’re buying one of these I would still recommend following the fitting advice on the website! However, I have the technology to take in the side seams at the waist without disrupting the technical construction of the girdle, so I’m going to do that before I get the paints out.


Photo © Marks and Spencer

Recently, Catherine wrote an article for The Lingerie Addict about What It’s Like to be a Woman with a Disability in the Lingerie Industry. This was particularly well timed for me to read, having just thrown out all my bras and replaced them with distinctly un-glamorous (but tolerably comfortable) brightly-coloured cotton crop tops from M&S. (Yes, they’re for children. Yes, that makes me feel weird.) Some of my health issues are different from Catherine’s, some of them are similar. And let’s just say that the multiple mirrors in a Marks & Spencer changing room do very little for the self-esteem of a woman who’s almost forty, overweight, in constant pain, and trying on children’s underwear as something of a last resort. That was not the most enjoyable morning I’ve ever had.

But, I did realise that if these crop tops are comfortable enough, then I could probably get away with one of Kiss Me Deadly’s more unstructured bras, like the Van Doren. (I love the style of the Fifi, but just looking at that narrow band makes my ribs hurt!) If this is a picture of the back of the Van Doren bralet (which I think it is), that nice deep strap and wide elastic combination looks very promising indeed.

First things first though – time to make that alteration to the waist of the Paradise girdle, and then get the paints out! Honestly, clothes you can colour in? Best. Idea. EVER.