Silver Jewellery

Silver Jewellery Class

Looking through my photos on Flickr, I realised that I made quite a lot of things towards the end of last year that I didn’t show you! These pieces were all made on a silver jewellery course at Maiden Erlegh School, with tutor Cathy Newell Price.

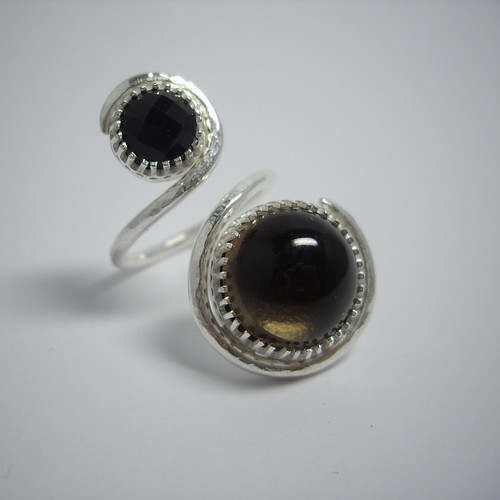
The piece above is an adjustable ring featuring two smoky quartz cabochons. The top one’s faceted and the bottom one’s smooth. The band is slightly hammered to give it a bit of texture. I bought the fancy bezel strip, I didn’t make all those teeny-tiny prongs from scratch!

Silver Jewellery Class

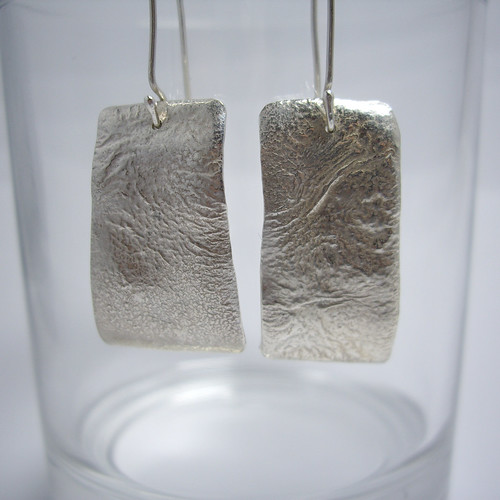
This was an experiment with reticulating the surface of sterling silver to create a textured effect. You have to heat and re-heat the silver enough times so that the silver and copper begin to separate, with the silver molecules coming to the surface. Once that’s happened, you can use the blowtorch to create ripples – you just need to be very careful not to melt everything!

Silver Jewellery Class

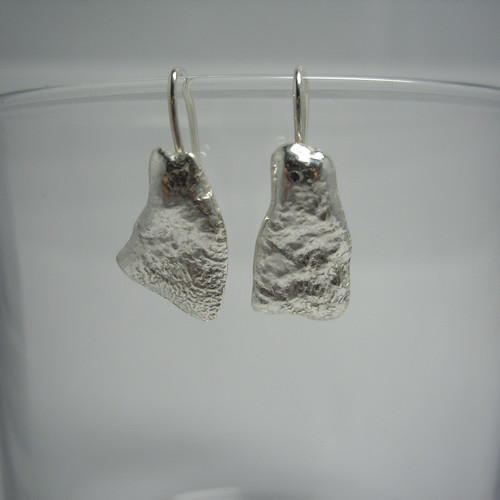
Which, as it turns out, is what happened here. I got a bit carried away with the blowtorch on one of these little pieces, and melted one end. Because I wanted the two pieces to match, I then had to very carefully and deliberately melt the other one until they were sort of similar. I don’t mind that they’re not exactly the same – I quite like having fraternal rather than identical earrings. Shows they’re made by hand.

I’d originally intended to make a pair of cufflinks, using the larger pieces of reticulated silver for the front, and the smaller pieces for the back. Unfortunately I very quickly ran out of patience while trying to make a chain to join the large and small pieces together. All those tiny little links were so fiddly! So I decided to quit while I was ahead, and ended up with two lovely pairs of earrings instead.

Silver Jewellery Class

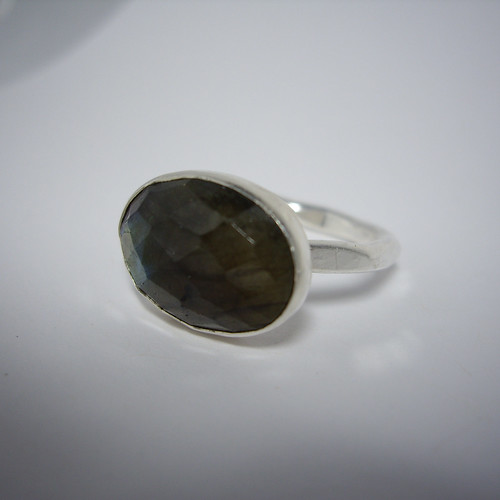
This was actually the first piece I finished, a labradorite ring. It’s ever so slightly too big for me, but I couldn’t bear to part with it. I wear it with a plain ring over the top to hold it in place, and the large stones prevents it from spinning around on my finger.

The course finished in December, and I promised myself that I’d do more work with silver back in the Shed. I have all the tools, and lots more stones to set… I just haven’t got around to actually buying any more silver. I’d love to make a pendant to match the labradorite necklace though. Kernowcraft have just got in a beautiful teardrop-shaped cabochon that would complement it perfectly!

Organic Cotton Thread

Organic Cotton Thread

This, in the centre, is that holiest of grails: organic cotton sewing thread. Not only that, but it’s available to purchase in the UK!

This is something that I’ve been trying to track down for a long time. It seemed ridiculous to be sewing organic cotton fabric with polyester thread (right), and in fact I do use cotton threads (left) now when I’m sewing natural fibres like cotton or linen. But surely if I’m making organic cotton clothing, I should be able to sew it with organic cotton thread? Sadly, it simply wasn’t available.

A couple of years ago I bought some organic cotton thread from Near Sea Naturals in America. Unfortunately my sewing machine didn’t like it (it won’t tolerate thread that’s the slightest bit fluffy), and it did seem a bit silly to add so many airmiles to my sewing thread in the first place.

Coats EcoVerde is a range of recycled polyester and organic cotton threads, but they’re available to industry only, so that’s no help.

And then, when I went to place my most recent order with organiccotton.biz… there it was! Organic cotton thread! It’s available in 11 colours, but I went with cream to begin with so that I can do some dye tests on it. It comes on nice big 275m spools for £2.99, and the spools themselves are wooden which makes them ideal for keeping and recycling afterwards.

I’d just assumed that organic cotton thread would be a lot more expensive than polyester or even ordinary cotton, but for the natural colour it actually works out ever so slightly cheaper! Other colours are £3.99 a spool, but even that doesn’t compare too badly.

As you can see from the picture above, I haven’t actually tested it out yet, so I do need to keep my fingers crossed that my machine doesn’t chew it up and spit it out. But it looks nice and fine and smooth, finer than the Coats cotton, even, so I live in hope that it’ll be good.

All I need then is to be able to buy it in overlocker-sized cones. I’m going to get through an awful lot of 275m spools otherwise!

Stationery Stash

Stationery Hoard - Before

Yesterday I needed a pen, but couldn’t find one that worked. This minor crisis precipitated the tipping out of all of the stationery drawers (yes, drawers, multiple), and a huge sorting out of all of our stationery. Before you decide I have an even bigger problem than you’d thought, not all of this is mine! There are pencils in here that I swear Paul’s been holding onto since he was about eight. We also found identical sets of coloured pencils and felt pens that we’d each had since childhood. Bless.

After a lot of scribbling, we threw away all of the pens that didn’t work. I was astonished to find that some of the felt pens I’d used at school (oh lord, it’s twenty years since I did my A-levels!) were still fine, whereas a lot of our more recent acquisitions had already dried out.

Best. Pencil. Ever.

I also found something that I thought had been lost forever! Grabbing it just before Paul chucked it in the bin, I recovered the last two inches of my favourite pencil! It’s that rarest of all things, a water-soluble graphite pencil. I must have scribbled my way through dozens of these at art college. Unfortunately it’s been sharpened away so much that I can’t read the brand name. On one side it says “…ite Aquarelle”, and on the other “…MACOLOR SOFT”. I looked on the Prismacolor website, but they don’t seem to make a water-soluble graphite pencil any more. Derwent do… but will they be as nice? I’m very fussy about my pencils. Which is silly, given that I haven’t used this one in nineteen years, but there you go.

Stationery Hoard - After
If you click through to Flickr, you can see notes explaining what’s in each box!

We also have a huge collection of watercolour pencils, for exactly the same reason. I had some that I loved when I was a kid, but I don’t know what happened to them, I can’t remember what brand they were, and I haven’t yet managed to find any replacements that I actually like.

The WHSmith own brand pencils (the white bundle, above) are too waxy and you can’t layer them. The Crimson & Blake ones (in the tin) draw well, but don’t blend very easily. I really want to try Derwent’s Inktense range (not least because you can also use them on fabric), but they’re currently out of my budget. (Hence my repeated hopeful purchasing of cheap ones.) And  my local Hobbycraft doesn’t sell them individually, which is a pain. Who wants to buy a whole new set because they’ve run out of one colour? Or pay more than twice as much for the shipping (£3.99) as for the pencil (£1.73)?

Part of the reason for all this fuss is that I’ve just signed up for a local evening class in Traditional Islamic Art. I’m waiting for the materials list to come through, but I’m wondering whether this might be the perfect time to bite the bullet and splash out on a set of Inktense…

Selling my Sole(s)…

The Great Spring Cleaning of 2012 has begun.

Actually, it began a few weeks ago when I wore one my my beloved pairs of Jeffery~West shoes and they gave me a blister. Again. At that point I finally had to concede that I’m not a size 40, no matter how thick my socks are, and it was time to let go. I popped all four pairs on Ebay, and with the resulting funds I treated myself to a new pair of boots. Not quite in the same sort of style… but I’ve ordered a pair of Fairysteps‘ finest Moonshine boots. Mine will be in gold (GOLD!!) with round toes and silver stars. I’m trying not to be impatient, but I can’t wait for them to arrive!

Flushed with success, I thought it was about time I cleared out all of my other shoes that I bought because they look amazing, but which turned out to be impractical or ill-fitting. There are a few pairs still on Ebay, ending this afternoon. Depending on how much money I raise from those, I plan to buy one pair of shoes to replace the lot. My criteria are:

  • Hand made, or at least made in England,
  • Actually comfortable,
  • Gorgeous,
  • Smart, and black.

Current contenders are Fairysteps Clara or Quince, Conker star sandals, Green Shoes Willow, or the slightly more heavy-duty Dr Martens for Life.

You may have noticed that I’m also selling my beloved concertina, and my Mulberry handbag. I’m on a mission to no longer keep things that I don’t use, however lovely they may be as objects in their own right. An instrument that’s never played and a handbag that’s never carried are fundamentally useless, so it seemed like their time to be re-homed with someone who’ll appreciate them.

[edit]
Apparently I’m not selling my “Mulberry” handbag – Ebay have taken down the listing because it’s been reported as a fake! I was extremely indignant at first, having bought it from what I thought was a reputable place, but a little online research tells me they’re right. How embarrassing! Because I’d never owned a Mulberry bag before, I didn’t notice the subtle differences in the details that tell you it’s not a real one. All the details which I, in the spirit of full disclosure, have just photographed and put on Ebay! A classic example of caveat emptor, I suppose. *sigh*

Still, now I can’t sell it, I feel a bit less bad about making some alterations that will allow me to actually use it. Like taking off the straps and repositioning them so that they actually fit over my shoulder, for a start. Onwards and upwards…

Louisa Harding Ginerva

Louisa Harding Ginerva

Issue 34 of The Knitter dropped though my letterbox a couple of days ago, and I was immediately smitten by this lacy dress pattern. It’s Ginerva by Louise Harding, and it’s so new that there are currently only 2 projects for it on Ravelry. (One of them’s mine!)

I decided straight away that I didn’t want to make a dress version, but a shorter jumper would be perfect. A few sums and a day later, I found myself in John Lewis buying two balls of Kidsilk Haze Stripe. This is the Forest colourway.

I’ve started with the sleeves. That way I can see how much yarn they take up, and then hopefully figure out how long I can make the body afterwards. I tried to pick two balls of yarn that looked as though they’d been wound the same way, in the hope that the stripes won’t be too all over the place on the finished jumper.

So far I’ve managed the set-up rows and one repeat of the edging. The pattern says to repeat the twelve row lace pattern until the work measures a certain length (depending on your size), and then you get into the tricky business of trying to work shaping at the same time as keeping track of which pattern row you’re on. I know from experience that I’m very bad at following more than one set of instructions at once, so it seemed like a good idea to make myself a chart. That way I can simply tick off each row as I work it, without having to scribble incomprehensibly all over the magazine.

I thought it would be nice to share it, so you can have it as an Excel file, or a PDF.

Please note that this is NOT THE ENTIRE PATTERN. That’s obviously copyrighted to Louisa Harding and The Knitter. This is just a way of keeping track of the lace motif and the shaping, for both the body and the sleeves. You’ll need a proper copy of the pattern for the rest.

Also, these are only the instructions for a size 14. If you need a different size, I recommend downloading the Excel file and using the original pattern to update the stitch counts for each row. (The central lace motif stays the same for each size.) If you’re already making a size 14, you can just download the PDF.

I’m rapidly discovering that this is the most complicated thing I’ve ever knitted, mostly because the lace motif is worked from both sides. This is definitely going to be slow going because of all the counting and tracking required. Not one to sit and knit in front of the telly, or to take out and about with me. Thankfully I’ve cast on another sock for that!

New Old Cardigan

New Old Cardigan

This morning I rediscovered the gathering foot for my sewing machine, and combined it with Pretty Jane’s continuous bias tape tutorial.

Half a metre of fabric turned into around twelve metres of tape, which I then ran through the gathering foot. This resulted in about four and a half metres of pretty ruffled trim! It’s about 4cm wide, and I ran both long edges through the overlocker. This gives it a nice finish, and also a little extra wiggle as the bias edges stretch a bit.

New Old Cardigan

I wanted to use my lovely new ruffle straight away, so I decided to re-vamp a very old cardigan. My Mum knitted this for me many years ago (I might even have worn it to school!), and the cuffs had become very threadbare.

Once I’d chopped off the worst of the unravelling cuffs and run them through the overlocker, I simply zig-zagged a length of ruffle into place. That looked a bit silly on its own, so I added some matching buttons. Good, but still nowhere near ruffly enough, so I decided to go a bit mad and stitch the ruffled trim all the way around the neck. Much better!

I was looking at the bias tape tutorial because I have quite a lot of small pieces of fabric lying around in the Shed, and I wanted to find a use for them. Now I’ve got the hang of it I’m planning to make some lengths of bias tape in different prints and patterns, and see about resurrecting my old Etsy shop. I have lots of vintage buttons that I’m never going to use, so I was thinking about listing them, along with some covered buttons and bias tape, and having a little haberdashery clear-out. Chances of this happening soon are minimal, but I’m thinking about it, and that’s a start!

Stripy Socks

Socks

This was something of an exercise in nail biting – would it be possible to make a pair of socks from just 80 grams of yarn? The answer turned out to be yes – if you don’t mind them being short, and you’ve got a little bit of something else to use for the heels!

The stripes are just less than a single ball of one of Kaffe Fassett’s colourways for Regia. I didn’t think I’d matched the repeat when I wound the yarn into two balls, and had resigned myself to knitting fraternal rather than identical socks. I’m thrilled to bits that the stripes actually match! The heels are a little bit of Opal which just happened to match the purple stripes perfectly.

The pattern is Wendy D Johnson’s Slip Stitch Heel Basic Socks. I knitted them from the toe up on two circular needles, starting with a figure eight cast on and ending with a Russian cast off. I have a high instep so I like socks with a heel flap and gusset, as they give a little extra room. I also like the way that the slip stitch heel provides a thicker fabric where the socks will wear. I might experiment in future with slip stitch toes!

I bought new needles for these – Addi 30cm circulars with angled tips. I’d been using 40cm Pony circulars, but found the extra cable a bit annoying. I’d say that the 30cm needles are the perfect length for knitting socks in the round, especially with the angled tips, but I did find the purl rows a little fiddly when I was working on the heels. My gauge is much better for socks on 2.5mm needles – nice tight fabric, and minimal holes in the short-row heels. I might buy a couple more, so I can have more than one pair of socks on the go at once.

I think the only thing I’m not completely happy with is the cast off. I know from experience that I tend to cast off tightly, so I looked around for some stretchy solutions. Unfortunately I think I’ve gone too far the other way, and the socks are very slightly baggy around my ankles. Mind you, if the socks were longer the ribbing would be around a wider part of my leg, so the cast off would probably be just fine. Perhaps I’ll give it another try before I decide against it altogether.

I may have had a little falling down in the Hobbycraft sale just after Christmas, which resulted in rather a lot of half price Regia coming home with me. Looks as though everyone’s getting socks for Christmas, now I’ve got the hang of making them!

London Trip

British Library

This must be the most-photographed view of the new British Library. But it was such a beautiful day, and the building looked so striking against the clear blue sky, that I just couldn’t resist. I went to see the Royal Manuscripts exhibition which was very beautiful, but very busy. I got a bit tired of having to peep over other people’s shoulders, so I left after about an hour and went up to the Treasures of the British Library gallery instead. Much cooler, much quieter, and still full of beautiful things.

While I was there I wandered over to the conservation centre, where they have a little exhibition that I hadn’t seen. I was surprised to find that I actually knew almost everything the exhibition had to show me. I always feel as though there’s more I can learn about almost everything, so sometimes it takes me by surprise to discover that I already know more than I think!

Happy Birthday!

In the afternoon I met up with a friend who’d been in a meeting just around the corner from the Grant Museum. I couldn’t pass up the opportunity to go in again, and was excited to discover that we’d arrived on their birthday! Yes, we did sign the card and fill in the quiz. Jo loved the museum – although frankly who wouldn’t love a place with a skeleton in a party hat?

Pulmonary Vein

I had every intention of taking lots of artistic photos, but Jo and I were so busy going around pointing at exciting things that I failed miserably. I did like this one though – another ingenious bit of labelling on an elephant’s heart.

Manatee Socks!

As if Jo wasn’t already excited enough about the preserved infant manatee, she was thrilled to bits when I gave her a gift of manatee socks! The manatee looks suitably impressed, I think. Probably jealous. Jo’s going to visit manatees in Singapore soon, as well as meeting orangutans in Borneo. Now I’m jealous!

Walking home

Despite leaving London just after 5, it was getting dark by the time I walked home from the station. The lake was misty as the sun set, so I took the opportunity to snap a picture. Quite a contrast to the blue sky over London!

Grant Museum of Zoology

Grant Museum of Zoology, UCL

Somebody at the Grant Museum of Zoology definitely has a sense of humour. These four skeletons are perfectly placed to watch over the whole museum from their vantage point in the first floor gallery!

Those of a sensitive disposition should probably look away now, because the Grant Museum is filled with skeletons and things in jars. And when I say “filled”, I really mean it. I was reminded a little of the displays at Pitt Rivers, where the museum is as much about the origins of the collection itself as the individual objects in it.

Grant Museum of Zoology, UCL

There’s a whole cabinet full of brains from different animals, so that you can compare and contrast them. I just love the way the parts have been labelled with little slips of paper stuck directly into the specimen. This one is

Brain of “Dog” in median section to show the main convolutions and sulci.

(Sulcipl. depression or fissure in the surface of the brain. The bumpy bits are gyri.)

Grant Museum of Zoology, UCL

I didn’t make a note of exactly which species this is, but it reminded me of Skycarrots‘ beautifully delicate photograms of Mermaids’ Purses that she found on the beach. When you find these washed up they’ve usually already hatched, so I find it really exciting to be able to see one from the inside.

The museum’s currently open Monday-Friday, 1-5pm. I didn’t stay long because I was on a trip to UCL with work, so I’m going again on Monday. This time with a better camera, and a friend who wants to see the baby manatee!

(Yes, this does mean there’ll be more pictures. Sorry, Lettice!)

Walk in the woods

Web

I had to go out to the Post Office this morning, and it started off as a very misty day. I thought I might be able to take some photos of trees dramatically silhouetted against the sky, so I took the camera with me. As it turned out I’d brought along the macro lens, which isn’t so good for dramatic trees, so I took lots of photos of little details of things instead.

Oak leaves

This was supposed to be a picture of a beautiful green shoot springing forth vigorously from the ground… but the plant was out of focus, so I cropped it out. Can you tell I have a lot to learn about the macro lens? Look at the lovely texture of these leaves though!

Blossom

Still very misty, and quite dark as I walked into the woods. If you look closely (or click the picture to see a larger version on Flickr), you can see tiny dewdrops all over the petals.

Acorn

Buried treasure! This acorn had been recently unearthed, but apparently deemed not good enough for eating.

Hole

I do like a good hole to peep through. This one made me want to go back to the doll that I never finished making. In my imagination, she looks great perched in this tree.

Buds

Look! It’s spring! Finally.

Catkins

I must admit, I had real trouble getting the macro lens to focus where I wanted it to. Left on automatic, it was zooming in and out all over the place. This one was done using manual focus, but I’m so used to using the big screen on the back of my point and shoot camera that I find the viewfinder too tiny to see through properly. (That’s my excuse, and I’m sticking to it.)

Crocus with dewdrop

Sometimes things worked out pretty nicely though – I didn’t even see the tiny dewdrop on the end of the crocus leaf until I looked at this image on the computer.

Bud

By the time I was heading back home it was a beautifully sunny morning. I must get out with the camera more often. It was so satisfying to take a very slow walk and really look at everything around me.

Walk in the woods

Unfortunately I underestimated how much mud I might bring back with me, otherwise I’d have worn my walking boots!