REVEAL: a showcase of quality hand-made craft

I mentioned this a little while ago, but some of my badges are going to be in an exhibition!

It’s called REVEAL – a showcase of quality hand-made craft.

It’s on from Sunday 6th to Saturday 12th July, 10am to 5pm every day, and entry is free.

It’s at the Henley Exhibition Centre.

The website has a gallery of work by all the exhibitors – I’m really looking forward to going along and seeing all the lovely things!

Wonderful Wilderness Walk.

This afternoon, after we’d become bored with scraping the dirt off the house, Paul and I went for a walk in The Wilderness. It’s part of the University campus, and somewhere I spent quite a lot of time when I was a student.

Paul took photographs, and I talked to geese. 🙂

Lots and lots of badges.

Today I have been mostly making lots and lots of badges.

Badge mix-up

This probably wasn’t a very clever thing to do with a bad wrist, but I needed to get some photographs taken to send to Lauren Denney. She’s organising an exhibition of local artists, and she saw my badges on Etsy and invited me to take part!

Lauren is a ceramic artist, and the exhibition will take place in Henley, from the 6th to the 12th of June. Rest assured that I will be advertising this like mad as soon as I have more details!

I’m submitting three different types of badges to the exhibition, all made from recycled paper ephemera:

Map badges
Damaged Ordnance Survey maps (this one’s of Sheffield)

Textbook badges
Discarded Library textbooks

Pin-up badges
An out of date Gil Elvgren pin-up calendar

Some of the badges will be sold singly, simply pinned on to individual Moo cards. Others will be grouped into sets of four – I need to design the packaging for these, and work out how they’re going to be displayed.

I’m on the reserve list for the Rising Sun Art Market the day before the exhibition opens, so I’m planning to make even more badges over the next three weeks, so that I can also sell them at the Art Market if I’m lucky enough to get a place.

I need to make lots of pillowcase tote bags for the Art Market as well, not to mention having a jacket and dress fitting day in the meantime, so it looks as though I’ve got a busy time coming up!

Experimental slipper-shoes…

So, I’ve made a few pairs of slippers now, and they seemed to go quite well. I thought I would attempt the next stage in the experiment towards being able to make my own shoes.

Blue brocade slippers - an experiment! Blue brocade slippers - an experiment!

In the left hand photo, the slippers have completely finished uppers. At this point I would normally attach a felt sole, and that would be it! I decided to try a cork sole (made from an old floor tile!), so you can see it laid on top of the slipper.

I tried to sew the cork directly to the upper, which did work, but it left me with several rather painful holes in my fingers from pushing the needle through the cork! Eventually I reasoned that if I could sew through cork by hand, surely my sewing machine would make a better job of it. I sewed the cork sole to a piece of drill, and used heavy thread to turn over the edges.

Blue brocade slippers - an experiment! Blue brocade slippers - an experiment!

This gave me a strong sole which could then be sewn by hand directly on to the upper. I removed the plain cork sole, and made them both this way.

The soles are now black, having been covered with a coating of liquid latex. This makes them non-slip, and also fairly waterproof. Several more coats will be needed if they’re going to be suitable for walking around outside – and of course the uppers aren’t waterproof at all, being brocade!

There turned out to be quite a few problems with this pair, although now I’ve identified the difficulties I should hopefully be able to avoid them next time:

  • The slippers are too small.
    I hadn’t allowed for the fact that so many layers would take up quite a lot of space. I also hadn’t allowed enough depth in the pattern for my toes. I can easily amend this for the next pair, by adding extra allowance into the pattern, particularly at the heel and toe.
  • The slippers are uncomfortable at the heel and toe.
    In the first picture, you can see where the seam allowances from the upper are folded round under the sole, and stitched in place. Even though I graded the seams, you can still feel a ridge under your foot from this extra fabric. I need to grade the seams more closely next time, and trim a little more away around the curved areas.
  • The sole was difficult to sew into place.
    Even after I’d given up on trying to hand sew though the cork layer, it was still quite tricky to sew the sole into place neatly. I now understand the purpose of a welt. It bridges the gap between the upper and the sole, and gives you a neat way of finishing the join which avoids having stitching on the bottom of the shoe which would eventually wear away. However, adding a welt might compound the problem of having too many layers of seam allowance between the upper and the sole.

Whilst it’s frustrating to have spent time making an uncomfortable pair of slippers which don’t even fit, I’ve definitely learnt enough from this process to be looking forward to making the next pair!

That’s better!

After the slight technical difficulty with Daniel’s slippers I did a bit of unpicking and attached the soles in a slightly different way.

Here they are, with big brother Edward’s skull slippers, enjoying the sunshine:

Slippers for Daniel & Edward

Both of these pairs were made from drawings of the boys’ feet.
I’m slightly concerned that Daniel and Edward won’t be heavy enough to compress the 1″ foam inside the soles, and that the slippers will be a bit tight as a result. They’re only little! At least their slippers will be nice and squashy though.

Next up is a pair for myself, following a flash of inspiration that I had whilst watching a documentary about Riverdance over the weekend. Would anybody be the slightest bit surprised if I told you that I spent the entire programme watching the dancers’ shoes?

Shoe Envy.

I really must get a move-on and work out how to make little canvas shoes.

The Nice Man Who Knows About Feet told me that I shouldn’t be wearing Converse any more, so I sold my yellow pair with daisies and ladybirds to . I still have a pinstripe pair that didn’t sell, and I keep looking at them, and wondering whether the next time I put them on they’ll magically be okay for my feet.

(Note to self: This didn’t work with the Doc Martens, so it seems unlikely that the Cons would be okay.)

Because I am a sucker for punishment where shoes are concerned, I’ve just been to look at the Converse section of the Schuh website.

Look! They have Converse with Little Red Riding Hood on them!

I immediately want to make a little red gingham dress to wear with these.

I’m not so keen on this year’s ladybird design, but I do rather like this blue and yellow floral pair. I’m sad that these Sailor Jerry low-tops are men’s, because that means they don’t come in my size. They’re so pretty that I’d happily have worn these with all my summer skirts.

Mind you, if I’m looking at Converse, I ought really to be looking instead at Ethletic Sneakers. It would be really easy to buy a cream pair and paint on them, and then I can have whatever design I like, as well as supporting Fair Trade and renewable resources.

Having said that, has just pointed out that the Little Red Riding Hood Converse are part of (PRODUCT) RED, which has a global fund to provide anti-retroviral drugs, to help fight the AIDS pandemic in Africa. I’ll be looking out for that one red eyelet if I do decide to buy a pair of Converse in future.

I’m still quite a few steps away from being able to transform the slippers I’ve been making into outdoor shoes. I just need to resist the urge to give in to temptation in the meantime!

A Slight Technical Difficulty.

Today I’ve been making slippers for Daniel, my colleague’s smallest son.

I’ve been following the instructions from Kwik Sew pattern 3323.

The Kwik Sew pieces are simple ovals, which can be worn on either foot, so I drew out my own pattern pieces to make them the same shape as Daniel’s feet. I then assembled all the pieces in the right order, and things seemed to be going pretty well!

Daniel's slippers

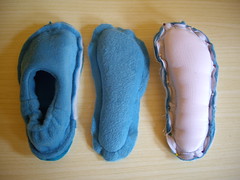
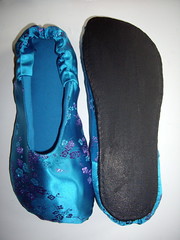
On the left is one completed upper, and in the middle its matching sole. The upper is two layers of fleece, with a layer of batting in between. The sole is made from 1″ foam, sandwiched between a layer of fleece and a layer of drill. On the right is what happens when you pin the upper and sole together, right sides in. The idea is that you sew most of the way around the edges, leaving a gap at the heel to turn the slippers through.

Admittedly I did use slightly thicker foam than called for in the pattern, and I had been thinking that maybe the layer of batting was a bit superfluous with the fleece. I could see that the sole/upper piece was quite thick, even after I’d trimmed the seam allowances off the foam. I was expecting this part of the sewing to be a little tricky…

Daniel's slippers

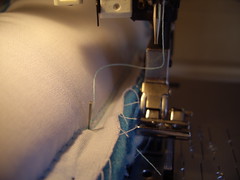
…and I was right. Oops.

The needle’s not only snapped, it’s also curved! This is apparently what happens when you try to squash six layers of fabric, plus an inch of foam, through your average domestic sewing machine. I don’t recommend it!

Next time I think I’m going to leave out the batting layer, and I definitely need to use only &frac12″ foam if I want to go with this particular construction method!

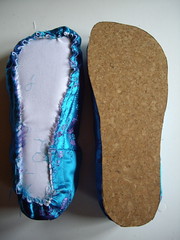
For this pair, I’m going to do a bit of unpicking, and then use the method where the final outer layer of the sole is sewn on by hand. Sometimes a bit of good old-fashioned hand sewing is the best way after all.

More slippers, and an exhibition!

, your slippers are finished! I hope you like them. 🙂

This pair were made to fit a drawing of ‘s feet, which she sent to me using the Power of the Internet. I now need to post them across the Atlantic, and hope that they fit when they get there!

Tiger slippers!

These are made in the same way as the monkey slippers. The uppers are made from plush tiger fabric lined with gold satin, and interfaced with a layer of batting for extra softness. The inner soles are made from gold satin and white cotton, with a layer of 1″ foam and a piece of buckram sandwiched in between. The outer soles are felt, edged with blanket stitch in a strong buttonhole thread.

I learnt a few things while making this pair – namely when it’s better to use a curved upholstery needle, and when a straight one is more effective.

Next up will be two little pairs for Daniel and Edward, my colleague’s sons. They’ll both be made of polar fleece, so they should be really squashy and cute!

Oh yes, the art exhibition!

I’ve received an email via Etsy, from a local ceramic artist. She’s asked me whether I’d like to have some of my badges included in an exhibition that she’s putting on in Henley in July.

I’ve mailed back to ask for more information, but this is the first time I’ve been invited to take part in anything like this, so I’m very excited about it!

Scalloped skirt – finished!

Remember the scalloped skirt that I started working on the other day?

I’ve just finished it, and I’m really pleased!

(Please excuse the gormless squinty face – that’s the first time I’ve used the self-timer on the camera, and I couldn’t tell when it had taken the picture!)

Scalloped skirt - pink Scalloped skirt - purple

Ta-daa! Two views of the same skirt. This is the first garment that I’ve made from the Bishopston fabrics, in Raspberry and Wine.

It’s bagged out at the scalloped hem, so there are no seams at all on the outside. This makes it conveniently reversible, for two skirts in one! It also holds the two layers neatly together, so they can’t slip about or ride up. As with all of my skirts, it’s elasticated at the waist for comfort.

Now, if I can just work out how to put pockets in the side seams of a reversible skirt, I’ll be very happy indeed.

As soon as I’ve asked Paul to take some photos of me looking slightly less confused, I’ll be adding this one to the shop. (Not this one – this one’s mine. But you’ll be able to order one in your size, in any of the Bishopston colours.)

Kaffe Fassett Fat Quarters

Look what I’ve got!

Paul’s Mum very kindly gave me a set of ten fat quarters. Aren’t they beautiful?

Kaffe Fasset patchwork fabrics

They’re Rowan fabrics which were designed by Kaffe Fassett, and hand woven in India with the support of Oxfam.

They go absolutely perfectly with the Bishopston fabrics, so at the moment I’m thinking of some lightweight cotton coats, with fabulous striped collars and pockets. Maybe also covered buttons, if I can squeeze enough fabric out of the fat quarters.

I’m enormously grateful to Stef for passing these on to me. Look at the colours! They’re so pretty.